Interfacing with C plus plus-programing communication with microcontrolers (K. Bentley, 2006)
.pdf
144 6 DIGITAL-TO-ANALOG CONVERSION
outportb(BaseAddress+2,data ^ 0x0B);
}
unsigned char ParallelPort::ReadPort1()
{
InDataPort1 = inportb(BaseAddress+1);
//Invert most significant bit to compensate
//for internal inversion by printer port hardware. InDataPort1 ^= 0x80;
//Filter to clear unused data bits D0, D1 and D2 to zero.
InDataPort1 &= 0xF8; return InDataPort1;
}
class DAC : public ParallelPort
{
private:
unsigned char LastOutput;
public:
DAC();
DAC(int baseaddress);
void SendData(unsigned char data); unsigned char GetLastOutput();
};
DAC::DAC()
{
LastOutput = 0;
}
DAC::DAC(int baseaddress) : ParallelPort(baseaddress)
{
LastOutput = 0;
}
void DAC::SendData(unsigned char data)
{
ParallelPort::WritePort0(data); LastOutput = data;
}
unsigned char DAC::GetLastOutput()
{
return LastOutput;

6 DIGITAL-TO-ANALOG CONVERSION 145
}
void main()
{
DAC D_to_A;
clrscr(); // clear screen
D_to_A.SendData(0); |
", |
D_to_A.GetLastOutput()); |
|
printf("\nDAC byte:%3d |
|||
cout << " |
Measure voltage |
and press a key" << endl; |
|
getch(); |
|
|
|
D_to_A.SendData(32); |
", |
D_to_A.GetLastOutput()); |
|
printf("\nDAC byte:%3d |
|||
cout << " |
Measure voltage |
and press a key" << endl; |
|
getch(); |
|
|
|
D_to_A.SendData(64); |
", |
D_to_A.GetLastOutput()); |
|
printf("\nDAC byte:%3d |
|||
cout << " |
Measure voltage |
and press a key" << endl; |
|
getch(); |
|
|
|
D_to_A.SendData(128); |
", |
D_to_A.GetLastOutput()); |
|
printf("\nDAC byte:%3d |
|||
cout << " |
Measure voltage |
and press a key" << endl; |
|
getch(); |
|
|
|
D_to_A.SendData(255); |
", |
D_to_A.GetLastOutput()); |
|
printf("\nDAC byte:%3d |
|||
cout << " |
Measure voltage |
and press a key" << endl; |
|
getch(); |
|
|
|
}
6.6 Summary
The operational amplifier, discussed in this chapter, is the building block for many analog electronic systems. This device is used in conjunction with the interface board DAC0800 IC to form a complete digital-to-analog voltage converter system. Basic principles of two types of DAC circuits have been discussed including DAC characteristics and specifications.
In this chapter the important concepts of inheritance and polymorphism have been explained. How various access attributes interact with each other, and how various

146 6 DIGITAL-TO-ANALOG CONVERSION
access specifiers affect the access attributes has also been described. We also learned how to use the scope resolution operator to call a polymorphic function from a base class. The DAC object created at the end of the chapter has all the functionality to drive the Digital-to-Analog Converter, and protects the member data of both the base class and the derived class at private level.
6.7 Bibliography
NS DATA CONVERSION/ACQUISITION Databook, National Semiconductor Corporation, 1984.
Bentley, J., Principles of Measurement Systems, Second edition, Longman Scientific & Technical, Essex, 1988.
Horowitz, P. and Hill, W., The Art of Electronics, Cambridge University Press, Cambridge, 1989.
Loveday, G., Microprocessor Sourcebook, Pitman Publishing Limited, London, 1986.
Savant, C.J., et al., Electronic Design Circuits and Systems, Second Edition, Benjamin-Cummings, Redwood City, 1987.
Webb, R.E., Electronics for Scientists, Ellis Horwood, New York, 1990. Wobschall, D., Circuit Design for Electronic Instrumentation, McGraw-Hill, 1987.
Lafore, R. Object Oriented Programming in MICROSOFT C++, Waite Group Press, 1992.
Wang, P.S., C++ with Object Oriented Programming, PWS Publishing, 1994. Pohl, I., Object Oriented Programming Using C++, Benjamin Cummins, 1993.
Johnsonbaugh, R. and M. Kalin, Object Oriented Programming in C++, Prentice Hall, 1995.
Barton, J.J. and L.R. Nackman, Scientific and Engineering C++ - An Introduction with Advanced Techniques and Examples, Addison Wesley, 1994.

7
Driving LEDs
Inside this Chapter
ξ
ξ
ξ
ξ
ξ
ξ
ξ
Iterative loops.
Conditional Branching.
Object classes for Driving LEDs.
Arrays.
Default actual arguments to functions.
Pointers.
Dynamic memory allocation.

7.1 Introduction
In this chapter we will first explain how to apply the widely used C/C++ constructs such as iterative loops and conditional branching. We will then discuss the use of pointers that are employed extensively in many C++ programs. Knowledge of pointers is essential when using dynamic memory allocation and virtual functions as discussed in the next chapter. You will gain a familiarity with pointers when they are used to scan an array of numbers. These numbers will then be used to light LEDs on the interface board to visualise the array scanning operation.
7.2 Iterative Loops
7.2.1 The for Loop
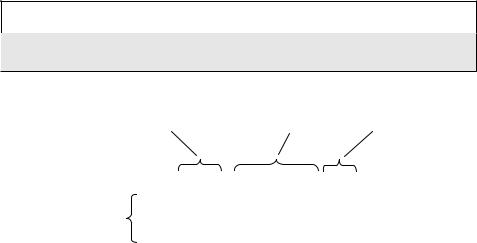
The for loop is an iterative loop. It executes one or more statements repeatedly. In general, a for statement takes the form shown in Figure 7-1. The braces in the for statement are essential only if the body has a compound statement. If the body is a single statement, the braces may be used but are not essential.
C++ |
Compound statement |
|
|
A Compound statement or block is a number of single statements grouped
together between matching braces ({}).
|
|
|
|
|
Initialising expression |
Test expression |
Incremental Expression |
The body of the for loop (braces are necessary if the body has more than one statement).
for(i = 0; i < 10000; i++)
{
†statements
}
† statements must be replaced by proper C++ statements.
Figure 7-1 An example of a for loop.
Three expressions are enclosed within the pair of parentheses belonging to the for loop. The first of these statements is:

7 DRIVING LEDS 149
i = 0;
This expression is executed only once at the start of the for statement and is known as the initialising expression. The initialising expression can be quite complex. It may be used to initialise a number of variables. In general, these variables are known as loop counters. In the preceding example, the value of i is used to keep a count of the number of times the for loop is executed; hence the name loop counter. In C++, the initialising expression may even include variable declarations (e.g. int i = 0;). Note that if the initialising expression is omitted the semicolon must still be used.
The second expression:
i < 10000;
is known as the test expression. This expression is evaluated just before the body of the for loop is executed. The result of evaluating this expression is considered in a logical sense. That is, it will be tested to determine whether the expression evaluates to true (one) or false (zero).
true or false
A program that is given any values that are zero are considered to be false; non-
zero values are considered to be true.
When a program evaluates a logical expression, if the condition is true the result
will be 1. If the condition is false the result will be zero.
In this particular case, the test expression tests whether the value of i is less than 10000. If the value of i is less than 10000 the expression evaluates to true, otherwise false. The body of the for statement will be executed immediately after the test expression, if and only if the test expression evaluates to true. If the test expression evaluates to false, the for statement terminates without executing the statements in its body.
The left angle bracket (<) is known as the less than operator. These operators belong to a class of operators named relational operators. Due to the presence of the relational operator, the expression (i< 10000) is known as a relational expression.
C++ |
Relational Operators |
|
|
<less than
>greater than
|
<= |
less than or equal to |
|
>= |
greater than or equal to |

150 7 DRIVING LEDS
In addition to relational expressions, we can also use equality expressions. These expressions contain equality operators.
C++ |
Equality Operators |
|
|
==equal to
!= |
not equal to |
|
|
The third expression in the for statement is:
i++;
This statement is known as the incremental immediately after executing the body of the for
expression. It will be evaluated statement. Usually, it increments
one or more loop counters. In this particular case it increments the value of i by 1.
The ++ operator can be used in two different ways. Using it before the identifier will cause a pre-increment, e.g. ++i. Using it after the identifier will cause a postincrement, e.g. i++. In the case of ‘pre’ operations, the operation (operation meaning increment or decrement) is carried out before using the identifier in the test expression. In the case of ‘post’ operations, the operation is carried out after using the identifier in the test expression. The -- operator is used exactly the same way; the only difference being that it will cause a decrement. These operators fall into a category known as unary operators. They are referred to as unary operators because they operate on just one argument.
C++ Unary Operators
+unary plus
-unary minus
++pre-increment (prefix) or post-increment (postfix)
--pre-decrement (prefix) or post-decrement (postfix)
~bitwise complement. Toggles bit by bit.
!logical negation. Change true to false and vice-versa.
The code fragment shown below demonstrates the operation of the for loop. It also shows how a for loop operates inside another (nested for loops):
int i, j;
for (i = 0; i < 5; i++)
{
for(j = 0; j < i; j++) cout << ‘*’;

7 DRIVING LEDS 151
cout << endl;
}
Implementing this code in a program will produce the output shown in Figure 7-2:
*
**
***
****
*****
Figure 7-2 The output of the nested for loop operation.
The body of the outer for loop starts at the open brace and ends at the close brace. Between these two braces is the inner for loop. The inner for loop has no braces because it only has the one statement as its body:
cout << ‘*’;
The second statement of the outer for loop is:
cout << endl;
and will be executed after the inner for loop has completed all its iterations. Each iteration of the inner for loop prints the character ‘*’ on the screen and increments the loop counter j. Printing for that line ceases when the value of j reaches that of the outer loop counter i. Therefore, each iteration of the outer for loop consists of j iterations of the inner for loop.
7.2.2 The while Loop and the do–while Loop
Repetitive iterations as performed with the for loop can be carried out using the while loop. The while loop is similar to the for loop without initialising and incremental expressions. It simply has a test expression enclosed within a pair of parentheses that is evaluated at the start of the loop. This expression must evaluate to true for the body of the while loop to be executed. If it evaluates to false (zero) the loop will be terminated. It is possible that the body of the while loop is not executed at all - if in the first entry of the loop, the test expression evaluates to false or zero.
Because initialising and incremental expressions are omitted, while loops do not generally deploy a loop counter. However, the while loop can be used to implement the behaviour of a for loop and vice-versa. In general, while loops are implemented when the exact number of iterations are not known.

152 7 DRIVING LEDS
Test expression is evaluated first.
while(i < 10000)
{
i++;
}
Statements in the body
do
Statements in the body
{
i++;
}
while(i < 10000)
Test expression is evaluated last.
Figure 7-3 The while and do-while loops.
The do-while statement is very similar to the while statement. The difference being that the test expression is evaluated at the end of the loop resulting in at least one execution of the body of the loop. The statements in the body of the loop are between the keyword do and the keyword while. Braces must be used if the body is a compound statement. Figure 7-3 shows the anatomy of the two types of loop.
7.3 Branching
7.3.1 The if Statement
The if statement has a conditional expression enclosed within a pair of parentheses placed immediately after the keyword if. The most general form of the if statement has a true clause and a false clause separated by the keyword else. The true clause consists of the statements before else and the false clause consists of the statements after else. The conditional expression will evaluate to true or false. If it evaluates to true, the true clause will be executed and the false clause will be ignored, otherwise the false clause will be executed and the true clause will be ignored.
If there are multiple statements in any of the clauses, they must be placed within braces ({ and }) to form compound statements. Within these compound statements there may be other if statements. If this is the case they are known as nested if statements. In nested if statements, the else keyword will bind to the last opened if statement without an else.

7 DRIVING LEDS 153
conditional expression
The keyword if
if(i < 10000)
{
statements
}
The keyword else separates the true
and false clauses else
{
statements
}
The true clause. This section will be executed if the conditional expression evaluates to true. The braces are necessary if there is more than one statement in the true clause.
The false clause. This section will be executed if the conditional expression evaluates to false. The braces are necessary if there is more than one statement in the true clause.
Figure 7-4 The if statement - the most general case.
It is also possible to have if statements with only one clause as shown in Figure 7-5. This clause must be the true clause.
conditional expression
The keyword if
if(i < 10000)
{
statements Statements for the true clause.
}
No else keyword and no false clause. If the conditional expression evaluates to false, no action will be taken.
Figure 7-5 The if statement with only a true clause.
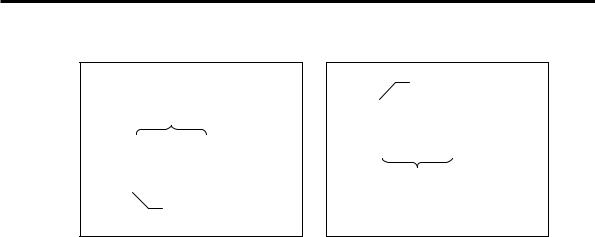
The if statements can be nested as shown in Figure 7-6. In the two examples shown, the else keyword binds to two different if statements. Use of proper indentation helps the programmer to see the correct association for each clause in nested if statements as shown in Figure 7-7.
