

ManualOperator
.pdfHeadings & Distances & Bearings
Calculate bearings by EBL/VRM
A variable range marker (VRM) and its associated electronic bearing line (EBL) is used to determine the range and bearing (respectively) of objects detected by the radar.
A standard VRM is displayed as a circle with its center on your GPS position, and its EBL is displayed as a line from the origin, to the edge of the radar screen. Both are shown as lines. If you range in or out, or offset the center of the display, the original setting of the EBL/VRM remains unchanged.
The software allows two EBL/VRMs to be displayed at the same time such as it is shown in the Toolbar under the Compass tool:
When using the EBL / VRM
To measure the range and/or bearing of a target or a point from your GPS position as you will do on a Radar overlay display. This function can be useful and essential in measuring the width of river mouth, narrow channel as well as navigable navigation lanes.
This is displayed by clicking the EBL/VRM 1 in the Toolbar and drawing on the chart. Repeat with the EBL / VRM 2. If your GPS is not connected you can simulated a GPS position with using the Dead reckoning function.
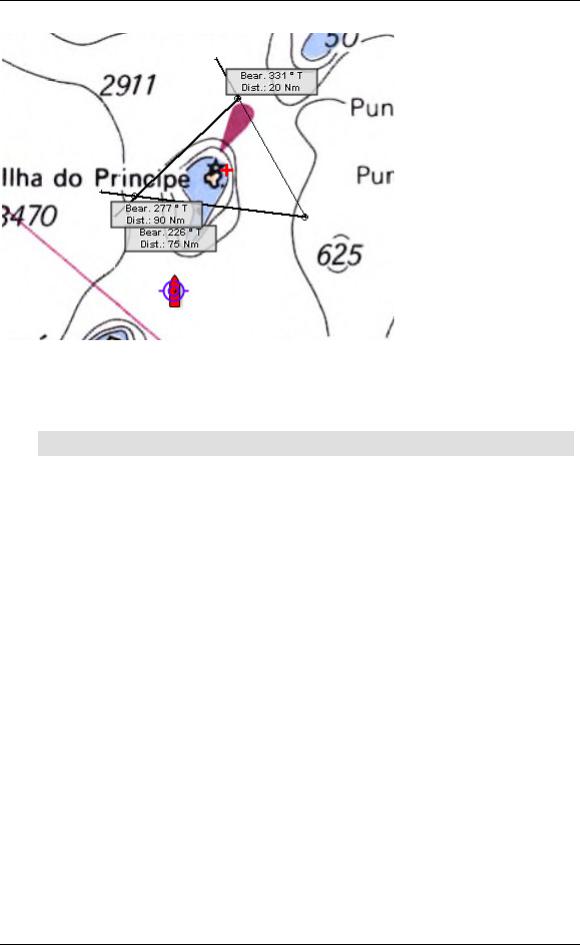
Then you can draw the EBL /VRM (1 and 2) as it is shown in following picture:
Tool tips are displayed on screen which informed at any time about the EBL (Line representation in the picture) and VRM (ring representation in the picture) range. This can be useful to follow up a point on screen when turning off Radar.
To adjust the EBL/VRM simply click on it and drag it to the desired angle directly on the chart. The angle and distance are displayed in each corresponding tool tip.
39

MaxSea Operator Manual version 12.6
Erasing EBL/VRM from the chart display:
1.To erase EBL/VRM 1 double click the compass tool selected on EBL/VRM 1 option.
2.Do the same with EBL/VRM 2 the compass must be selected on EBL/VRM 2 before. Get more information on this function in the Radar overlay chapter
Calculate fix by two bearings
Using the Bearing Tool  or right-click any where on the chart and select the "Bearing tool" in the "Select tool" submenu.
If you have used a compass to take the bearing of two seamarks, drag the bearing line from the first seamark (click, drag and release) and then do the same to set the bearing line of the second seamark.
Select [Calculate fix] from the [Route] menu to obtain as before, the point of the bearing which is recorded in the active layer.
Note:
(1)- it is not necessary to lengthen bearing lines to make the intersection, MaxSea will perform this function.
(2)- instead of sliding the cursor over the chart you can click the seamark and then use the keyboard to enter the bearing in the dialog box which opens.
To erase the trace of the bearing taken go to the [Route] menu and select [Delete Bearing] or double-click on the Bearing tool.
Calculate fix by three bearings
Using the Bearing Tool  or right-click any where on the chart and select the "Bearing tool" in the "Select tool" submenu.
Proceed exactly as explained in the above paragraph to Calculate fix by two bearings , but trace three bearing lines instead of two.
After selecting [Calculate fix] from the [Route] menu, the software displays the point of theoretical calculation as well as the triangle of accuracy.
40
Headings & Distances & Bearings
These elements (point and triangle) are recorded in the active user's data layer.
Note: instead of sliding the cursor over the chart, you can click the seamark taken, then use the keyboard to enter the bearing in the dialog box available.
Go to the [Route] menu and select [Delete Bearing] to erase the trace of the bearing taken or double-click on the Bearing tool.
Calculate fix by a bearing and a range
 Right-click any where on the chart and select the "Bearing tool" in the "Select tool" sub-menu.
If you have taken the bearing of a seamark ( fixed object such as a point of land) using a compass or a radar and if you know the range separating you from the seamark, click this seamark on the chart and then drag the cursor over to the point where the bearing and range correspond to the values taken.
41

MaxSea Operator Manual version 12.6
Select [Calculate fix] from the [Route] menu.
A mark (red cross) is displayed on the chart and recorded in the active layer. The trace line of the bearing remains displayed on the chart.
Note: instead of sliding the cursor over the chart, you can click the seamark taken, then use the keyboard to enter the bearing in the dialog box available.
42

Headings & Distances & Bearings
Go to the [Route] menu and select [Delete Bearing] to erase the trace of the bearing taken or double-click on the Bearing tool.
Note that the point from the calculation remains displayed on the char (red cross)t. It has been recorded onto the active layer. Use the delete tool on the palette if you want to delete it.
43

Routes
Routes overview
A Route is a travel from a location (1)
Fig.1
to another location (2), and is composed of series of waypoints.
The Selected Route is your draft. You can easily plot and edit a route on the chart using the Route tool to simulate your navigation. The Planning Route is drawn on the chart with series of QuickWaypoints (or Waypoints) linked with orange dotted lines. When you make a route with the Route Tool, if you don't click on existing Waypoints, QuickWaypoints are automatically created. These QuickWaypoints are not added to the Waypoint database and are automatically deleted when the route is erased.
(Fig.1 : Route using QuickWaypoints)
Each Leg along the Route are listed in a table called the Selected Route Center.
All routes you have created are listed in the Routes Center.
In this section you will learn :
1.How to create a Route.
2.How to display and select existing route for working on it (using the Routes Center)
3.How to display the Route Plan that gives you information about the Selected Route (Selected Route Center)
You will also learn in this section how to edit and customize a planning Route to simulate your navigation:
1.How to Modify a Route (insert, delete and move waypoint in a route)
2.How to Duplicate a Route
3.How to Reverse a Route
4.How to Import Routes
5.How to Export Routes
6.How to Archive Routes and Waypoints Database
7.How to Restore Routes and Waypoints Database
8.How to Delete Routes
Create a Route
MaxSea enables you to create a Planning Route by placing and linking together several Waypoints on the chart. Each part along the route corresponds to a Leg.
To create a Route, you can :
45

MaxSea Operator Manual version 12.6
Draw directly the route on the chart (creating QuickWaypoints) :
1.Select the Route Tool and move the cursor to the starting point
2.Click directly on the chart. A blue square (QuickWaypoint) is displayed at the point clicked and is named number (1).
3.Create additional QuickWaypoints by clicking points further along the route. These QuickWaypoints will be successively numbered (2), (3), etc...
Note : All the QuickWaypoints created are not listed in the Waypoints Database. They are only temporary Waypoints linked to a specific route (if you delete the route, all the QuickWaypoints will be erased)
Place Waypoints on the chart and build the Planning Route:
1.Select the Plotting Tool (Pencil)
2.Choose a shape (icon) and color for your Waypoints
3.Move the Plotting Tool on the chart and click to record Waypoints (each Waypoint will be automatically saved in the Waypoints Database)
4.When you have plotted enough Waypoints, you may change the tool and select the Route tool to create the Route by selecting and connecting any combination of these waypoints, or new
QuickWaypoints. Take care that no Route is selected at this moment because the Waypoints will be added to this one. To unselect a route, simply double-click on the Route Tool.
5.Click on each Waypoint in the desired order to build the Route.
Note : if you erase a route created with existing Waypoints, the waypoints will not be deleted.
Fig.1
46

Routes
(1)Route using QuickWaypoints,
(2)Selected Route using QuickWaypoints
(3)Route using Waypoints (previously created with the Plotting Tool)
When a Route is chosen or created
1.The Route is drawn in orange on the chart.
2.The line which corresponds to the Selected Route is colored in orange in the Routes Center.
3.The Selected Route Center lists each Leg and gives you various information such as length, time to go and ETA of the Route.
TIPS - To make a new Route, you have first to double click on the Route Tool to un-select any route previously created. If you don't do so, you will add leg to the Selected Route.
Making Route from selected objects (series of marks, tracks and lines)
Creating a route from a track is a convenient way to re-navigate a previous trip. This is useful for navigating a path on specific positions which you know to be safe because you have used it before.
Import selected marks to Route
1.Left-Click with the Select tool, in the required order, each mark on the chart while holding down the Ctrl key or a group of mark selected together with the Rectangle (or Lasso) tool.
2.When the selection is closed enough, choose the [Import Selection to Route] option from the [Route] menu.
3.The new route will be created at the same time the waypoints are added in the Waypoints Center list.
Group of marks selected with the Rectangle option under the Select Tool.
Create a Route from a line, track ...
A Planning Route is automatically created when the Import Selection to Route is chosen.
1.Left-Click with the Select Tool select, in the required order, select a complete line or a track for example (see chapter Data Layers/ Marks / Modifying marks , and the paragraph Selecting objects ).
47

MaxSea Operator Manual version 12.6
2.Choose the [Import Selection to Route] option from the [Route] menu.
3.Then the selection is automatically converted to waypoints and a planning route (see following picture)
Making a Route from selected lines
Note:
(1)- if a route was drawn before on the chart the previous planning route will be closed.
(2)- The line will NOT be erased. The Route will be superimposed to the line or the track.
Cancelling the selected Route
This feature does not delete the route from MaxSea. It allows you to cancel the Planning Route on the chart. Even if the route is made invisible, the route still exists and can be made visible on the chart at any time. To show it again you may display the Routes Center and select it in the list by clicking a Route line.
Fig.1
(1)Selected Route
(2)Unselected Route
Two ways for cancelling the Planning Route:
1.Select [Unselect Route] from the [Route] menu.
2.Or double click the Route tool in the Toolbar.
This function will be used each time for creating a new planning Route.
48