

ManualOperator
.pdfElectronic Charts
Note: to order C-MAP NT/PC refer to the "Installing charts" chapter.
C-Map NT Functions Overview
The C-Map NT charts are opened in the same window as seamless chart, and its opened presence can be identified by means of the C-Map NT option which is added in the Chart Information drop down menu list.
C-Map NT |
Chart Config |
Density |
When a CMap NT chart is already opened, the Chart Information drop-down menu list shows following items:
1.CMap NT item: to show / hide the CMap NT Chart layer, click on it to display or not the layer.
2.Chart Config item: The appropriate CMap NT sub-menu appears at the same time in the list . This menu list is called Chart Config and allows you to configure the chart display as you wish.
As with all charts in MaxSea, you can open several C-Map NT windows.
In order to open a new C-Map NT window chart, select [New chart window] from the [Window] menu. The window that you have just opened places you on the same geographic zone as the one in the last opened chart window. For more information see related topic above: Opening several chart windows.
C-Map NT Chart Properties
You can obtain information from the C-Map NT chart presently opened in MaxSea by displaying the corresponding C-MAP NT chart properties dialog.
Two ways for activating the Chart properties dialog:
1.Using the Hand Tool on Toolbar and double-click anywhere on the chart.
2.Using the right click anywhere on the chart will display the contextual menu, then choose and click on Chart
Properties.
The "Chart Properties" window appears on screen and informs you on cartographic info such as the Source of data.
If you need more information on a specific object drawn on the chart or if you want to find specific information nearest you, see related topics:
1.CMap NT Chart Object Center
2.C-Map NT Chart Object Properties
3.C-Map NT Find nearest function
4.Display options
179

MaxSea Operator Manual version 12.6
C-Map NT Chart Configuration
You can change the display scale by clicking on the chart where you wish to zoom. You can then select the desired scale. The scales with an available chart are preceded by one black sign, the others are available but will over-zoom when necessary.
Two methods to display the dialog which allows you to modify display options:
1.Either click the Chart zone information and Choose "Chart config..." item from the pull down menu.
2.Or RIGHT CLICK anywhere on the chart to call up the contextual menu, then select the "Chart Config..." item .
CMap NT
|
Chart Config |
|
|
Custom... |
|
|
|
|
|
|
|
|
Density |
|
|
Low |
|
|
|
|
|
|
|
|
|
|
|
Simple |
|
|
|
|
|
|
|
|
|
|
|
Full |
|
|
|
|
|
||
|
|
|
|
|
|
|
|
|
|
Fishing |
|
|
|
|
|
||
|
|
|
|
|
|
|
|
|
|
My Config |
|
|
|
|
|
|
|
The "Chart Config" menu list allows you to choose a type of configuration between 6 detail levels:
1.Custom... ( if you want to create your own display configurations.)
2.Low: minimum level of detail
3.Simple: standard level of detail
4.Full: most complete level of display detail
5.Fishing useful configuration for fishing
6."My Config" ( additional option which configuration created by user)
Click on "Custom..." to display the "Change Config" dialog:
180

Electronic Charts
To display an own configuration:
1.Click "Add" button in previous window,
2.Enter a "Config Name" and check each box nearest an option to choose which one you will affect to your own configuration
3.Then click on "OK" to validate your Configuration
4.A new Name Config is added to the Config Sub menu list
To remove a configuration
181

MaxSea Operator Manual version 12.6
1.Select Chart Config / Custom... and click a config in the right target window and then click on the "Remove" button.
2.Click on OK to confirm the change
CMap NT Chart Object Center
The Chart Object Center is useful for quickly obtaining all available information from an object selected on the chart.
Two ways for editing information on selected object:
1.Using the Select tool in the Toolbar:
•Then Position the cursor on the object drawn on the chart which it is necessary to obtain information,
•Then double click on it
2.Independently of selected tool in the palette:
•Select the [Center] option from [Display] menu, then select and click on "Chart Object Center...".
•Right-click an object drawn on the chart which it is necessary to obtain information. Select and leftclick on "Chart Object Center...".
 This action has two consequences :
1.A window is displayed in the bottom part of the Chart Window. It contains all available information on the selected object.
2.An acquisition marker appears on the chart around the selected objet which indicates its ultimate position on the chart. Purple hooks surround the selected object on the chart. The Same purple hooks symbol is reminded in the Tab center.
The Chart Object Center's content depends on the object type which is selected.
As it is shown on picture example the chosen object is a Lighthouse and the Chart Object Center lists all available
information according to the selected object such as Light, Lighthouse, Tower, Source of data and more...
When you double-click a line the Object details dialog is opened. For more information see related topic:C-Map NT Chart Object Properties
For more information on how to use and move in the Center Window see related topic: Center display and controls...
182

Electronic Charts
C-Map NT Chart Object Properties
You can each time you wish acquire information on a selected object by displaying its Properties Dialog.
Several ways for opening the Chart Object Properties:
1.When you move the mouse over a C-Map NT object a tooltip of Quick links appears on screen. This tooltip allows you to reach the four most important object at the selected localization. Then click a link to get details on it.
2.Double-click on object with the Select Tool will bring the Chart object Center and its Properties dialog, then click a line to display the Properties dialog.
3.RIGHT CLICK on object right mouse context menu and then choose "Chart Object Center...", then click a line to display the selected Object Properties dialog.
4.Or using the select point tool and double left clicking any where in the Chart window to bring up the "Chart object Center" dialog.
CMap NT chart object "Properties" dialog gives following:
1.In the left window part: list of attribute names of the selected object.
2.In the right window part: detail of each attribute of the selected object.
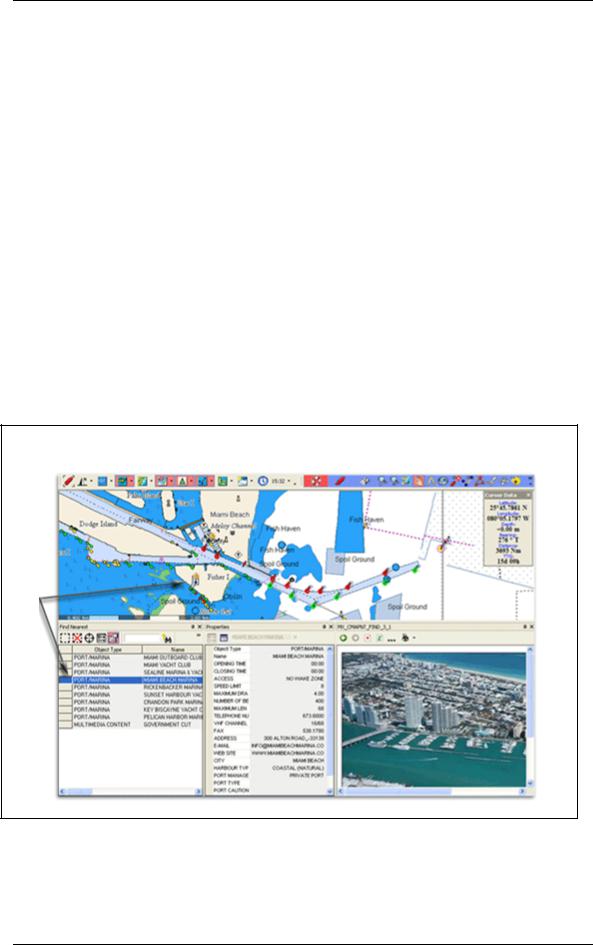
C-Map NT Find nearest function
C-Map NT find nearest function is useful for obtaining complementary information around a selected point displayed on the chart.
1 - Right click anywhere on the chart, choose and click Find Nearest... item in the contextual menu list 2 - The following dialog appears and allows you to choose a service nearest the selected position.
3 - Choose a Service type in the appropriate pop up (Port service is chosen in the example above). You can choose between 4 types: Port services or Wreck or Port area or Obstruction
183
MaxSea Operator Manual version 12.6
4 - You can also limit the number of object to research and define the distance offset around the selected object (selected number equal to 10 by default).
5 - Then Click on a symbol which is representative of a chosen service, this will search and display a result list.
6 - Click OK to confirm your choice, at this moment the Find Nearest Center is displayed on the bottom of
the screen and its symbol representation looks like : 
For example:
(If the area in the present example is Fuel Station of around a point selected on the chart)
The Find Nearest Center enumerates all C-Map NT Objects of requested type at a given position such as :
1.It gives you up to ten best matches (value selected by default).
2.If you need more information, select a line and double click on it to display its Properties dialog. You will obtain complementary information on a selected point by clicking the "Properties" button on the center toolbar, if there is no more information, the dialog will appear empty. See related topic: C-Map NT Chart Object Properties
3.It allows you to quickly locate a "Find Nearest object" on the chart. To do this, select the appropriate line in the "Find Nearest" center, click the "Center On" button on the Center toolbar and the chart will automatically be centered around the selected point (drawing of black hooks outlined it on the chart.)
IMPORTANT - The Find Nearest Multimedia Object as Photography, can only be done in a same level of scale. Use magnifying tools to change scale level and find other multimedia objects location.
For more information on how to use and move in the Center Window see related topic: Center display and controls...
184

Electronic Charts
Closing C-Map NT chart
Select the [Close] function of the [File] menu. Select the CMap NT item, which represents the C-Map charts catalogue in the list of available files and click Close.
The C-Map chart layers are closed in MaxSea and all the C-Map charts are canceled. "C-Map NT" Item disappears from the "Chart Zone Information" menu list.
Note : You may change the C-Map NT cartridge at any time without quitting MaxSea, provided that you close the chart beforehand.
C-Map CM93/3
The C-Map Cartographic Service Overview
The system that you are now using has the capability of using and displaying the latest C-Map CM-93/3 worldwide vector chart database. These charts are fully compliant with the latest IHO S-57 3.1 specifications and, when using the CM-93/3 ENC database in an approved ECDIS, are considered equivalent to the navigational charts required by the SOLAS (Safety Of Life At Sea) convention.
In order to prepare the system for use with the C-Map CM-93/3 database, there are a number of steps you must follow:
1. Registering the system at C-Map.
When a system is installed that has the capability to use the CM-93/3 database, a file called USER.USR will be automatically created (normally in the Program Files\CM93v3 SDK directory). This file contains the Company ID and System ID assigned to the ECDIS/ECS system when it is installed. These ID’s can be found on the back of the installation CD box or on a sticker placed on the equipment. This file must be sent to C-Map Norway by email (license@c-map.no) or by a direct Internet connection when installing the software. Licenses can only be generated once this file has been received and registered by C-Map. It is important to note that the software may need to be reinstalled and reinitialized if the operating system or hardware is upgraded (see the troubleshooting section). In some cases the manufacturer of the system will have already pre-registered the system.
If when installing a new system, you do not know your Company ID or System ID, please contact C-Map Norway before continuing installation.
2. Ordering Charts
It is essential that as much information as possible is sent to C-Map when ordering charts for a system. To order CM-93/3 charts, the System Information section should first be completed (normally found in the License Administrator section of your software). This contains vital information that will allow us to maintain your licenses throughout the lifetime of the system. Once this section is completed you can order charts by choosing the ORDER LICENSES section in the License Administrator. Charts can be ordered by Zone, Area or Cell and these which can be seen at www.c-map.no. Price quotes can be obtained via your chart dealer or direct from your local C-Map office. Once the license order has been prepared, it should be e- mailed to (license@c-map.no) or faxed to C-Map Norway AS (+47 51464701).
3. Applying For Licenses
Once the order has been received at C-Map, a license will be generated and transmitted back to the user. This may be in the form of a single alphanumerical string (16 characters), or in the form of a file called PASSWORD.USR. Once this license has been received it should be input using the License Administrator or the software designed by the ECDIS/ECS manufacturer. There are two types of licenses, purchase and subscription. Purchase licenses are valid indefinitely while subscription licenses need to be renewed each 12 months from the start of the subscription. Failure to renew a subscription will result in the charts becoming unavailable.
185

MaxSea Operator Manual version 12.6
4. Troubleshooting
If you are having problems installing your software or charts please check the following before calling C- Map:
•You are installing on Windows XP, Windows NT, Windows 2000 or Windows 98 second edition. The system will not normally run under Windows 95 or Windows 98 first edition.
•That you have registered the WORLD database in the GDBADMIN application.
•That the registered WORLD database is available. If you are running the database from the CD drive, the CD-ROM must be loaded.
•That you have correctly typed the license string.
•That you have not reinstalled Windows or any major hardware components. If you have done this you will probably need to reinstall your software.
Contact Information:
For information or help please call you’re nearest C-Map Office (details can be found on the reverse side of the C-Map chart CD box) or contact C-Map Norway:
C-Map Norway |
Tel. +47 51464700 |
AS
Fax.+47 51464701
Post Box 212
Email: technical@c-map.no
Hovlandsveien 52
4379 Egersund
Norway
Opening C-Map CM93 v3 Chart
Unlike other charts, CM93v3 charts are organized in a database (and not as simple graphic files). This database must be referenced before you open CM93v3 charts. (for more information see related topic: How to install CM93 v3 vector charts )
From [File] on the MaxSea menu, choose [Open Charts] and then highlight CM93/S57.
Next press “Open,” at the bottom of the dialog box.
As you do for the other charts you can open the C-Map CM93 v3 background chart and its database by selecting the [Open chart] option from the [File] menu.
New items appear in the Chart Information menu list as it is shown in following:
186

Electronic Charts
CMAP NT |
|
CMap CM93 v3 |
|
Geographic Grid |
|
Chart Config |
|
Density |
Low |
|
Normal |
|
High |
Very High
Maximum
Note that the Chart Config menu list depends on the selected type of chart.
Important
•If the CM93v3 database is corrupted or unavailable, MaxSea will warn you and will not open Cm93v3 Windows.
•If no CM93v3 licence is available at the time you try to open a chart, only a general scale chart (1:5 Million) will be available in MaxSea.
•MaxSea will warn you 2 months in advance of any license expiration. (See the Licences Management chapter to renew licenses.)
C-Map CM93 v3 display Options
Magnifying
187

MaxSea Operator Manual version 12.6
As in all the available cartographies in MaxSea, you can change display scale by doing one click straight ahead in the wished place. You can then select the scale suited to your needs. The scales for which there is a chart are preceded by one black sign, the others are thus available but without supplementary information with regard to the first marked superior level.
Modify the display level
You can customize the appearance of charts by turning on and off layers of information. You can modify the display level by clicking on the Chart zone information situated in the chart palette to call up the menu. This menu gives you the choice between various display configurations.
Planisphere.wld |
Mapmedia.mm2 |
Vector CMap CM93 |
Geographic Grid |
Chart Config |
Custom... |
|
Density |
S52 |
Base |
|
S52 |
Standard |
|
S52 |
Other |
|
S52 |
Other Text |
|
Antigrounding Master GPS |
|
You can obtain information about the present objects around a point of the chart, either by clicking the Charts zone information button or by right clicking in the chart window to call up the context menu.
The Charts menu on the chart palette provides the ability to display :
•A own configuration by selecting "Change Configuration..."
•S52 Base,
•S52 Standard and corresponding S52
188