

Embedded Systems Design - An Introduction to Processes Tools and Techniques (A. Berger, 2002)
.pdfDouglass, Bruce Powel. “UML Statecharts.” Embedded Systems Programming, January 1999, 22.
Grehan, Rick. “Real-Time Design Goes Object-Oriented.” Computer Design, December 1997, 57.
McElroy, Jim. “The ABCs of Visual Programming.” Embedded Developers Journal, May 2000, 16.
Mellor, Stephen J. “UML Point/Counterpoint: Modeling Complex Behavior Simply.” Embedded Systems Programming, March 2000, 38.
Moore, Alan. “UML’s Shortfalls in Modeling Complex Real-Time Systems.” Computer Design, November 1998, 53.
Pacheco, Sylvia. “UML Delivers Real-Time Software Standardization.”
Real Time Computing, March 2000, 87.
Varhol, Peter. “Front-End Design Automation for Building Complex Systems.” Computer Design, July 1998, 87.
Varhol, Peter. “New Designs Model Complex Behavior.” Electronic Design, 21 February 2000, 79.
systems programming from other kinds ofFprogramming. Although many “big picture” programmers find direct interaction with the hardware distasteful at best,
Summary Y More than anything else, the need to “work onLthe metal” differentiates embedded
M A A willingness to get your handsEdirty, however, shouldn’t translate into sloppy
most embedded systems programmers take a certain amount of pride in getting their hands dirty.
practice. Little things, likeTdeclaring a variable extern or packaging in-line assembly in a function wrapper, mark the difference between professionally written, maintainable code and sloppy work. The lessons of software engineering and good coding practice apply here just as much as anywhere else — they just have to be interpreted within the context.
Although I have tried to mention some key factors that I think contribute to getting started with interrupts, I want to stress that this chapter does not teach how to write real-time code. Real-time programming requires a precise and complete understanding of the issues of mutual exclusion, synchronization, deadlock, and scheduling. On these issues, there can be no compromise. Errors are subtle and impossible to fix through standard debugging techniques. If you are not well-versed in these topics, don’t write real-time code.
Works Cited
1.DeMarco, Tom. Structured Analysis and System Specifications. New York: Yourdon, 1978.
2.DeMarco, Tom. Controlling Software Projects (New York: Yourdon, 1982).
3.Duby, Carolyn. “Getting Started with the Unified Modeling Language.” A paper presented at the Embedded Systems Conference, San Jose, 26 September 2000.
Team-Fly®
4.Ganssle, Jack. “The Art of Designing Embedded Systems.” Boston, MA: Newnes, 2000, 61.
5.Gatliff, Bill. “The How-To’s of Flash: Implementing Downloadable Firmware.” A paper presented at the Embedded Systems Conference, San Jose, 25 September 2000.
6.Murphy, Niall. “Watchdog Timers.” Embedded Systems Programming, November 2000, 112.
7.Saks, Dan. “Volatile Objects.” Embedded Systems Programming, September 1998, 101.
8.Saks, Dan. “Using const and volatile in Parameter Types." Embedded Systems Programming, September 1999, 77.
9.Silberschatz, Abraham, and Peter Baer Galvin. Operating System Concepts, 5th ed. Reading, MA: Addison Wesley Longman, 1998.
10.Simon, David E. An Embedded Software Primer. Reading, MA: AddisonWesley, 1999, 149.
11.Sumner, Scott A. “From PROM to Flash.” Embedded Systems Programming, July 2000, 75.
Chapter 6: A Basic Toolset
Overview
Unlike host-based application developers, embedded systems developers seldom program and test on the same machine. Of necessity, the embedded system code must eventually run on the target hardware. Thus, at least some of the testing and debugging must happen while the system is running in the target. The target system seldom includes the file system storage or processor throughput necessary to support a typical development environment, and even when it does, it’s likely to be running a minimal (or even custom) operating system supported by few, if any, tool vendors.
Thus, system integration requires special tools: tools that (mostly) reside on the development platform but that allow the programmer to debug a program running on the target system. At a minimum these tools must:
Provide convenient run control for the target
Support a convenient means to replace the code image on the target
Provide non-intrusive, real-time monitoring of execution on the target
The lowest cost tool set that adequately addresses these needs is comprised of a debug kernel (usually in connection with a remote debugger) and a logic analyzer. Some targets also require a ROM emulator to allow quick code changes on the target. This chapter explains why these tools are necessary, how they work, and what they do.
Host-Based Debugging
Although you can do a certain amount of testing on your desktop PC, unless you are lucky enough to be programming for an embedded PC, eventually differences between the desktop hardware and the target hardware will force you to move the testing to the target.
If you write your applications in C or C++, you should be able to debug an algorithm on the host (as long as you watch out for a few minor differences that tend to cause major bugs that I’ll discuss shortly). Even if you write in assembly (or have inherited a library of legacy code in assembly), you can execute the code on your desktop system using an Instruction Set Simulator (ISS) until you need to test the real-time interaction of the code and the target system’s special hardware.
Aside from the availability of real working peripherals, the greatest source of problems for host-based debugging derives from two architectural characteristics: word size and byte order.
Word Size
Obviously, if your embedded processor has a 16-bit wide architecture and your host-based compiler is expecting a 32-bit data path, you can have problems. An integer data type on a PC can have a range of approximately ± 2 billion, whereas an integer in your target might have a range of approximately ± 32 thousand. Numbers bigger than the targeted range will cause bugs that you’ll never see on the PC.
Byte Order
Another problem is the “Little Endian, Big Endian” problem, which is legendary for the amount of money that’s been spent over the years finding and fixing this particular bug. Consider Figure 6.1.
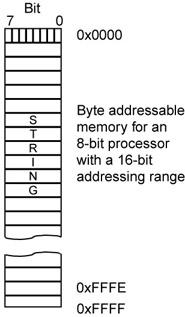
Figure 6.1 is a simple example of storing a C string data type in an 8-bit wide memory. Because a char is also eight bits wide, there’s no problem. Each character of the string occupies exactly one memory location. Now suppose that the processor has a 16-bit wide data bus, such as Motorola’s original 68000-based family of devices or Intel’s 80186-based family. Storing only eight bits of data (a char) in a memory location that is capable of holding 16 bits of data would be wasteful, so give the processors the capability of addressing individual bytes within the 16-bit word. Usually, the least significant bit (LSB) is used to designate which byte (odd or even) you are addressing. It’s not obvious that byte addressability causes a problem until you have a choice as to how the bytes are packed into memory.
Figure 6.1: Storing a char type.
Storing a type char in an 8-bit wide memory.
Figure 6.2 shows the two different ways one can store a string of characters in a 16-bit wide memory. You can align the even byte address with the high-order end of the 16-bit data word (Big Endian), or you can align it with the low-order end of the 16-bit data word (Little Endian).
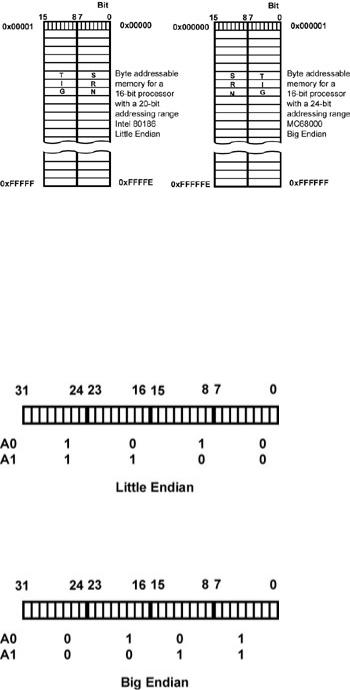
Figure 6.2: 16-bit wide memory storing the string.
Storing bytes in 16-bit wide memory introduces an ambiguity with respect to the order in which these bytes are stored.
This ambiguity can cause mischief. Fresh engineers trained on Little Endian systems, such as PCs, are suddenly reading the wrong half of memory words. The problem also extends to 32-bit data paths. Figure 6.3 shows the Big and Little Endians ordering for a 32-bit machine. In a 32-bit data word, the two least significant address bits — A0 and A1 — become the byte-selector bits, but the same ambiguity exists: “From which end of the 32-bit word do you count the address?”
Figure 6.3: Big and Little Endians.
Big and Little Endian organization in a 32-bit data word.
Debug with ISS
Another possible solution is for the software team to use Instruction Set Simula tors (ISS) to allow them to compile their target code for their chosen microproces sor but execute the code on their workstations. The ISS is a program that creates a virtual version of the microprocessor. Some ISS’s are very elaborate and main tain cycle-by-cycle accuracy of the target microprocessor, including cache behav
ior, pipeline behavior, and memory interface behavior. My hardware architecture class at UWB uses an ISS for the Motorola MC68000 microprocessor, developed by Paul Lambert, Professor Alan Clements and his group at the University of Tee side, in Great Britain.
Instruction set simulators can be very complex simulation programs. At AMD, we drew a distinction between the architectural simulator, which accurately mod eled the processor and memory interface behavior, and the instruction set simula tor, which was fast enough for code development but could not be used to accurately predict software execution times for given memory configurations. Today, you can purchase ISS’s that are both fast and cycle-accurate. Given the power of today’s workstations and PC’s, it is reasonable to expect an ISS to be able to have a throughput in the range of 1 to 25 million instructions per second, certainly fast enough to meet the needs of most software developers.
Software developers can also build virtual representations of the target hardware (not just the processor) prior to the general availability of the real hardware. Ledin[3,4] describes a method based upon representing the hardware as a set of non-linear differential equations. Clearly, there is a considerable investment of time required to build these hardware models; however, the investment may well be worth it because they can provide an early indicator of relative task-timing requirements. If the embedded system is to be run under an RTOS, then it is important to know whether a task will be able to run to completion in its allotted time slot. It is better to know this sooner than later.
Smith[5] describes another method of hardware simulation that uses the ability of some processors to execute an exception if an attempt is made to access illegal or non-existent memory. In Smith’s example, a single-board computer is used, and the simulated I/O is accessed through a memory fault exception handler. The vec tor transfers the application to the user’s simulation code. The assembly language code example, shown below (from Smith), is written for the Motorola 68332 microcontroller.
As I’ve discussed earlier, being able to integrate hardware and software sooner in the design process generates big advantages. Clearly, bugs found in the hardware before the hardware is “real” should be much less costly to repair, and design issues uncovered in the software will be simpler to analyze and correct because the hardware is still virtual.
Remote Debuggers and Debug Kernels
Typically, embedded platforms are too resource limited and specialized to support a full-featured debugger. Debuggers for embedded systems address this limitation by distributing the debugger; a portion of the debugger resides on the host computer, and a portion resides in the target system. The two elements of the debugger communicate with each other over a communications channel, such as a serial port or Ethernet port. The portion of the debugger that resides in the target is called the target agent or the debug kernel. The portion of the debugger that resides in the host computer is sometimes called the debugger front end or GUI. The same functionality that you expect from your host debugger is generally available in an embedded debugger, assuming that you have a spare communications channel available. Figure 6.4 shows a typical architectural block diagram for an embedded debugger. (The Wind River debug kernel is a bit more complex than most because it is integrated with VxWorks, Wind River’s RTOS.)

Figure 6.4: Typical architectural block diagram.
Schematic representation of the Wind River Systems debugger (courtesy of Wind River Systems).
The debugger generally provides a range of run control services. Run control services encompass debugging tasks such as:
Setting breakpoints
Loading programs from the host
Viewing or modifying memory and registers
Running from an address
Single-stepping the processor
The debugging features encompassed by run control are certainly the most fundamental debugging tools available. The combination of the functionality of the remote debug kernel with the capabilities of the user interface portion of the tool is the most important debugging requirement.
The debug kernel requires two resources from the target. One is an interrupt vector, and the other is a software interrupt, which is discussed later. Figure 6.5 shows how the debugger is integrated with the target system code. The interrupt vector for the serial port (assuming that this is the communications link to the host) forces the processor into the serial port ISR, which also becomes the entry point into the debugger. Again, this assumes that the serial port’s interrupt request will be taken by the target processor most, if not all, of the time. After the debug kernel is entered, the designer is in control of the system. The debug kernel controls whether other lower-priority interrupts are accepted while the debugger is in active control. In many situations, the target system crash as if the debugger does not re-enable interrupts. Obviously, this major compromise must be dealt with.

Figure 6.5: Debug kernel in a target system.
Schematic representation of a debug kernel in a target system.
The debug kernel is similar to an ISR in many ways. An interrupt is received from a device, such as the serial port, which happens to be connected to the designer’s host computer. The interrupt is usually set at a high enough priority level — sometimes as high as the non-maskable interrupt (NMI) — that a debugger access interrupt is always serviced. If this were not the case, an errant ISR could disable any other interrupt and you wouldn’t be able to regain control of the system. Just like an ISR, the arrival of a command from the host computer stops the execution of the application code and can cause the processor to enter the debug kernel ISR. The machine context is saved, and the debugger is now in control of the target. You can see this schematically in Figure 6.5.
Implementing Breakpoints
To understand how you set a breakpoint in the first place, consider Figure 6.6.
Figure 6.6: Breakpoints.
How a debugger sets a breakpoint in read/write memory.
Let’s consider the assembly case because it’s the most straightforward. The user wants to set a breakpoint at a certain instruction location in RAM. The breakpoint request is acted on by the host-based part of the debugger, and the address of that instruction’s memory location is sent to the debug kernel in the target. The debug kernel copies the instruction at that location into a safe place and replaces it with a software breakpoint or trap instruction, which forces control back into the debugger when the breakpoint is accessed. This way, you can single step, run to a breakpoint, and exercise the software while continually transitioning in and out of the debugger.
However, most developers want to debug in C or C++, not assembly. Most likely, in these instances, you will need to enable debugging as a compiler switch so that the debugger and debug kernel can figure out where the breakpoint should be set in memory.
Another obvious problem with this mechanism is that you need to be able to replace the user’s instruction code with the trap code, thus implying that you can read and write to this memory region. If the code you’re trying to debug is in true ROM or EPROM, you can’t get there from here. You’ll need to use a RAM-based ROM emulation device to give you the ability to replace user code with breakpoint traps. Several companies manufacture ROM emulators, which are devices that plug into a ROM socket on the target system and contain RAM rather than ROM. Thus your code couldn’t be in the traditional ROM (It’s possible to set trap codes in EPROM or flash memory). Depending on the architecture of the actual device, flash might not be so difficult with which to work. The debugger might have to erase an entire sector on the device (perhaps 16KB) and then reprogram the sector, but it’s possible. Response wouldn’t be instantaneous because programming these devices takes much longer than simply writing to a RAM device.
If a software-only breakpoint mechanism isn’t possible, you must turn to the additional features that hardware has to offer. Many processors contain special breakpoint registers that can be programmed directly under software control or through the JTAG or BDM ports (See Chapter 7 for more details on these standards.). These registers provide a simple, yet extremely powerful, capability for the debugger. By placing the appropriate address into the breakpoint register, when the processor fetches an instruction from that address, the breakpoint is asserted, and the mechanism for entering the debugger becomes active.
Having the breakpoint register mechanism on the processor itself yields another advantage. In a processor with an on-chip instruction cache, a potential problem exists with coherency between the instruction memory and cache memory. Usually, you don’t expect people to write self-modifying code, so you might not be able to detect that an instruction in external memory and an instruction in the cache are different. In that case, you are setting a breakpoint, but it’s not detected because the breakpoint in the cache was never changed. Thus, you might have to run the debug session with the caches turned off. An on-chip debug register doesn’t have this problem because it looks at the output of the program counter and not the physical memory location.
Setting a breakpoint on a data value or range of values is also a necessary debugging capability. You might be able to break into the debugger on a data value that’s out of range by running the debugger in a virtual single-step mode. After every instruction executes, break in to the debugger and examine registers and memory for this data value. This will be extremely intrusive (read this as slow) but it would work. In this mode, your target system might not tolerate running this

slowly because it’s closer to running as an instruction set simulator than to a processor running at speed.
The venerable old 68000 microprocessor was among the first processors to include on-chip debug facilities. It includes a trace bit in the status register that, when set, forces a trap instruction to occur after every real instruction is processed. Using this mechanism, it’s not necessary to replace the actual instructions in memory with exception traps or software interrupts, but it is a hardware assist.
The debugger and debug kernel must always remain synchronized with each other. Unexpected events in the target system, such as overwriting the debugger with an errant pointer, causes the whole debugging session to be lost, which forces you to RESET the system and reload the code. Sometimes, the debugger can be isolated from target mishaps by placing it in a protected region of memory (for example, in flash memory); generally, however, it has the same level of fragility as any other piece of software.
Note Debug kernels are extremely useful in field service applications, enabling a technician to plug into a target and learn something about what is going on inside. If you’ve ever seen a target system with a RESERVED switch on the back, there’s a good chance that switch can kick you into an embedded debug kernel when the target is powered up.
Most embedded systems place their code into some kind of non-volatile memory, such as flash or EPROM. The debug kernel, however, needs to be able to modify the program, set breakpoints, and update the code image. These systems require some means of substituting RAM for the normal code memory, usually via some form of ROM emulator. As the next section explains, a ROM emulator offers many other advantages as well.
The advantages and disadvantages of the debug kernel are summarized in Table 6.1.
Table 6.1: Advantages/disadvantages of the debug kernel.
Advantages of the debug kernel
Low cost: $0 to <
$1,000
Same debugger can be used with remote kernel or on host
Provides most of the services that software designer needs
Simple serial link is all that is required
Can be used with “virtual” serial port
Disadvantages of the debug kernel
Depends on a stable memory sub system in the target and is not suit able for initial hardware/software integration
Not real time, so system performance will differ with a debugger present
Difficulty in running out of ROMbased memory because you can’t sin gle step or insert breakpoints
Requires that the