

LearningSDL011
.pdfDecember 15, 2011 [LEARNING SDL – A BEGINNER’S GUIDE]
Uint8 Rshift;
Uint8 Gshift;
Uint8 Bshift;
Uint8 Ashift;
Uint32 Rmask;
Uint32 Gmask;
Uint32 Bmask;
Uint32 Amask;
/** RGB color key information */ Uint32 colorkey;
/** Alpha value information (per-surface alpha) */ Uint8 alpha;
} SDL_PixelFormat;
We will not cover all the fields in SDL_PixelFormat in this section. The key one we will need for this exercise is BytesPerPixel. The BytesPerPixel tells us the number of bytes used to represent color for each pixel in a surface. This number will usually be some number from 1 to 4. So the way to get to this information is to use the format:
pDisplaySurface->format->BytesPerPixel
We can imagine display memory as:
Border |
pixels |
20 |
|
||
|
|
Screen |
40 |
|
|
|
480 |
|
|
|
640 |
|
|
720 |
Figure 69 - Screen Memory layout
Now it would be easy to think that the formula for computing the memory address of pixel (x,y) would just be the following:
start_memory_of_display_memory + offset_for_starting_row(using y) + offset_in_row (using x)
We will use the fact that the display memory pixels start at address pointed to by pDisplaySurface->pixels (see Figure 69), which corresponds to the pixel at screen location (0,0).
71

December 15, 2011 [LEARNING SDL – A BEGINNER’S GUIDE]
char* pPixelAddress; |
// variable to hold hold the |
|
//starting pixelAddress for the pixel at (x,y) |
//initialize to the starting location of the display surface address pPixelAddress = (char*)pDisplaySurface->pixels;
//add horizontal offset – x
pPixelAddress = pPixelAddress + (x * pDisplaySurface->format->BytesPerPixel);
// add vertical offset - y pPixelAddress = pPixelAddress
+ (y * MAX_WIDTH * pDisplaySurface->format->BytesPerPixel);
Let‘s see if we can make sense out of the above which as seen in a more mathematical light would be expressed as:
pPixelAddress = startingPixelAddress + x * BYTESPERPIXEL + y * MAX_WIDTH * BYTESPERPIXEL;
Using BYTESPERPIXEL = 3 (24bpp) and MAX_WIDTH=640
for (0,0) we would get
pPixelAddress = startingPixelAddress + 0 * BYTESPERPIXEL + 0 * MAX_WIDTH * BYTESPERPIXEL;
or just pPixelAddress = startingPixelAddress |
(makes sense right) |
Let‘s say we wanted the pixel address of (1,0),
pPixelAddress = startingPixelAddress + 1 * BYTESPERPIXEL + 0 * MAX_WIDTH * BYTESPERPIXEL;
pPixelAddress = startingPixelAddress + 3 (again makes sense since it should be 3 bytes down)
What about the pixel address of (0,1), that is the pixel right below (0,0) (see Figure 66)
For (0,1)
pPixelAddress = startingPixelAddress + 0 * BYTESPERPIXEL + 1 * MAX_WIDTH * BYTESPERPIXEL;
pPixelAddress = startingPixelAddress + 0 + 1 * 640 * 3
pPixelAddress = startingPixelAddress + 1920
The above is logical but not correct. The above is assuming that if you know the address of pixel x,y on the screen that the pixel below is at (address of pixel x,y) + MAX_WIDTH * BYTEPERPIXEL. But, in general the offset y * MAX_WIDTH * BYTESPERPIXEL will not be accurate. I tried to illustrate a
72

December 15, 2011 [LEARNING SDL – A BEGINNER’S GUIDE]
possible reason why this would be true in Figure 6919. The memory address of the pixels comprising the next scan line may not be adjacent to the end of the pixels comprising the last scan line. In our example above the offset would need to be adjusted by 80 units. To make it easier for users to compute the offset SDL holds within the SDL_Surface the struct variable pitch. The pitch holds the actual length of the scanline (borders and all!) so the formula to compute the pPixelAddress is:
char *pPixelAddress = (char *)pDisplaySurface->pixels
+x * pDisplaySurface->format->BytesPerPixel
+y *pDisplaySurface->pitch ;
The function we will use to copy the value we got from SDL_MapRGB – displayColor is memcpy:
memcpy(pPixelAddress, &displayColor, pDisplaySurface->format- >BytesPerPixel)
memcpy
This function copies the value of num bytes from the location pointed by source directly to the memory block pointed by destination.
void * memcpy( void * destination, const void * source, size_t num);
The destination is a pointer to the array or memory where the content is to be copied. The source is a pointer to the source of data and num is the number of bytes to copy.
the above copies BYTESPERPIXEL bytes from displayColor (the source) to pPixelAddress (the destination).
―Graphics hardware is a shared resource. Operating systems generally require that we lock shared resources before we use them and unlock them after we are done. SDL provides SDL_LockSurface() and SDL_UnlockSurface() to lock and unlock hardware surfaces. It is possible to have a hardware surface that should not be locked and SDL provides the macro so that we can tell them apart.‖20
Function Name: SDL_LockSurface
Format:
int SDL_LockSurface(SDL_Surface *pDisplaySurface);
Description:
This function is used to lock a surface so you can directly access it. Once a surface is locked the update should be done quickly and the lock released.
19The actual memory layout may be different but the figure is meant to illustrate a point.
20From http://linuxdevcenter.com/pub/a/linux/2003/08/07/sdl_anim.html?page=2
73
December 15, 2011 [LEARNING SDL – A BEGINNER’S GUIDE]
Function Name: SDL_UnlockSurface
Format:
int SDL_UnlockSurface(SDL_Surface *pDisplaySurface);
Description:
This function releases a previously locked surface.
ADVICE: Try to unlock a surface as soon as you possibly can.
MACRO Name: SDL_MUSTLOCK
Format:
int SDL_MUSTLOCK(SDL_Surface *pDisplaySurface)
Description:
If the macro returns 0 then you can draw without having to lock and unlock the surface. You should not make operating system or library calls between lock and unlock of a surface. Example Usage:
if (SDL_MUSTLOCK(pDisplaySurface)) {
int retValue = SDL_LockSurface(pDisplaySurface); if (retValue == -1) {
cerr << “Could not lock surface. “ << SDL_GetError() << endl; exit(1);
}
}
// . . . update screen pixel code here if (SDL_MUSTLOCK(pDisplaySurface)) {
SDL_UnlockSurface(pDisplaySurface);
}
// . . . rest of program
Let‘s review what we have learned. We wanted to understand what it would take to set a pixel‘s color on the screen. We needed four things:
The pixel location on the screen
o The x location, which in our case will be a value from 0..SCREEN_WIDTH-1 o The y location, which in our case will be a value from 0..SCREEN_HEIGHT-1
The color – we can use SDL_Color and convert into a color for the display The video display surface
74
December 15, 2011 [LEARNING SDL – A BEGINNER’S GUIDE]
We will create a function drawPixel with the following signature:
void drawPixel (SDL_Surface* pDisplaySurface, int x, int y, SDL_Color color);
We will create a program to test the function. The program will do the following;
Loop
Generate random x, y location on the screen
Generate a random color
Invoke colorPixel
Until User closes the Window
LAB #4: Program 2_4 – Plot Pixels
Create a new project named Program2_4 using the template Simple SDL Project template. Enter the following lines into the main.cpp
Table 11 - PROGRAM2_4
#include <cstdlib> #include <iostream> #include <time.h> #include "SDL\sdl.h"
using namespace std;
//screen dimensions const int SCREEN_WIDTH=640; const int SCREEN_HEIGHT=480;
//COLOR RANGE
const int MAX_COLOR_VALUE = 255; // Function prototypes
void drawPixel (SDL_Surface *surface, int x, int y, SDL_Color color);
//display surface
SDL_Surface* pDisplaySurface = NULL;
//event structure SDL_Event event;
int main(int argc, char *argv[])
{
//initialize SDL
if (SDL_Init(SDL_INIT_VIDEO)==-1) {
|
cerr |
<< |
"Could not initialize SDL!" |
<< |
endl; |
|
exit(1); |
|
|
|
|
} else |
|
{ |
|
|
|
|
cout |
<< |
"SDL initialized properly!" |
<< |
endl; |
}
//create windowed environment pDisplaySurface =
SDL_SetVideoMode(SCREEN_WIDTH,SCREEN_HEIGHT,0,SDL_ANYFORMAT);
75

December 15, 2011 [LEARNING SDL – A BEGINNER’S GUIDE]
// set caption
SDL_WM_SetCaption("Plot Pixels", NULL); //error check
if (pDisplaySurface == NULL) { //report error
cerr << "Could not set up display surface!" << endl; //exit the program
exit(1);
}
// seed the random number generator srand ( time(NULL) );
//repeat forever for(;;) {
//wait for an event if(SDL_PollEvent(&event)==0) {
//generate random a screen position int x = rand() % SCREEN_WIDTH;
int y = rand() % SCREEN_HEIGHT;
//generate a random screen color SDL_Color color;
color.r = rand() % MAX_COLOR_VALUE; color.g = rand() % MAX_COLOR_VALUE; color.b = rand() % MAX_COLOR_VALUE; drawPixel (pDisplaySurface, x, y, color);
//update the screen SDL_UpdateRect(pDisplaySurface,0,0,0,0);
} else {
//event occurred, check for quit if(event.type==SDL_QUIT) break;
}
}
SDL_FreeSurface(pDisplaySurface); SDL_Quit();
//normal termination
cout << "Terminating normally." << endl; return EXIT_SUCCESS;
}
void drawPixel (SDL_Surface *surface, int x, int y, SDL_Color color) { // map color to screen color
Uint32 screenColor = SDL_MapRGB(surface->format, color.r, color.g, color.b);
// Calculate location of pixel
char *pPixelAddress = (char *)surface->pixels
+x * surface->format->BytesPerPixel
+y *surface->pitch ;
//check and the lock the surface
if (SDL_MUSTLOCK(surface)) {
int retValue = SDL_LockSurface(surface); if (retValue == -1) {
cerr << "Count not lock surface. " << SDL_GetError() << endl;
exit(1);
}
76
December 15, 2011 [LEARNING SDL – A BEGINNER’S GUIDE]
}
// copy directly to memory
memcpy(pPixelAddress, &screenColor, surface->format->BytesPerPixel);
if (SDL_MUSTLOCK(surface)) { SDL_UnlockSurface(surface);
}
}
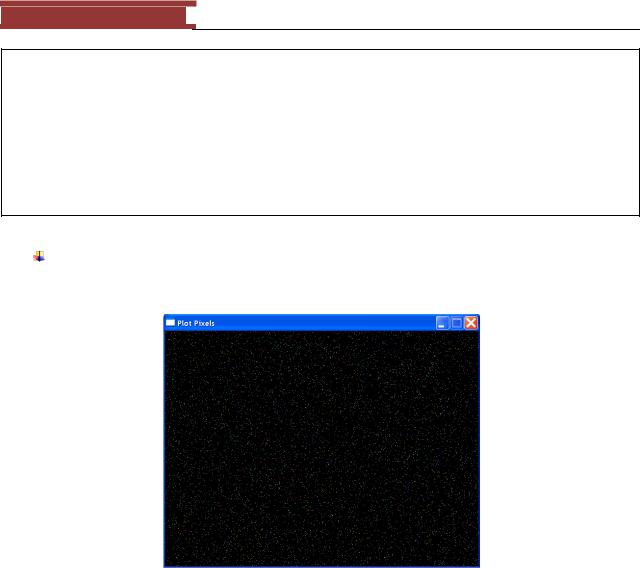
Compile and execute the program. You should see a nice star field appear as shown below.
Figure 70 - Plot Pixels screen
The program uses the SDL function SDL_UpdateRect.
Function Name: SDL_UpdateRect
Format:
void SDL_UpdateRest(SDL_Surface *pDisplaySurface, Sint32 x, Sint32 y, Sint32 w, Sint32
h);
Description:
This function updates the area on the screen specified by the rectangular specified by the arguments x, y, w and h. If these values are set to 0 then the entire display screen is updated. We use this function to update the screen after we have made changes.
77

December 15, 2011 [LEARNING SDL – A BEGINNER’S GUIDE]
Another function used by the program is SDL_WM_SetCaption.
Function Name: SDL_WM_SetCaption
Format:
void SDL_SetCaption(const char *title, const char *icon);
Description:
This function is used to set the windows title (e.g. ―Plot Pixels‖) and icon name. I usually just use:
SDL_WM_SetCaption("Plot Pixels", NULL);
The NULL value just uses the default windows icon. If you wanted to set your own icon you can use:
Drawing a Line
In this section I will challenge you a bit by taking all the information we have discussed and implement a function not available in SDL – drawLine. The signature of the new function will be:
void drawLine(SDL_Surface *surface, int x0, int y0, int x1, int y1, SDL_Color color);
The new function will have six input parameters:
A pointer to an SDL_Surface representing the video display
The x location x0 of one point of the line
The y location y0 if one point of the line
The x location x1 of the other point of the line
The y location y1 of the other point of the line
The SDL_Color of the line
The function will draw a line from (x0,y0) to (x1, y1) using SDL_Color on the video display.
We will be examining several algorithms for drawing a line. I will provide everything but the actual function you will implement the function and test to see it matches my screen display.
A Little History on Drawing Lines21
21 This section uses the following web site: http://www.cs.unc.edu/~mcmillan/comp136/Lecture6/Lines.html.
78
December 15, 2011 [LEARNING SDL – A BEGINNER’S GUIDE]
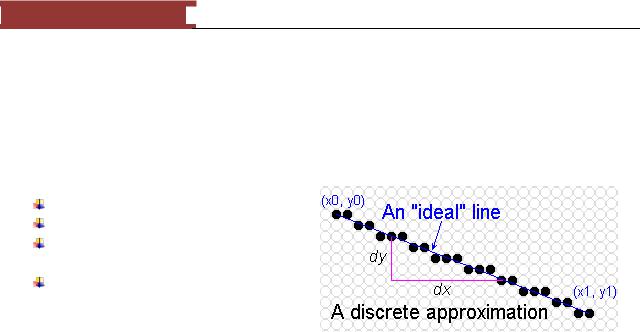
The invention of raster displays where the image is depicted using a grid of pixels (Figure 66) led to the search of good algorithms for drawing lines and polygons. The work done by researchers investigating the same issues for digital plotters was used to come up with fairly decent line plotting algorithms for monitors and printers. Jack Bresenham, an IBM researcher came up with the most popular algorithm used today. Because of the nature of a raster display we can expect to come up with an approximation to a line. The quest to find an algorithm to display a line on a raster display should meet the following criteria:
Continuous appearance
Uniform thickness and brightness
Are the pixels nearest the ideal line turned on
How fast is the line generated
A Simple Algorithm – Slope-Intercept Algorithm
The first algorithm we will investigate comes from our notion of ―a line‖ that we learned in algebra. A line was described b the function:
y = mx + b
where m is the slope and b is the y-intercept. In our program we will have the two endpoints of a line (x0, y0) and (x1, and y1). You may recall that given two points of a line that you can compute the slope as:
x1 – x0
m = ----------------
y1 – y0
The pseudo-code of the algorithm to plot a line is the following:
Given: Two points (x0, y0) and (x1, y1) and a color. We will first plot (x0,y0) and then compute the next raster point to plot computing m and b for the line given the initial two points. The main part of the algorithm adds 1 (or -1 depending if x1 is the left or right of x0) to x0 and determines the corresponding y value using the formula y = mx+b. This continues until x0 gets to x1.
int dx = x1 – x0; |
|
int dy = y1y0; |
|
drawPixel(surface, x0, y0, color); |
// plot the first point |
if (dx != 0) { |
|
float m = (float) dy / (float) dx; |
// calculate the slope |
float b = y0 – m * x0; |
// compute the y-intercept |
dx = (x1 > x0) ? 1 : -1; |
|
while ( x0 != x1 ) { |
|
x0 += dx; |
// next x value |
y0 = round(m*x0 + b); |
// corresponding y value |
|
79 |

December 15, 2011 [LEARNING SDL – A BEGINNER’S GUIDE]
drawPixel(surface, x0, y0, color);
}
}
Let‘s test it out. I have supplied the program and will leave it to you to implement the function drawLine.
LAB #5: Program 2_5 – Slope-Intercept Algorithm
Create a new project named Program2_5 using the template Simple SDL Project template. Enter the following lines into the main.cpp
Table 12 - PROGRAM2_5
#include <cstdlib> #include <iostream> #include <math.h> #include "SDL\sdl.h"
using namespace std;
// Function prototypes
void drawPixel(SDL_Surface *surface, int x, int y, SDL_Color color);
void drawLine(SDL_Surface *surface, int x0, int y0, int x1, int y1, SDL_Color color);
// screen dimensions const int SCREEN_WIDTH=640; const int SCREEN_HEIGHT=480;
//display surface
SDL_Surface* pDisplaySurface = NULL;
//event structure
SDL_Event event; |
|
// colors |
|
SDL_Color COLOR_BLACK = |
{ 0, 0, 0 }; |
SDL_Color COLOR_WHITE = |
{ 255, 255, 255 }; |
int main(int argc, char |
*argv[]) |
{ |
|
//initialize SDL
if (SDL_Init(SDL_INIT_VIDEO)==-1) {
|
cerr |
<< |
"Could not initialize SDL!" |
<< |
SDL_GetError() << endl; |
|
exit(1); |
|
|
|
|
} else |
|
{ |
|
|
|
|
cout |
<< |
"SDL initialized properly!" |
<< |
endl; |
}
//create windowed environment pDisplaySurface =
SDL_SetVideoMode(SCREEN_WIDTH,SCREEN_HEIGHT,0,SDL_ANYFORMAT);
//error check
if (pDisplaySurface == NULL) { //report error
cerr << "Could not set up display surface!" << SDL_GetError()
80