

ProtegeOWLTutorial
.pdfFigure 4.38: The Conditions Widget displaying the description for SohoPizza
Having created these pizzas we now need to make them disjoint from one another:
Exercise 23: Make subclasses of NamedPizza disjoint from each other
1.Select the class MargheritaPizza in the class hierarchy on the ‘OWLClasses’ tab.
2.Press the ‘Add all siblings’ button on the ‘Disjoints widget’ to make the pizzas disjoint from each other.
4.9Using A Reasoner
4.9.1Determining the OWL Sub-Language
As mentioned in section 3.1, OWL comes in three flavours (or sub-languages): OWL-Lite, OWL-DL (DL stands for Description Logics) and OWL-Full. The exact definitions of these sub-languages can be found in the OWL Overview, which is available on the World Wide Web Consortium website9. Prot´eg´-OWL features a species validation facility, which is able to determine the sub-language of the ontology being edited. To use the species validation facility, use the ‘Determine/Convert OWL Sub-language...’ option on the ‘OWL menu’ shown in Figure 4.39. This will report the sub-language of the ontology.
One of the key features of ontologies that are described using OWL-DL is that they can be processed by a reasoner. One of the main services o ered by a reasoner is to test whether or not one class is a subclass of another class10. By performing such tests on all of the classes in an ontology it is possible for a reasoner to compute the inferred ontology class hierarchy. Another standard service that is o ered by reasoners is consistency checking. Based on the description (conditions) of a class the reasoner can check whether or not it is possible for the class to have any instances. A class is deemed to be inconsistent if it cannot possibly have any instances.
9http://www.w3.org/TR/owl-features/
10Known as subsumption testing — the descriptions of the classes (conditions) are used to determine if a superclass/subclass relationship exists between them.
50
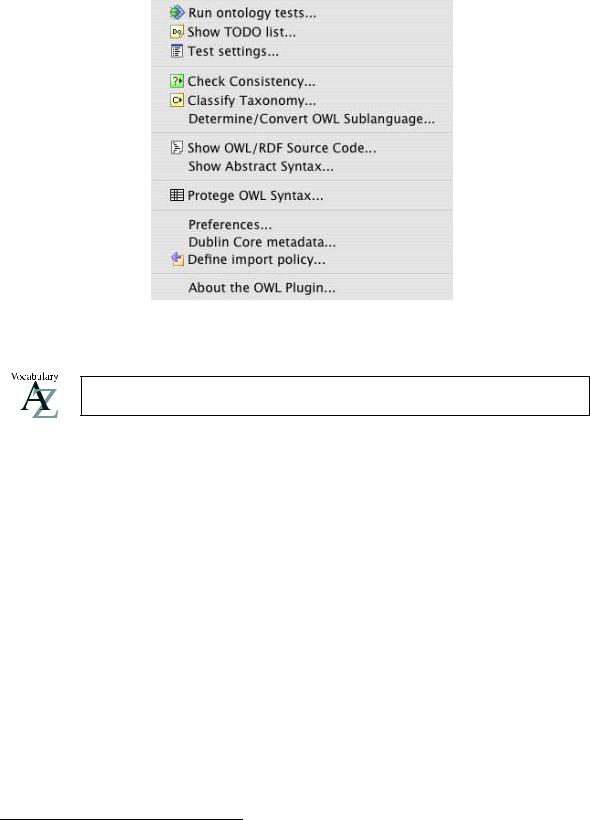
Figure 4.39: The OWL Menu
Reasoners are also known as classifiers.
4.9.2Using RACER
In order to reason over the ontologies in Prot´eg´-OWL a DIG11 compliant reasoner must be installed/configured and started. In this tutorial we use a reasoner called RACER, which is available for a variety of platforms from http://www.sts.tu-harburg.de/~r.f.moeller/racer/. RACER comes with a detailed manual that contains installation and setup instructions. When you have installed RACER on your system, it should be started with the default settings — RACER is typically started by double clicking on the RACER application icon, which opens a terminal/console window and starts the reasoner running with HTTP communication enabled.12 — Figure 4.40 shows a pruned version of the information that is displayed when RACER starts; The second from the bottom line indicates that HTTP communication is running, and specifies the I.P. address and port number. If for any reason RACER needs to be started on
a di erent port (or computer), Prot´eg´-OWL can be configured via the OWL preferences dialog shown in Figure 4.41, which is accessible via the ‘Preferences...’ item on the OWL menu.
4.9.3Invoking The Reasoner
Having started RACER, or another reasoner, the ontology can be ‘sent to the reasoner’ to automatically compute the classification hierarchy, and also to check the logical consistency of the ontology. In Prot´eg´- OWL the ‘manually constructed’ class hierarchy is called the asserted hierarchy. The class hierarchy
11DIG = Description Logic Implementers Group — A DIG compliant reasoner provides the means to communicate via the DIG interface, which is a standard interface/protocol for talking to description logic reasoners.
12By default racer runs with the HTTP service enabled on port 8080.
51

;;;RACER Version 1.7.12
;;;RACER: Reasoner for Aboxes and Concept Expressions Renamed
;;;Supported description logic: ALCQHIr+(D)-
;;;Copyright (C) 1998-2003, Volker Haarslev and Ralf Moeller.
;;;RACER comes with ABSOLUTELY NO WARRANTY; use at your own risk.
;;;Commercial use is prohibited; contact the authors for licensing.
;;;RACER is running on Mac OS Darwin computer as node Unknown
[2004-04-16 10:22:47] HTTP service enabled for: http://130.88.195.45:8080/ [2004-04-16 10:22:47] TCP service enabled on port 8088
Figure 4.40: RACER Startup Screen
Figure 4.41: The OWL Preferences Dialog
52
Show TODO list
Show Protege-OWL Syntax
Classify taxonomy
Display English Prose Tooltips
Check consistency
View RDF/XML source
Run ontology tests
Figure 4.42: The OWL Toolbar
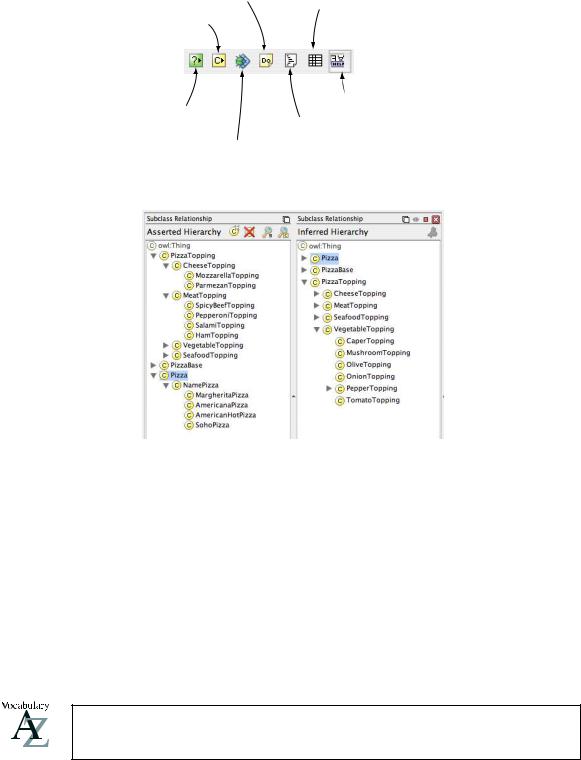
Figure 4.43: The Inferred Hierarchy Pane, which pops open next to the Asserted Hierarchy Pane when classification has taken place
that is automatically computed by the reasoner is called the inferred hierarchy. To automatically classify the ontology (and check for inconsistencies) the ‘Classify Taxonomy...’ action should be used. This can be invoked via the OWL menu (Figure 4.39), or by using the ‘Classify taxonomy’ button on the Prot´eg´-OWL toolbar shown in Figure 4.42. To check the consistency of the ontology, the ‘Check consistency...’ action should be used, which can be invoked from the OWL menu, or by using the ‘Check consistency’ button on the Prot´eg´-OWL toolbar. When the inferred hierarchy has been computer, an inferred hierarchy window will pop open next to the existing asserted hierarchy window as shown in Figure 4.43. If a class has been reclassified (i.e. if it’s superclasses have changed) then the class name will appear in a blue colour in the inferred hierarchy. If a class has been found to be inconsistent it’s icon will be circled in red.
The task of computing the inferred class hierarchy is also know as classifying the ontology.
53
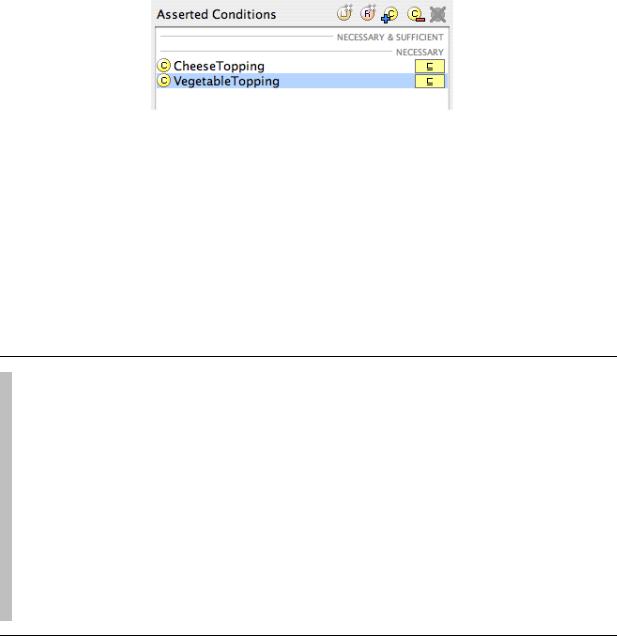
Figure 4.44: The Conditions Widget Displaying ProbeInconsistentTopping
4.9.4Inconsistent Classes
In order to demonstrate the use of the reasoner in detecting inconsistencies in the ontology we will create a class that is a subclass of both CheeseTopping and also MeatTopping. This strategy is often used as a check so that we can see that we have built our ontology correctly. Classes that are added in order to test the integrity of the ontology are sometimes known as Probe Classes.
Exercise 24: Add a Probe Class called ProbeInconsistentTopping which is a subclass of both
CheeseTopping and Vegetable
1.Select the class CheeseTopping from the class hierarchy on the OWLClasses tab.
2.Create a subclass of CheeseTopping named ProbeInconsistentTopping.
3.Add a comment to the ProbeInconsistentTopping class that is something along the lines of, “This class should be inconsistent when the ontology is classified.”. This will enable anyone who looks at our pizza ontology to see that we deliberately meant the class to be inconsistent.
4.Ensure that the ProbeInconsistentTopping class is selected in the class hierarchy, and then select the “NECESSARY” header in the ‘Conditions widget’.
5.Click on the ‘Add named class’ button on the ‘Conditions Widget’. This will display a dialog containing the class hierarchy from which a class may be selected. Select the class VegetableTopping and then press the OK button. The class VegetableTopping will be added as a necessary condition (as a superclass), so that the conditions widget should look like the picture in Figure 4.44.
54

Figure 4.45: The Class ProbeInconsistentTopping found to be inconsistent by the reasoner
If we study the class hierarchy, ProbeInconsistentTopping should appear as a subclass of CheeseTopping and as a subclass of VegetableTopping. This means that ProbeInconsistentTopping is a CheeseTopping and a VegetableTopping.
More formally, all individuals that are members of the class ProbeInconsistentTopping are also (necessarily) members of the class CheeseTopping and (necessarily) members of the class VegetableTopping. Intuitively this is incorrect since something can not simultaneously be both cheese and a vegetable!
Exercise 25: Classify the ontology to make sure ProbeInconsistentTopping is inconsistent
1. Press the ‘Classify Taxonomy’ button on the OWL toolbar to classify the ontology.
After a few seconds the inferred hierarchy will have been computed and the inferred hierarchy window will pop open (if it was previously closed). The hierarchy should resemble that shown in Figure 4.45 — notice that the class ProbeInconsistentTopping is circled in red, indicating that the reasoner has found this class to be inconsistent (i.e. it cannot possibly have any individuals as memebers).
55

Why did this happen? Intuitively we know something cannot at the same time be both cheese and a vegetable. Something should not be both an instance of CheeseTopping and an instance of VegetableTopping. However, it must be remembered that we have chosen the names for our classes. As far as the reasoner is concerned names have no meaning. The reasoner cannot determine that something is inconsistent based on names. The actual reason that ProbeInconsistentTopping has been detected to be inconsistent is because its superclasses VegetableTopping and CheeseTopping are disjoint from each other — remember that earlier on we specified that the four categories of topping were disjoint from each other using the Wizard. Therefore, individuals that are members of the class CheeseTopping cannot be members of the class VegetableTopping and vice-versa.
To close the inferred hierarchy use the small white cross on a red background button on the top right of the inferred hierarchy window.
Exercise 26: Remove the disjoint statement between CheeseTopping and VegetableTopping to see what happens
1.Select the class CheeseTopping using the class hierarchy.
2.The ‘Disjoints widget’ should contain CheeseTopping’s sibling classes: VegetableTopping, SeafoodTopping and MeatTopping. Select VegetableTopping in the Disjoints widget.
3.Press the ‘Remove selected class from list’ button on the Disjoints widget (shown in Figure 4.5) to remove the disjoint axiom that states CheeseTopping and MeatTopping are disjoint.
4.Press the ‘Classify Taxonomy’ button on the OWL toolbar to send the ontology to the reasoner. After a few seconds the ontology should have been classified and the results displayed.
56
It should be noticeable that ProbeInconsistentTopping is no longer inconsistent! This means that individuals which are members of the class ProbeInconsistentTopping are also members of the class CheeseTopping and VegetableTopping — something can be both cheese and a vegetable!
This clearly illustrates the importance of the careful use of disjoint axioms in OWL. OWL classes ‘overlap’ until they have been stated to be disjoint from each other. If certain classes are not disjoint from each other then unexpected results can arise. Accordingly, if certain classes have been incorrectly made disjoint from each other then this can also give rise to unexpected results.
Exercise 27: Fix the ontology by making CheeseTopping and Vegetable disjoint from each other
1.Select the class CheeseTopping using the class hierarchy.
2.The ‘Disjoints widget’ should contain MeatTopping and SeafoodTopping.
3.Press the ‘Add disjoint class’ button on the disjoint classes widget to display a dialog which classes may be picked from. Select the class VegetableTopping and press the OK button. CheeseTopping should once again be disjoint from VegetableTopping.
4.Test that the disjoint axiom has been added correctly — Press the ‘Classify Taxonomy’ button on the OWL toolbar to send the ontology to the reasoner. After a few seconds the ontology should have been classified, and ProbeInconsistentTopping should be highlighted in red indicating that it is once again inconsistent.
4.10Necessary And Su cient Conditions (Primitive and Defined Classes)
All of the classes that we have created so far have only used necessary conditions to describe them. Necessary conditions can be read as, “If something is a member of this class then it is necessary to fulfil these conditions”. With necessary conditions alone, we cannot say that, “If something fulfils these conditions then it must be a member of this class”.
A class that only has necessary conditions is known as a Primitive Class.
Let’s illustrate this with an example. We will create a subclass of Pizza called CheesyPizza, which will
57
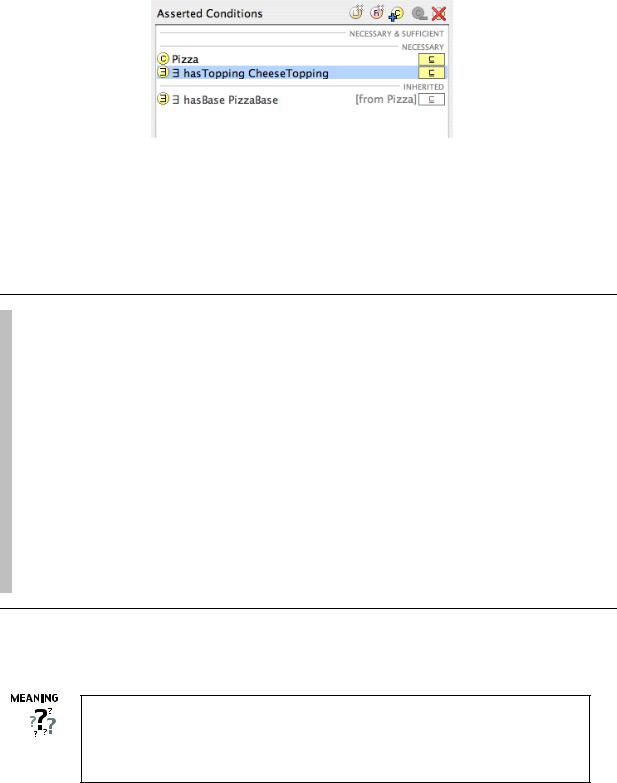
Figure 4.46: The Description of CheesyPizza (Using Necessary Conditions)
be a Pizza that has at least one kind of CheeseTopping.
Exercise 28: Create a subclass of Pizza called CheesyPizza and specify that it has at least one topping that is a kind of CheeseTopping
1.Select Pizza in the class hierarchy on the ‘OWLClasses’ tab.
2.Press the ‘Create subclass’ button to create a subclass of Pizza. Rename it to
CheesyPizza.
3.Make sure that CheesyPizza is selected in the class hierarchy. Select the “NECESSARY” header in the conditions widget. (You may have to select the ‘Asserted’ tab on the ‘Conditions Widget’ — the automatically shows the ‘Inferred’ tab after classification).
4.Press the ‘Create restriction’ button on the conditions widget to display the ‘Create restriction dialog’.
5.Select ‘ someValuesFrom’ as the type of restriction to be created.
6.Select hasTopping as the property to be restricted.
7.In the filler edit box type CheeseTopping (or use the ‘Insert class’ button to display a dialog from which CheeseTopping can be selected). Press ‘OK’ to close the dialog and create the restriction.
The ‘Conditions Widget’ should now look like the picture shown in Figure 4.46.
Our description of CheesyPizza states that if something is a member of the class CheesyPizza it is necessary for it to be a member of the class Pizza and it is necessary for it to have at least one topping that is a member of the class CheeseTopping.
Our current description of CheesyPizza says that if something is a CheesyPizza it is necessarily a Pizza and it is necessary for it to have at least one topping that is a kind of CheeseTopping. We have used necessary conditions to say this. Now consider some (random) individual. Suppose that we know that
58
this individual is a member of the class Pizza. We also know that this individual has at least one kind of CheeseTopping. However, given our current description of CheesyPizza this knowledge is not su cient to determine that the individual is a member of the class CheesyPizza. To make this possible we need to change the conditions for CheesyPizza from necessary conditions to necessary AND su cient conditions. This means that not only are the conditions necessary for membership of the class CheesyPizza, they are also su cient to determine that any (random) individual that satisfies them must be a member of the class CheesyPizza.
A class that has at least one set of necessary and su cient conditions is known as a Defined Class.
Classes that only have necessary conditions are also known as ‘partial’ classes. Classes that have at least one set of necessary and su cient conditions are also known as ‘complete’ classes.
In order to convert necessary conditions to necessary and su cient conditions, the conditions must be moved from under the“NECESSARY” header in the conditions widget to be under the“NECESSARY AND SUFFICIENT” header. This can be accomplished by dragging and dropping the conditions one- by-one.
Exercise 29: Convert the necessary conditions for CheesyPizza into necessary & sufficient conditions
1.Ensure that CheesyPizza is selected in the class hierarchy.
2.On the ‘Conditions Widget’ select the hasTopping CheeseTopping restriction.
3.Drag the hasTopping CheeseTopping restriction from under the “NECESSARY” header to on top of the “NECESSARY & SUFFICIENT” header.
4.Select the class Pizza.
5.Drag the class Pizza from under the “NECESSARY” header to on top of the hasTopping CheeseTopping restriction (note not on top of the “NECESSARY & SUFFICIENT” header this time).
The ‘Conditions Widget’ should now look like the picture shown in Figure 4.47.
59