

ProtegeOWLTutorial
.pdfFigure 4.6: Add Group Of Classes Wizard: Select class page
Figure 4.7: Add Group Of Classes Wizard: Enter classes page
OWL Classes are assumed to ‘overlap’. We therefore cannot assume that an individual is not a member of a particular class simply because it has not been asserted to be a member of that class. In order to ‘separate’ a group of classes we must make them disjoint from one another. This ensures that an individual which has been asserted to be a member of one of the classes in the group cannot be a member of any other classes in that group. In our above example Pizza, PizzaTopping and PizzaBase have been made disjoint from one another. This means that it is not possible for an individual to be a member of a combination of these classes – it would not make sense for an individual to be a Pizza and a
PizzaBase!
20

4.3Using The OWL Wizards To Create Classes
The OWL Wizards plugin, which is available from the Prot´eg´ web site, is an extensible set of Wizards that are designed to make carrying out common, repetitive and time consuming tasks easy. In this section we will use the ‘Create A Group Of Classes’ wizard to add some subclasses of the class PizzaBase. To use the OWL Wizards you must ensure that the OWL Wizards plugin in installed and configured in Prot´eg´ .
Exercise 5: Use the `Create Group Of Classes' Wizard to create ThinAndCrispy and DeepPan as subclasses of PizzaBase
1.Select the class PizzaBase in the class hierachy.
2.From the Wizards menu on the Prot´eg´ menu bar select the item ‘Create Group Of Classes’.
3.The Wizard shown in Figure 4.6 will appear. Since we preselected the PizzaBase class, the first radio button at the top of the Wizard should be prompting us to create the classes under the class PizzaBase. If we had not preselected PizzaBase before starting the Wizard, then the tree could be used to select the class.
4.Press the ‘Next’ button on the Wizard—The page shown in Figure 4.7 will be displayed. We now need to tell the Wizard the subclasses of PizzaBase that we want to create. In the large text area, type in the class name ThinAndCrispyBase (for a thin based pizza) and hit return. Also enter the class name DeepPanBase so that the page resembles that shown in Figure 4.7 .
5.Hit the ‘Next’ button on the Wizard. The Wizard checks that the names entered adhere to the naming styles that have previously been mentioned (No spaces etc.). It also checks for uniqueness – no two class names may be the same. If there are any errors in the class names, they will be be presented on this page, along with suggestions for corrections.
6.Hit the ‘Next’ button on the Wizard. Ensure the tick box ‘Make all new classes disjoint’ is ticked — instead of having to use the disjoint classes widget, the Wizard will automatically make the new classes disjoint for us.
7.Hit the ‘Next’ button to display the annotations page. Here we could add annotations if we wanted to. Most commonly annotations are used to record editorial information about the ontology – who created it, when it was created, when it was revised, etc. The basic OWL annotation properties are selectable by default. For now, we will not add any annotations, so just hit the ‘Finish’ button.
21

If we had imported the Dublin Core ontology (see section 7.2.5) then the Dublin Core annotation properties would have been available to annotate our classes in step 7 Exercise 5 . Dublin Core is a set of metadata elements that, in our case, can be used to annotate various elements of an ontology with information such as ‘creator’, ‘date’, ‘language’ etc. For more information see http://dublincore. org/a.
aAn ontology will be put into OWL-Full if the ontologies that are available on the Dublin Core website are imported. We recommend that an OWL-DL version of the Dublin Core ontology which is located in the Prot´eg´ ontology library is imported — details of this can be found in section 7.2.5
After the ‘Finish’ button has been pressed, the Wizard creates the classes, makes them disjoint, and selects them in the Prot´eg´ OWLClasses tab. The ontology should now have ThinAndCrispyBase and also DeepPanBase as subclasses of PizzaBase. These new classes should also be disjoint to each other. Hence, a pizza base cannot be both thin and crispy and deep pan. It isn’t di cult to see that if we had a lot of classes to add to the ontology, the Wizard would dramatically speed up the process of adding them.
On page two of the ‘Create group of classes wizard’ the classes to be created are entered. If we had a lot of classes to create that had the same prefix or su x we could use the options to auto prepend and auto append text to the class names that we entered.
Creating Some Pizza Toppings
Now that we have some basic classes, let’s create some pizza toppings. In order to be useful later on the toppings will be grouped into various categories — meat toppings, vegetable toppings, cheese toppings
22

and seafood toppings.
Exercise 6: Create some subclasses of PizzaTopping
1.Select the class PizzaTopping in the class hierarchy.
2.Use the OWL Wizards to add some subclasses of PizzaTopping called MeatTopping,
VegetableTopping, CheeseTopping and also SeafoodTopping. Make sure that these classes are disjoint to each other.
3.Next add some di erent kinds of meat topping. Select the class MeatTopping, and use the ‘Create Group Of Classes’ Wizard to add the following subclasses of MeatTopping: SpicyBeefTopping, PepperoniTopping, SalamiTopping, HamTopping. Once again, ensure that the classes are created as disjoint classes.
4.Add some di erent kinds of vegetable toppings by creating the following disjoint subclasses of VegetableTopping: TomatoTopping, OliveTopping, MushroomTopping, PepperTopping, OnionTopping and CaperTopping. Add further subclasses of PepperTopping: RedPepperTopping, GreenPepperTopping and JalapenoPepperTopping making sure that the subclasses of PepperTopping are disjoint
5.Now add some di erent kinds of cheese toppings. In the same manner as before, add the following subclasses of CheeseTopping, ensuring that the subclasses are disjoint to each other: MozzarellaTopping, and ParmezanTopping
6.Finally, add some subclasses of SeafoodTopping to represent di erent kinds of sea food: TunaTopping, AnchovyTopping and PrawnTopping.
The class hierarchy should now look similar to that shown in Figure 4.8 (the ordering of classes may be slightly di erent).
Up to this point, we have created some simple named classes, some of which are subclasses of other classes. The construction of the class hierarchy may have seemed rather intuitive so far. However, what does it actually mean to be a subclass of something in OWL? For example, what does it mean for VegetableTopping to be a subclass of PizzaTopping, or for TomatoTopping to be a subclass of VegetableTopping? In OWL subclass means necessary implication. In other words, if VegetableTopping is a subclass of PizzaTopping then ALL instances of VegetableTopping are instances of PizzaTopping, without exception — if something is a VegetableTopping then this implies that it is also a PizzaTopping as shown in Figure 4.9.a
aIt is for this reason that we seemingly pedantically named all of our toppings with the su x of ‘Topping’, for example, HamTopping. Despite the fact that class names themselves carry no formal semantics in OWL (and in other ontology languages), if we had named HamTopping Ham, then this could have implied to human eyes that anything that is a kind of ham is also a kind of
MeatTopping and also a PizzaTopping.
23

Figure 4.8: Class Hierarchy
24

PizzaTopping
TomatoTopping
VegetableTopping
Figure 4.9: The Meaning Of Subclass — All individuals that are members of the class TomatoTopping are members of the class VegetableTopping and members of the class PizzaTopping as we have stated that TomatoTopping is a subclass of VegetableTopping which is a subclass of PizzaTopping
4.4OWL Properties
OWL Properties represent relationships between two individuals. There are two main types of properties, Object properties and Datatype properties. Object properties link an individual to an individual. Datatype properties link an individual to an XML Schema Datatype value3 or an rdf literal 4. OWL also has a third type of property – Annotation properties5. Annotation properties can be used to add information (metadata — data about data) to classes, individuals and object/datatype properties. Figure 4.10 depicts an example of each type of property.
Properties may be created using the ‘Properties’ tab shown in Figure 4.11. It is also possible to create properties using the ‘Properties Widget’ shown in Figure 4.12 which is located on the ‘OWLClasses’ tab. Figure 4.13 shows the buttons located in the top left hand corner of the ‘Properties’ tab that are used for creating OWL properties. As can be seen from Figure 4.13, there are buttons for creating Datatype properties, Object properties and Annotation properties. Most properties created in this tutorial will be Object properties.
Exercise 7: Create an object property called hasIngredient
1.Switch to the ‘Propterties’ tab. Use the ‘Create Object Property’ button (see Figure 4.13 – second button on the left) to create a new Object property. An Object property with a generic name will be created.
2.Rename the property to hasIngredient as shown in Figure 4.14 (The ‘Property Name Widget’.
3See http://www.w3.org/TR/xmlschema-2/ for more information on XML Schema Datatypes
4RDF = Resource Description Framework. See http://www.w3.org/TR/rdf-primer/ for an excellent introduction to RDF.
5Object properties and Datatype properties may be marked as Annotation properties
25
|
Sist |
as |
|
h |
|
er
Matthew |
Gemma |
An object property linking the individual Matthew to the individual Gemma
|
|
Age |
|
as |
|
|
h |
|
Matthew |
|
“25”^^xsd:integer |
A datatype property linking the individual Matthew to the data literal ‘25’, which has a type of an xml:integer.
|
rea |
c:c |
|
d |
|
to
r
JetEngine |
‘‘Matthew Horridge’’ |
An annotation property, linking the class ‘JetEngine’ to the data literal (string) ‘’Matthew Horridge’’.
Figure 4.10: The Di erent types of OWL Properties
26
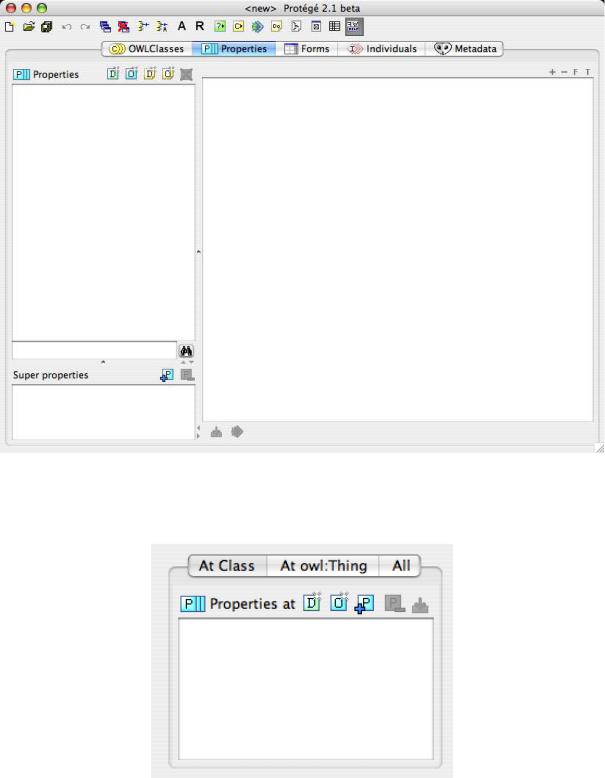
Figure 4.11: The PropertiesTab
Figure 4.12: The Properties Widget
27
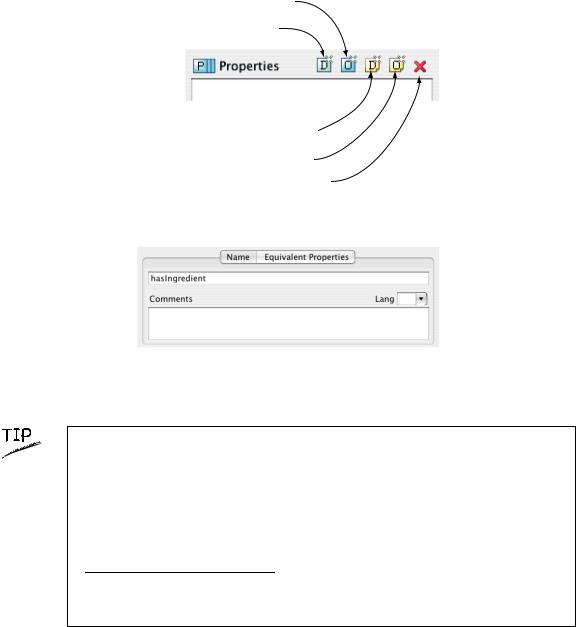
Create object property
Create datatype property
Create datatype annotation property
Create object annotation property
Delete selected property
Figure 4.13: Property Creation Buttons — located on the Properties Tab above the property list/tree
Figure 4.14: Property Name Widget
Although there is no strict naming convention for properties, we recommend that property names start with a lower case letter, have no spaces and have the remaining words capitalised. We also recommend that properties are prefixed with the word ‘has’, or the word ‘is’, for example hasPart, isPartOf, hasManufacturer, isProducerOf. Not only does this convention help make the intent of the property clearer to humans, it is also taken advantage of by the ‘English Prose Tooltip Generator’a, which uses this naming convention where possible to generate more human readable expressions for class descriptions.
aThe English Prose Tooltip Generator displays the description of classes etc. in a more natural form of English, making is easy to understand a class description. The tooltips pop up when the mouse pointer is made to hover over a class description in the user interface.
Having added the hasIngredient property, we will now add two more properties — hasTopping, and hasBase. In OWL, properties may have sub properties, so that it is possible to form hierarchies of properties. Sub properties specialise their super properties (in the same way that subclasses specialise their superclasses). For example, the property hasMother might specialise the more general property of hasParent. In the case of our pizza ontology the properties hasTopping and hasBase should be created as sub properties of hasIngredient. If the hasTopping property (or the hasBase property) links two
28

individuals this implies that the two individuals are related by the hasIngredient property.
Exercise 8: Create hasTopping and hasBase as sub-properties of hasIngredient
1.To create the hasTopping property as a sub property of the hasIngredient property, right click (or ctrl click on the Mac) on the hasIngredient property in the property hierarchy on the ‘Properties’ tab. The menu shown in Figure 4.15 will pop up.
2.Select the ‘Create subproperty’ item from the popup menu. A new object property will be created as a sub property of the hasIngredient property.
3.Rename the new property to hasTopping.
4.Repeat the above steps but name the property hasBase.
Figure 4.15: PropertyHierarchyMenu
Note that it is also possible to create sub properties of datatype properties. However, it is not possible to mix and match object properties and datatype properties with regards to sub properties. For example, it is not possible to create an object property that is the sub property of a datatype property and vice-versa.
4.5Inverse Properties
Each object property may have a corresponding inverse property. If some property links individual a to individual b then its inverse property will link individual b to individual a. For example, Figure 4.16 shows the property hasParent and its inverse property hasChild — if Matthew hasParent Jean, then because of the inverse property we can infer that Jean hasChild Matthew.
Inverse properties can be created/specified using the inverse property widget shown in Figure 4.17. For
29