Regroups
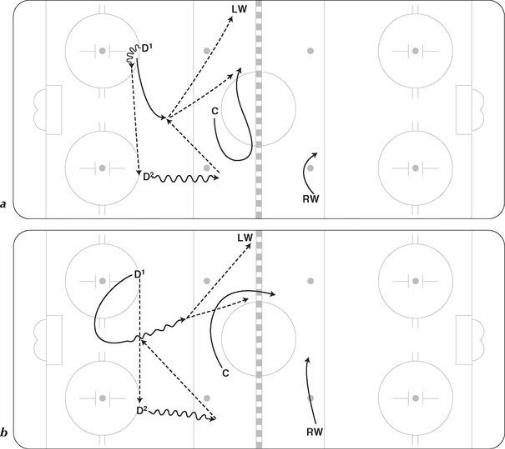
If the opponents are already set up and in position to forecheck in the neutral zone, then regroups are a more effective way to break through this area and enter the offensive zone. Most teams will have a set forecheck in the neutral zone to try to prevent teams from successfully regrouping. It is important to know before you play a team which forecheck they are using—this will help identify what regroup options are available. The coach must decide for all regroups what patterns the forwards should run, so they are consistent. This will help the defense identify where potential passing options may exist because the forwards are available in consistent areas. The two regroup patterns we will discuss are lane regroups and motion regroups. Both regroups are effective against all types of forechecking pressure. The difference in the two is whether the center stays in the middle or does he have the freedom to swing wide and exchange with the wingers (figure 2.11a).
Figure 2.11 (a) Center exchanging with the winger; (b) Center supporting both sides (low/high).
Lane Regroups
For the following regroups, the strong-side forward supports the boards while the back-side forward stretches. The center supports both sides, either low or high (figure 2.11b). The sequence of options for defensemen in the neutral zone depends on how the opponents forecheck. Do they forecheck with two forwards in a 2-1-2 system or with one forward in a 1-2-2 or 1-3-1 setup? If they forecheck with one forward, does he take away the D-to-D pass, or does he take away the flat pass to the wide forward? Teams that take away the D- to-D pass eliminate the hinge play, while teams that take away the cross-ice pass give up the hinge play. These are important reads that help the defensemen choose which of the following options to use.
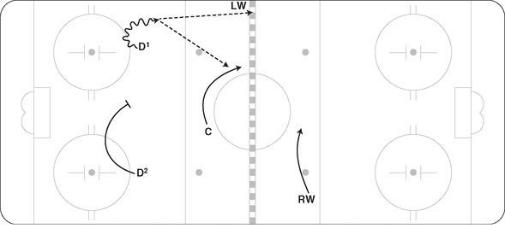
■ QUICK UP
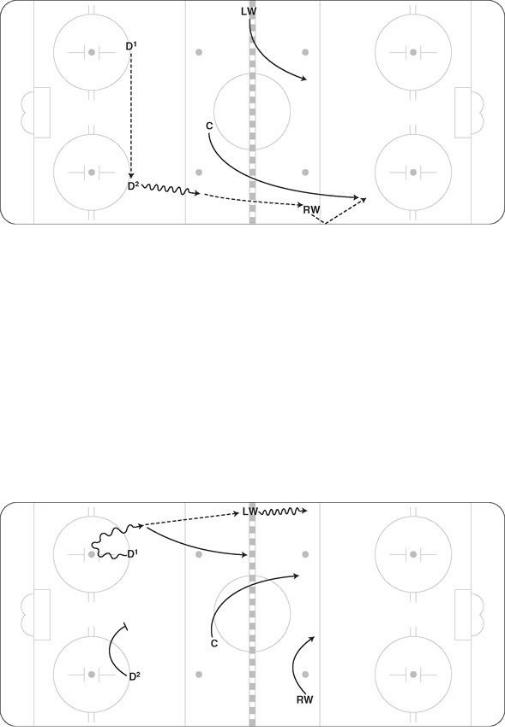
In this situation, D1 gets the puck just inside the blue line and turns it up quickly by passing to LW or C (figure 2.12). This should be the first option for all teams because speed in transition usually results in odd-man rushes, plus the quick-up play does not give the opposition time to set up a trap. RW stretches on the wide side and then supports across the ice when the pass is made.
Figure 2.12
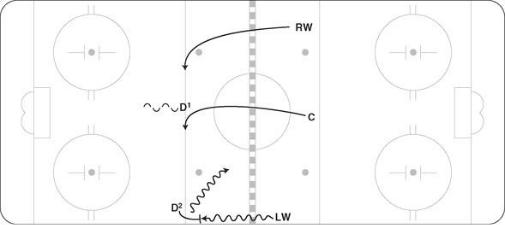
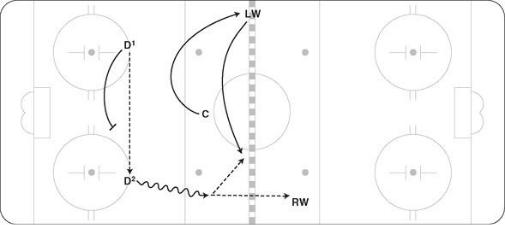
■ D-TO-D STRETCH
When D1 gets the puck and the strong-side options are taken away, then he should immediately pass the puck to his partner (figure 2.13). Once the pass is made, D1 should sink back to mid-ice to protect his partner in case of a turnover and also to provide an option for D2. D2 passes up to RW, who is in a stretch position by the far blue line, or to C in mid-ice. Once the pass is made the LW moves to support.
Figure 2.13
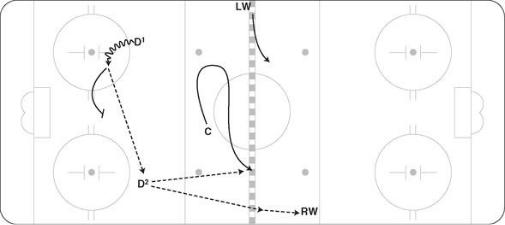
■ D-TO-D FLAT PASS
D1 passes to D2, and now the opposition takes away his options to RW and C. D2 passes across to LW, who sinks low into the open seam (figure 2.14). This option is usually available when the opponents forecheck in a 1-2-2 format and lock the center leaving the back side open. When D2 initially gets the pass from D1 he should move up ice and look to make a play up the boards or to the center. This deception will open up the wide side to LW. The pass must be made flat across the ice because a diagonal pass might be intercepted.
Figure 2.14

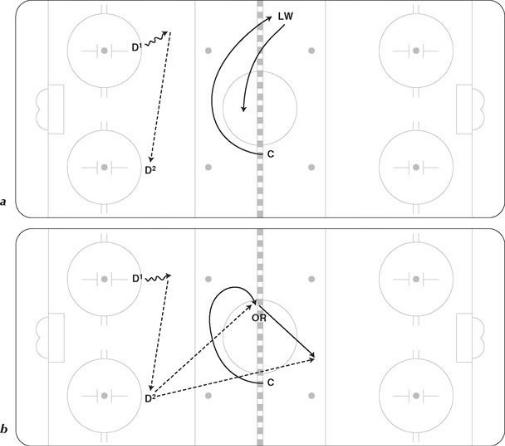
■ HINGE PLAY
D1 passes to D2 and then slides back to mid-ice to support his partner (figure 2.15a). D2 moves up ice and looks to make a pass. With no option available, he passes back to D1, who is behind and in mid-ice. D1 then moves the puck quickly to LW as the primary option or to C. Initially when D1 moves the puck to D2, he has the option to drop back deeper and perform a skating hinge—this is where the supporting defenseman moves back in behind the play and prepares to jump into the hinge pass with speed, catching the opponent off guard. Using the skating hinge also gives this defenseman room to accelerate, time to read the play, and the ability to draw in a checker and move the puck to the best option (figure 2.15b).
Figure 2.15
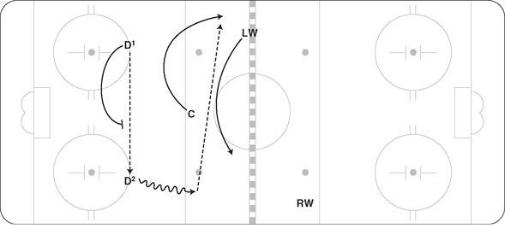
■ CENTER STRETCH
When a D1-to-D2 pass is made in the neutral zone, C should support low, but once the puck is passed back to D1 or LW, C should have the option of returning low or moving into the high mid-ice stretch area (figure 2.16) for a potential breakaway pass. If teams check center on center in the neutral zone, this is an effective way to lose your check and split the opponent’s defense.
Figure 2.16

■ CHIP BEHIND PRESSURE
Because most teams use tight-checking systems, there isn’t a lot of room in the neutral zone. When a pass is made to a teammate in this area, it is important that the receiver have quick and close support. If the pass receiver is confronted, he will now have the option of chipping the puck into the space behind the checker. The support player can anticipate this and get to the puck first. This is very effective if the pass is confronted by the opposing defenseman stepping up to make a hit. In most cases, the center should be the player who is ready to support the chip (figure 2.17).
Figure 2.17
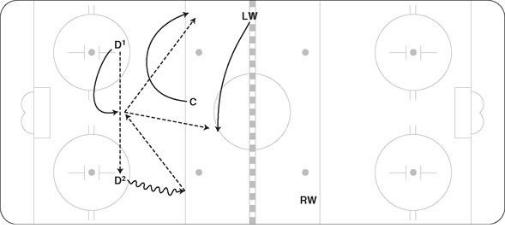
■ DEFENSE SUPPORTING MID-ICE
When a pass is made by a defenseman to a forward in the neutral zone, the passing D should be ready to move up through mid-ice and support the attack (figure 2.18). As the partner of D1, D2 must remain in a strong center-ice position behind the attack. D1 must again read the quality of puck possession to determine how far to move up and how quickly.
Figure 2.18
Motion Regroups
The difference with motion regroups is that the center now has the ability to exchange positions with the wingers. Once again, the sequence of options for defensemen in the neutral zone depends on how the opponents forecheck. The advantage of using motion regroups is that the players have more speed when getting the pass and often catch the opposition flat footed. The disadvantage is that the positioning of the forwards is not as predictable and as a result the defensemen can’t always anticipate where they will be. At times the forwards are so focused on moving and building up speed that they lose eye contact with the passer. The forwards must remember to keep their eyes on the puck. With motion regroups, the center always changes lanes with one of the wingers, and then that winger moves into center ice. If the player in the middle moves to support a pass and it is not made, an exchange occurs with the winger on that side (figure 2.19a). The player in the center may also swing away to build up speed on the wide side (figure 2.19b).
With motion regroups, if teams check center on center in the neutral zone, having the center move into an outside lane often results in coverage confusion.
Figure 2.19 (a) Strong-side motion regroup and (b) the wide-side motion regroup.
Using the same options presented for lane regroups, we now look at how the passing options change with the center leaving the mid-ice lane.
■ QUICK UP
In this situation, D1 gets the puck just inside the blue line and turns it up quickly by passing to LW or RW, who has moved off the wide boards as C swings to that side (figure 2.20). The exchange between the center and RW must be made quickly in order to provide immediate support for D1.
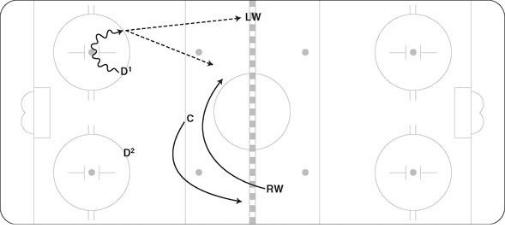
Figure 2.20
■ D-TO-D STRETCH
When D1 gets the puck and the strong-side options are taken away, he then passes to his partner (figure 2.21). C once again swings away to the wide side. Once the pass is made, D1 should sink back to mid-ice to protect his partner in case of a turnover and also to provide an option for D2. D2 passes up to RW or to LW who has moved off the boards and is available in the middle of the ice.
Figure 2.21
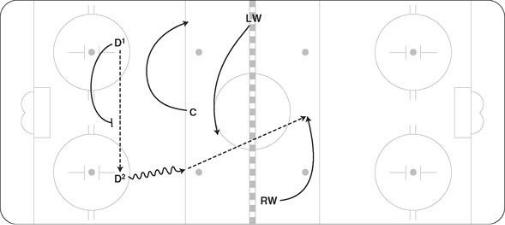
■ D-TO-D FLAT PASS
D1 passes to D2, and now because of how the opponents are forechecking, the main option is to make a flat pass to C with speed in the wide lane (figure 2.22). This is one of the more effective options in the motion regroup sequence because the center tends to build up a lot of speed in the wide lane and can often enter the zone easily. This option is usually available when the opponents forecheck in a 1-2-2 formation and lock the center of the ice, leaving the back side open.
Figure 2.22
■ HINGE PLAY
D1 passes to D2 and then slides back to mid-ice to support his partner. D2 moves up ice and looks to make a pass. With no option available, he passes back to D1, who is behind and in midice. D1 then moves the puck quickly to C, who once again has a lot of speed built up in the outside lane (figure 2.23). LW may also be available in the middle of the ice. D1 may perform a skating hinge and accelerate up the middle of the ice while looking for options.
Figure 2.23
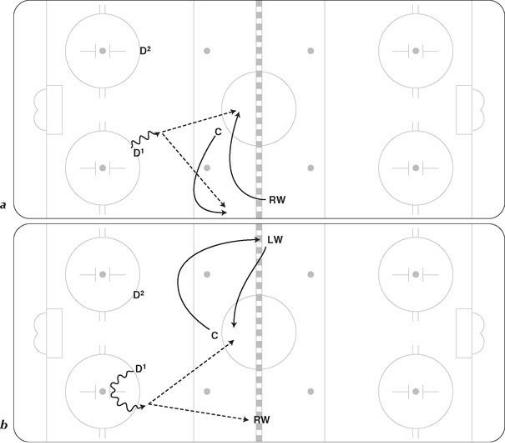
■ STRETCH PASS
When a D1-to-D2 pass is made in the neutral zone, C exchanges with the wing, and now RW has the option of moving out higher in behind the opposing defense (figure 2.24). Because the center swings lower, this provides the defense with an alternative safer option if the stretch play is not there. The RW must time it to hit the open space behind the opposition defense when D2 is ready to pass.
Figure 2.24

Chapter 3
Offensive Zone Entries
In this chapter, we deal with plays entering the offensive zone. Whether the rush starts from a successful breakout in the defensive zone or results from a counter or regroup in the neutral zone, offensive zone entry is a key strategy for generating successful scoring chances.
Entering the offensive zone in control of the puck is every player’s goal. Not turning the puck over when entering the offensive zone is every coach’s goal. Let’s face it. We play this
game to battle for and enjoy possession of the puck. Puck possession needs to be a key underlying philosophy, not only for playing hockey at a high level but also for its enjoyment.
Coaches universally get disappointed with players who needlessly lose possession of the puck in two areas. The first is the 7 or 8 feet (2.1 or 2.4 m) just outside the blue line, and the second is the 7 or 8 feet (2.1 or 2.4 m) just inside the blue line. Players turning over pucks in these two critical areas tend to hear about it. Why? When the puck is turned over here, the opposing team can counter quickly and create outnumbered attacks. This happens because the two forwards without the puck tend to be anticipating the puck going deep, and they are in that “flat” vulnerable position along the blue line with no speed (figure 3.1).
When playing five on five, a player with the puck wide entering the offensive zone must read the opponent’s pressure. If the gap between the player with the puck and the defender is large or adequate, obviously the attacking player keeps possession of the puck and enters the attacking zone. If the player with the puck senses pressure, then the cross-ice dump or chip are two tactics used to reduce this pressure and ensure a chance for puck possession deeper in the zone. Coaches should set up practice drills which incorporate this read. Drills which allow the puck carrier to react to varying gaps by the defender and also varying pressure; all help to make these decisions with the puck more automatic and successful in game action.
Figure 3.1 Turnover at the blue line.