
- •Foreword
- •Preface
- •Key to Diagrams
- •Reading Pressure and Options
- •Reacting to Support the Breakout
- •Breakout Plays
- •Control Breakouts
- •Counters
- •Regroups
- •Dump-In Entries
- •Mid-Ice Entries
- •Wide-Lane Drives
- •The Funnel
- •Two-on-One Attacks
- •Two-on-Two Attacks
- •Three-on-Two Attacks
- •Offsides
- •Activating Defense Into Offensive Zone Entries
- •Cycling
- •Playing Behind the Net
- •Stretching the Zone: Low-High Plays
- •Activating Defense in the Offensive Zone
- •Attack Zone Plays
- •Power-Play Breakouts
- •Gaining and Maintaining Possession off the Entry
- •Zone Setup
- •Five-on-Three Power Play
- •Four-on-Three Power Play
- •Forechecking Systems
- •Neutral Zone Forechecking
- •Neutral Zone Forechecking Systems
- •Neutral Zone Backchecking
- •Neutral Zone Backchecking Systems
- •Handling Defensive Zone Entries
- •Defensive Zone Systems
- •Situational Guidelines for Defensive Zone Coverag
- •Face-Offs and Penalty Kills
- •Forechecking and Penalty Kills
- •Pressuring the Entry
- •Defensive Zone Play
- •Three-on-Five Penalty Kill
- •Three-on-Four Penalty Kill
- •Offensive Zone Face-Offs
- •Neutral Zone Face-Offs
- •Defensive Zone Face-Offs
- •Power-Play Face-Offs
- •Penalty-Kill Face-Offs
- •Special Face-Off Situations
- •Managing Staff
- •Dealing With Officials
- •Adjusting Your Playing Strategy
- •Managing Lines
- •Line Changes
- •Handling the Moment
- •Index
- •About the Authors
Defensive Zone Systems
There are several systems a team could use in their defensive zone. Teams may choose between the 2-3 system, low zone collapse, half ice overload, or man on man coverage. The 2-3 system should be used against teams that have a balanced attack in the offensive zone while the low zone collapse works well against teams who have trouble generating chances from their defense but generate a lot of chances from below the circles. The half ice overload smothers the offensive team on one side of the ice but with teams who are good at changing the point of attack it is not as effective. The man-on-man system is based on pressure and sticking to your check. If one player loses their check then excellent scoring opportunities result. It is not our recommendation that coaches should change from system to system depending on the opponent. We believe it is important to pick one that is suitable for your level of play and teach it well.
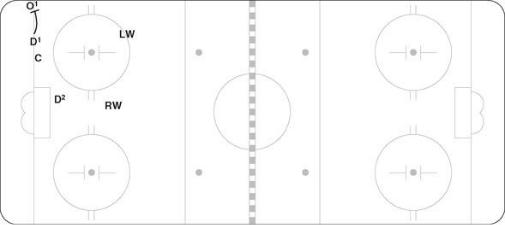
2-3 System
In this system, the two defensemen work with one forward (usually the center) to cover down low, while the wingers cover the slot and higher areas (figure 9.2). Listed here are the key areas of defensive zone coverage, including teaching points for coaches. This should form a basis for teaching your players how to play in your own zone without the puck. It can also be used as a framework for developing your defensive zone drills. While in the defensive zone, all players should have an “active stick,” meaning the stick is on the ice and it is moving. This takes away shooting lanes and leads to turnovers and transition opportunities.
Figure 9.2 In the 2-3 system the two defensmen work with one forward to cover down low, while the wingers cover the slot and higher areas.
Playing Low Three on Three
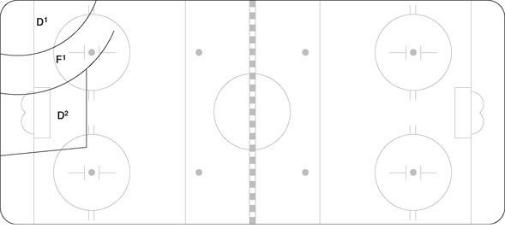
D1, F1, and D2 work together and play the three low zones (hit zone, support zone, and net zone). The first forward back assumes the position of F1 (figure 9.3). Most of the time you want your center in this position (assuming he is the better of the three forwards in defensive play), so an exchange may be made when appropriate.
Figure 9.3 Low zone positioning for D1, F1, and D2.
With the new interpretation of the rules at the NHL and amateur levels, body position means everything. Players are less able to create interference or hold up players, so early defensive positioning is critical.
Hit Zone
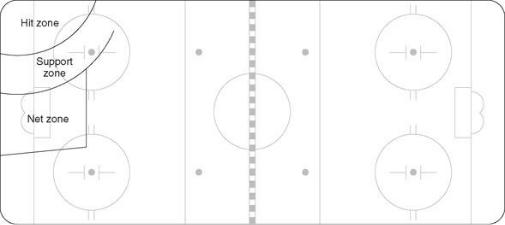
In this area, the first defensive player quickly closes on the puck carrier and makes contact with the opponent’s body (figure 9.4). Show patience if the puck carrier has clear possession before you can get there. If you see the opposing player’s number, then close quickly but be careful of hitting from behind; if you see the opposing player’s logo, then contain. By containing the defensive player holds his position briefly then cautiously goes at the puck carrier. Containing means keeping he puck carrier in a set space by holding inside position and not letting him get to the net.
Figure 9.4 The hit zone, support zone, and net zone.
Once the puck is moved or he loses possession, stay with your check (do not hook) until that player is no longer a passing option. Now release that player and move into one of the other zones. The desired goal is for all defending players to keep their positioning between the opposing players and the goal you are defending.
Support Zone
In this zone (figure 9.4), the defensive player is aware of both the puck carrier and the closest passing option. Make sure the puck carrier cannot walk to the net if the first player gets beaten or falls down, and be ready to take away the opponent’s closest passing option. Give yourself some space to react to the movement of players and the puck. At all times, try to stay above the goal line in support coverage. Because not many goals are scored by opposing teams from behind the goal line, your defensive positioning should not have you rushing into this area.
Net Zone
One player, usually a D, must always be in this zone (figure 9.4). Be aware of the third offensive player, and play halfway to any overload shooters (the offensive player on the half of the ice where the puck is). If there are any breakdowns, be patient and don’t leave this area unless replaced by a teammate. Keep your stick on the ice. Stay out of the blue crease area, allowing the goaltender to have free movement.
Strong-Side Top Zone
F2 holds inside position at the top of the slot (figure 9.5). F2 must be ready to slide out tighter to his point if the puck carrier has the ability to pass there or cover him tight if he comes into the slot. When players cycle up high out of the corner, F2 must hold the top
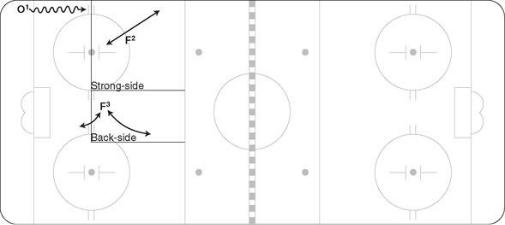
of the circle and deny inside access. Once a pass is made out to the point, F2 must approach the defenseman in the shooting lane so as to take away a direct shot on net.
Figure 9.5 F2 covers the strong-side top zone, while F3 covers the back-side slot.
Back-Side Slot Coverage
F3 slides down lower on the back side (figure 9.5). If the net D is caught out of position, F3 will protect the low slot. Be aware of the back-side point sliding in. If F3 loses sight of where the backside defenseman is then he will have an opportunity to move into a dangerous scoring area for a wide pass outside the vision of the goaltender. F3 must always have his head on a swivel.
Low Zone Collapse
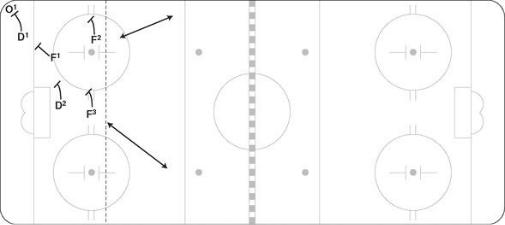
In this system, all five defensive players collapse in tight and basically play the opponent five on three low (figure 9.6). The theory is that you take away all plays to the slot by outnumbering the opponent and clogging up the scoring area. Most NHL teams use this collapse around the net style of play when the puck is below the goal line or after a point shot. Once the puck is passed back to the defenseman, the wingers who have collapsed in tight now move out to block the shooting lane.
Figure 9.6 The low zone collapse coverage areas.
Playing Low Five on Three
D1, F1, and D2 work together and play the three low zones (hit
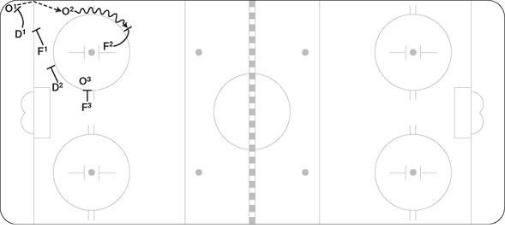
zone, support zone, and net zone; figure 9.7). The first forward back assumes the position of F1. Most of the time you want your center in this position, so an exchange may be made when appropriate. The other two forwards sink in tight as well. The adjustment from the 2-3 system is that D2 can now move to the strong-side post F3 plays close to the net, covering the low slot while F2 (who is also collapsed below the dots) tries to deny passes back to the point.
Figure 9.7 Low five on three coverage.
High Zone Coverage
When the offensive team moves the puck back to the point, F2 expands out in the shooting lane (figure 9.8). F2 should move quickly but be under control when the defenseman is ready to shoot. Get into the shooting lane when you anticipate a shot. At
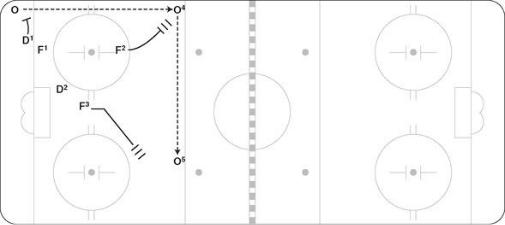
times it will be necessary to slide and block the shot. F3 holds the slot by moving out slightly and then when the opponent passes the puck D-D, F3 will move out in the shooting lane and F2 will rebound back to the low slot.
Figure 9.8 High zone coverage.
Half-Ice Overload
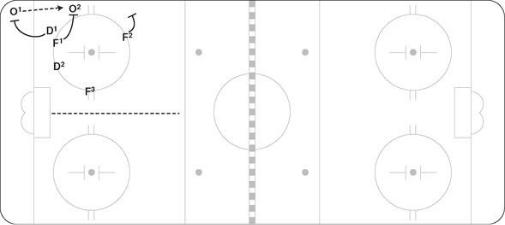
In this system, the defensive group basically splits the rink in half, trying to squeeze the offensive team to one half of the ice (figure 9.9). Plays to the back side are given up but made difficult because of the number of bodies in the way and how tough it is to make the long cross ice pass. D1, F1, and D2 take care of the strong-side corner and at times will be playing the opponent three on two in that area. These three defensive players squeeze the offensive space the opponents have to work in, and once the puck is recovered, they either quickly move it up the strong side or escape out the wide side.
Figure 9.9 In the half-ice overload, the defensive team splits the rink in half.
If the defensive team has three players down in the corner, then the most important player off the puck is F3, who covers the slot but also shading to the strong side. F3 must be aware of the
opponent’s third forward and cover anyone who comes to the front of the net while at the same time be looking to see if the opposing back-side defenseman is moving into the scoring area. The opposition will try to sneak a defenseman down the back side, so F3 has to be aware and alert. F2 takes away the strong-side defenseman by playing much closer to the boards, therefore denying a pass out to the strong-side point. F2 needs to start inside the circle and then move out to cut off players cycling up the boards and having an active stick to cut off passes to the point.
The advantage of this system is that it is very difficult for the offensive team to find room to move and make plays on the strong side. A lot of teams like to cycle and then attack the net, but with this system, space to cycle is all but eliminated. When offensive players play against teams that use the half-ice overload, they often complain that they have no time! The one disadvantage is that quick plays to the net may result in a two on one on F3 if the opposing defensemen drives to the front of the net, but this is a difficult pass to make.
Man-on-Man Coverage
This system relies on constant puck pressure and denying time and space to the opponent. D1 starts by pressuring the puck carrier and then, after a pass is made, sticks with that player as he tries to get open. The only place D1 won’t follow the player when he doesn’t have the puck is out to the blue line; D1 has tight coverage on any players in the slot. F1 now pressures the pass and once again if the puck is moved sticks to his man (figure 9.10). This continues with D2 in the low zone area while F2 and F3 have responsibility for the opposing defensemen. F2 and F3 cover the defensemen whether they move in through the slot or slide down the boards. There is no confusion with the man-on-man system with regard to who a player is covering, but if the opposition is fairly creative and incorporates lots of motion, then it becomes harder to stay with your check. The new rules preventing clutching and grabbing have made it harder to play a true man-on-man system, but it can be very effective if the defenders are good skaters because the offensive team has minimal time with the puck before being pressured, and players away from the puck have trouble finding space to get open for a return pass.
Figure 9.10 Man-on-man coverage.

