

Situational Guidelines for Defensive Zone Coverag
When covering active Ds, both F2 and F3 have a responsibility to cover their points if the opposing Ds move into scoring position. More and more teams are encouraging their defense to be active. If the defenseman they are covering moves into the slot, cover him tight. If the defenseman slides down the boards, there are two options. Either, cover tight, and move down the boards and into the corner with the D, or let D go and hold the inside position (figure 9.11). Once the opposing D is down low in the corner, he can be covered by your Ds or low forward. F2 or F3 can sink down and play inside but should not get dragged into covering a D in a non scoring area.
Figure 9.11 Covering active Ds.
Handling the Low Two on One Out of the Corner
Sometimes there is a breakdown, and the opponent attacks two on one versus the net defender (figure 9.12). Be patient and hold the net area. As the puck carrier advances, allow the goaltender to take one offensive player while holding the midnet position and defending the pass across.
Figure 9.12 Handling a two on one out of the corner.
Defending a Player Behind the Net
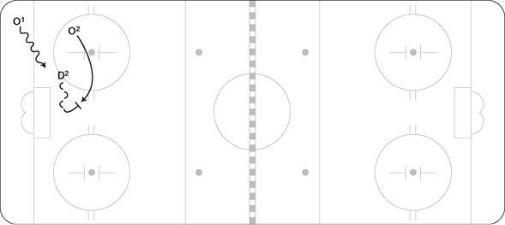
First, recognize that there is a player behind the net and intercept the pass. If it is an even situation, pressure the puck carrier right away. When pressuring try to force the puck carrier away from where he got the pass and also away from support. If the player is unsure or the opponent has the advantage, wait to pressure until all defending players get back to position. RD flushes (for right-shot opponent); C holds mid-ice, aware of the back door; LD holds the back post; and the high wingers sink in tight (figure 9.13). Once the flush has started, LW (the side you are forcing them to) will start to slide back out toward his point, while RW stays tight in the slot. In all situations when the opposing team has the puck below the goal line, make sure only one defender is below the goal line so that the defenders outnumber the opponents in the house (or scoring area).
Figure 9.13 Defending a player behind the net.

Chapter 10
Penalty Kills
Today’s game of hockey can be characterized by two focuses and two words: special teams. Over the past few seasons, all levels of hockey have endured much change. Most of this change stems from an increased attention by officials on the obstruction that had snuck into our game. Players and coaches had become very adept at running interference and slowing down not only the game but also its most skilled players. A by-product of this change is a gigantic increase in the volume of penalties and an obvious impact that power plays and penalty kills have on the outcome of each game.
The penalty kill has in many ways turned into an art. Players
who in years past may have played a lesser role because of their lack of offensive gifts are now playing a major role making sure that the opposing power play does not affect their team’s chances of winning. Here are the keys to successful penalty killing:
 Outwork the power play. Most PP units will relax to a degree because of the extra man, so be prepared to significantly outwork them.
 Win face-offs. Possession of the puck and a quick clear will not only force the PP unit to go back 200 feet (61 m) for the puck but will also frustrate the PP unit, which is what you want.
 Talk. Communication improves positioning and awareness.
 No big hits. Never hit on the PK, as tempting as it is; you should only “bump and run.” It is a priority to keep your feet moving and pressure the opponent. Making a big hit takes players out of the play which you can’t afford when already down one player.
 Have an active stick. Keep it on the ice at all times and in the right passing lane.
 Get body position in shooting lanes, and know when to go down to block shots. Blocking shots can be a big boost to the penalty kill.
 When in the zone, pressure the puck in straight lines— rebound back into position quickly after you pressure, and lead with your stick as you return.
 Compete hard for loose pucks.
 When clearing the puck, make sure it goes 200 feet (61 m). Try to score only when you have a lane to take the puck into the offensive zone.
 Never get tied up with the player at the net. Most leagues prevent you from moving that player legally, so
once he is there, do not create a double screen in front of your goaltender; play around him and have an active stick.
 Players coming out of the penalty box must know where to go. Coaches should set rules for all players coming out of the box when the puck is in your end.