

Neutral Zone Backchecking
Every team wants to be known as a hardworking team. Well, there is nothing more reflective of a team’s work ethic than the players’ willingness and commitment to backcheck. The backcheck starts once the puck is turned over in the offensive zone and doesn’t end until either puck possession has been regained or you shift into defensive zone coverage. All three forwards need to be involved in the backcheck. Some teams rely mainly on one backchecker, with the other two forwards coasting back and watching that the other team’s Ds don’t jump by them. This strategy allows for quick counterattacks using long stretch passes once the puck is turned over, but it does not result in as many turnovers as when all three forwards come back hard. Also it provides the offensive team with more space to work with as they advance up the ice.
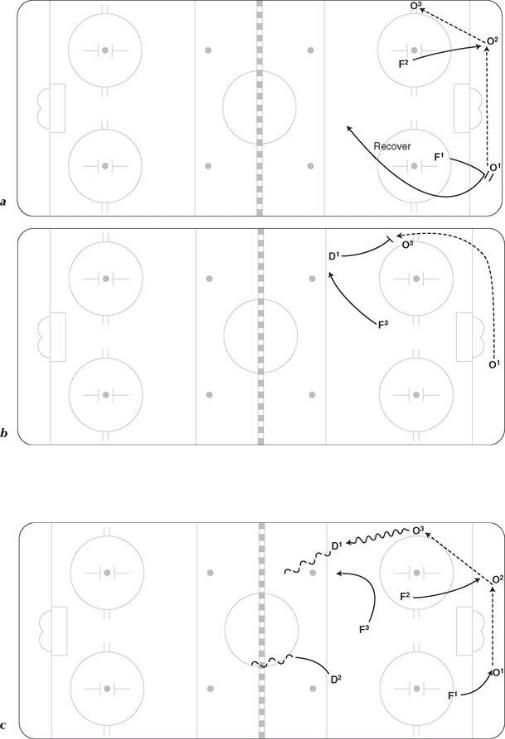
The backcheck is set up in the offensive zone off the forecheck when players away from the puck recover above the puck to reattack (figure 7.10a), back up a pinching defenseman (figure 7.10b), or initiate the backcheck by being in a high offensive position (figure 7.10c, above). It is important that players in the offensive zone recognize the potential for loss of possession and quickly get themselves into an appropriate backchecking position.
Figure 7.10 The back check set up by (a) recovering or (b) backing up a pinching defense
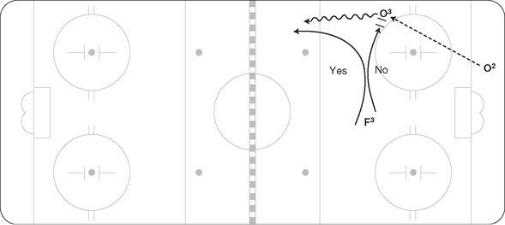
Late in games, a strong F3 (high forward) position in the offensive zone is key to eliminating odd-man rushes against. This should be a strategy throughout the game. When in a high position F3 has two choices on how to force the breakout. The first is to immediately pressure the pass if he has support from a team mate who is recovering to the high slot. If he doesn’t have support the second option is to “soft lock”. This refers to F3 not going for a hit but angling the offensive player up ice (toward his own net) and running him out of room or making him hurry his pass (figure 7.11). In this way, he keeps in the rush and not behind it. If the offensive player makes a good pass up ice F3 is still in a great position to apply backchecking pressure and chase down the rush.
Figure 7.11 The neutral zone backcheck soft lock.
Let’s discuss the keys to an effective backcheck.
 Move into a high recovery position. First and probably most important is that all forwards on the forecheck move

immediately into a high recovery position when the puck is moved away from them in the offensive zone or after they make a hit (figure 7.12). The high recovery area is the top of the circles in the offensive zone; that is where coaches always want the forwards to move to. By always having one forward in this area teams rarely give up odd man rushes. This now sets the stage for an effective backcheck. If the forwards don’t get in the habit of recovering, then it won’t matter what your backchecking strategy is because they will not be in a position to help out.
Figure 7.12 The high recovery area off a forecheck.
 Pressure the attack from behind. All forwards come back hard through mid-ice. Backcheck hard, and prepare to move in transition with speed once the puck is turned over. Coaches must reinforce with their players that it is important for all three forwards to come back hard; not just the responsibility of the high forward or the closest forward (figure 7.13a).
 Outnumber them at the line. Keep pressuring the attack from behind, and at the defensive blue line, you should outnumber the attacking team. Squeeze the attack from both sides, with the forwards pressing from behind and the Ds keeping a tight gap on the other side (figure 7.13b). If you were to look at an overhead picture of the opposition attack at your blue line, you should see more of the defending team than the offensive team. Show the team a freeze frame at the defensive blue line and if you have 5 players in the picture and the opponent has, three, then the players are doing a great job of squeezing the attack. Often the puck will be turned over in this area or the opposition will be forced to dump the puck in.
Figure 7.13 (a) Pressuring the attack from behind or (b) outnumbering them at the line.

 Have set rules for F1 and D1. Make sure you have rules for which player plays the puck carrier once the play advances to your blue line and which player holds inside position. There are two ways to do this.
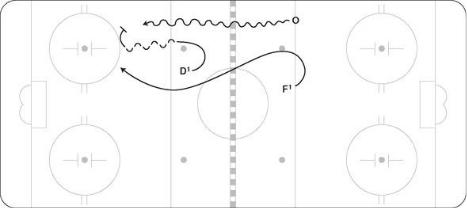
1. F1 pressures the puck carrier hard and if he can catch him before center does so and tries to turn the puck over. But after the center line he releases the puck carrier to the defense (D1), and now F1 holds inside position and supports the defense while looking for late players. D1 calls that he has the puck carrier and stands him up at the line, knowing he has inside protection form F1 (figure 7.14).
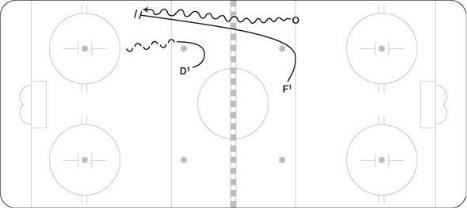
2.F1 pressures the puck carrier hard from behind and continues to try to steal the puck and keep the puck carrier wide all the way into the zone. D1 recognizes that this is the strategy and now holds inside position and supports F1 while looking for late players (figure 7.15).
Figure 7.14 D1 stands the puck carrier up at the line while F1 protects mid-ice.
Figure 7.15 D1 holds the inside position while F1 pressures the puck carrier.
 Watch for stretch players. With no red line, the defense must be aware of the stretch player. Generally this is the responsibility of the defense, but at times and in certain systems such as the 1-3-1 or 1-2-2 wide neutral zone forecheck, it will be the responsibility of the wide forward. When forechecking or in possession of the puck in the offensive zone and the other team sends a player out early into the neutral zone, it is important that the closest D drop back in coverage and hold mid-ice. When covering a stretch player, you do not have to skate close to the player —just maintain mid-ice position and equal depth. If a quick pass is made up, make sure you have support before going out to play the stretch player. Do not allow the stretch player to bump the puck into mid-ice to create an odd-man rush (figure 7.16).
Figure 7.16 The stretch player bumping the puck into mid-ice as D1 overplays.