

Defensive Zone Play
While in the defensive zone, the penalty-killing unit moves from “active contain” to “contain pressure” to “all-out pressure.” This is based on the reads of when to pressure. Every coach will have a varying degree of pressure he is comfortable with. Some coaches make a simple rule for their players to read when to press and when not to press. The rule is called “eyes” and “backsides.” If your player sees that the opposing player with the puck is looking directly at them they move into a more passive “containing” mode. If the player see an opponent’s “backside or number” then they apply maximum pressure. Obviously when a player is turned to get the puck and not facing mid-ice (backside and numbers) he is not ready to make a play and therefore can be pressured harder. Remember, once one player moves to pressure, each subsequent pass must be pressured. The penalty killers should assert more pressure when they know the puck carrier will have a difficult time controlling the puck and making a good play. Here are some examples:
 the PP has poor control or a player juggles a pass,
 the player with the puck has no immediate support,
 the player with the puck has his back turned to the net,
 the puck is being rimmed from one player to another along the boards,
 there is a loose puck from a rebound or missed shot, or
  the ice conditions are poor late in the period.
Following are some situations PK units may face and how to play them. We describe different power play options and how the penalty killers should react.

■ LOW-HIGH PRESS
When O2 receives a pass from O4 or O1, D1 pressures him up the boards (figure 10.18). D2 is ready to take away any return passes to O1. F1 takes away the passing lane to O4. F2 stays in the slot, aware of passing options to the back side. Players should keep their sticks in the most dangerous passing lane which could be to the slot player or backside D.
Figure 10.18
■ CZECH PRESS
F1 forces O4 at the point (figure 10.19). O4 passes back to O2 on the side boards but too high for D1 to pressure. F1 now pressures back on the pass and forces O2 down the boards. D1 is ready to pressure the pass to O1. D2 holds the slot and prevents any crossice passes. If the puck is passed back to O4, there are two options:
(1) F1 can return up high to pressure, or (2) F2 can pressure and F1 returns to the slot. F2 would only pressure if he can get there at the same time as the pass.
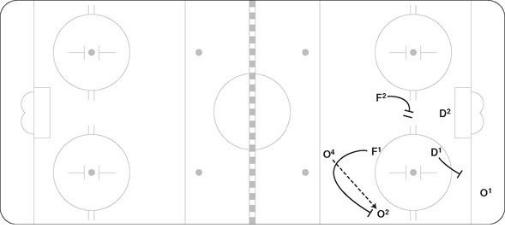
Figure 10.19
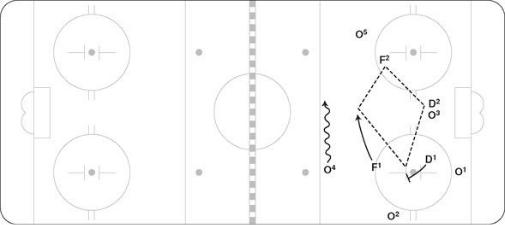
■ DIAMOND FORCE
F1 pressures or stays in O4’s shooting lane as he slides with the puck across the blue line (figure 10.20). D1 moves up slightly, ready to go after O2 if the pass goes there. F2 sinks back into the diamond and is ready to get in the shooting lane of passes to O5. D2 plays the net. Stay in this formation as long as O4 continues to stay in the middle of the blue line.
Figure 10.20
■ FORCING THE BACK OF THE NET
Many teams like to set up behind the net on the PP or take the puck behind. D1 recognizes a chance to pressure and forces O1. D2 holds normal position, avoiding screens or picks and is ready to challenge the walkout (figure 10.21). F1 slides down to replace D1. F2 moves to the middle of the triangle in front of the net, aware of any opposing Ds coming in from the point. It is also important to try to deny passes to players behind the net— anticipate that play, and cut it off as the pass is made.
Figure 10.21

■ TIGHT COLLAPSE
If the puck does end up behind your net, then all players should sink in tight (figure 10.22). Be aware of players moving in, and have an active stick to take away passing lanes as the puck carrier moves out. D1 or D2 may hold their position or force the puck carrier to one side.
Figure 10.22