

Control Breakouts
There are times when your team gets the puck and the opposing players have already pulled back into a trap forecheck. They are back toward the neutral zone waiting for the breakout to take place and looking to turn the puck over. Instead of freelancing your way through the trap and many times being unsuccessful, it is better to move out together in a coordinated fashion. This is called a control breakout.
Unless you come out of your zone in a controlled manner with set patterns for the five players, it is too easy for the opponent to create a turnover. There are two key factors in a controlled breakout: (1) the four players without the puck move with speed, and (2) the puck carrier knows the options and picks the best one. In a control setup, the puck carrier is like a quarterback who knows the routes of the receivers and picks which option is open. This section includes diagrams of three control breakouts where the effect of moving in a coordinated fashion will provide you with enough options to break the trap. They are all equally successful, but it is difficult to learn and execute all three, so coaches should pick one and practice it over and over until it becomes automatic. Often when these breakouts are run effectively, they not only result in breaking the trap but also generate a scoring chance.
In all control breakout situations, the idea is to give the defenseman with the puck more options than the opposition can take away. It is up to the defenseman to make the right choice, but the coaching staff must also prepare the team for specific options that may work against certain opponents.
■ BLUE-TO-BLUE STRETCH
D1 waits behind the net for C to move back with speed. C swings with speed behind the net. D2 swings into the opposite corner. LW waits at the corner of the close blue line. RW waits at the corner of the far blue line. There are four options available to D1. C can pick up the puck with speed and try to weave his way through the trap or move the puck to LW, RW, or back to D1 and up the other side (figure 1.11a). D1 can allow C to go through and then step out the other side of the net and pass to LW or D2 (figure 1.11b). If D1 passes to D2, the next primary option should be a stretch pass to RW moving across the ice or to LW, who bends his pattern through the center of the ice.
Figure 1.11
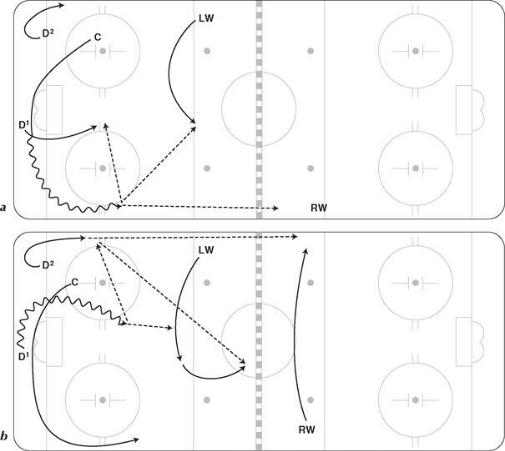
■ STRONG-SIDE SLANT
D1 waits behind the net for C to swing. C can swing behind the net or into the far corner. RW swings on the same side but a bit higher up than C. LW stations himself at center ice along the boards. D2 waits deep in the corner. D1 now passes to D2, who then has three options as he moves up ice: (1) Pass to LW, who can pass or chip the puck to RW as he slants across mid-ice; (2) pass to RW; (3) pass across to the center on the far side. The key players are RW and C as they move with speed to break through the trap (figure 1.12).

Figure 1.12
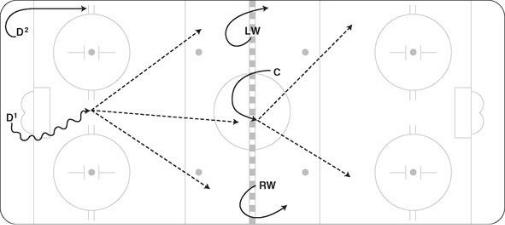
■ THREE HIGH
D1 waits behind the net for a few seconds. All three forwards stay out high in the neutral zone. D2 supports D1 by moving wide into one of the corners. D1 steps out and passes to C curling in mid-ice or to LW or RW, who are moving or posting up (stationary along the boards by one of the lines). If C is under pressure when he receives the puck, he may chip it by and create a footrace for LW or RW (figure 1.13).
Figure 1.13
Chapter 2
Neutral Zone Counters and Regroups
For the purpose of clarity, this section deals with plays that originate in the neutral zone as opposed to plays that originate in the defensive zone and move through the neutral zone. There are basically two types of attacks that involve the neutral zone: (1) the rush, which is a continuation of the breakout, or (2) regroups and counters. All rush plays are covered in the next chapter on offensive zone entries. This chapter focuses on transition plays such as quick counters and regroups. Puck possession in the neutral zone usually results from a turnover or face-off. When the
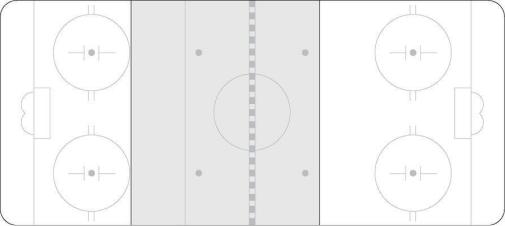
defensive team gets the puck off a turnover, it is important to move through the neutral zone quickly and catch the opposition behind the play. Advancing the puck through the neutral zone off a face-off is more challenging because the opposing players are initially aligned above the puck. Although the neutral zone is technically between the blue lines, we have expanded this area to include the tops of the circles at the attacking team’s end in order to allow the play to develop (figure 2.1).
Figure 2.1 The neutral zone.