

Gaining and Maintaining Possession off the Entry
When explaining breakout options to your team, it is important to discuss how the players set up once they are in the offensive zone. Where do they move the puck to get into the formations they have practiced? Many penalty-killing units focus on denying the setup and prepare different tactics to regain possession of the puck once the power play unit is in the zone. Listed here are three ways to ensure that the players are able to set up after a dump-in or clean entry.
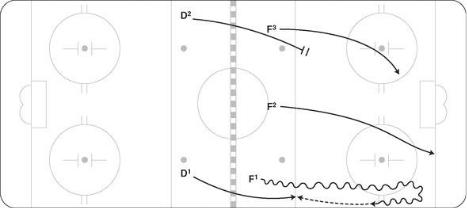
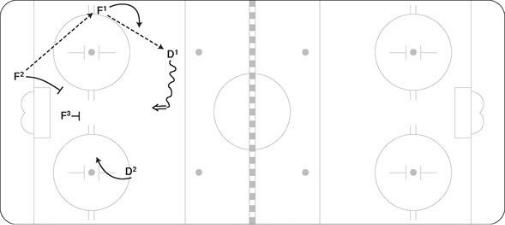
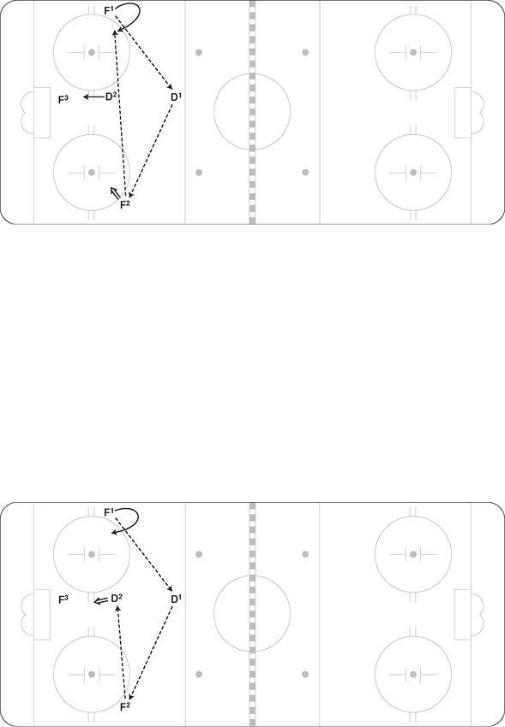
1.Reversing the puck. When under pressure as he enters the zone, F1 stops or delays and then reverses the puck back up the boards where he came from. This is successful against teams whose strong-side forward comes down low on the entry (figure 5.8). D1 must get up to the offensive blue line quickly to be ready for this play.
Figure 5.8 Reversing the puck on entry.
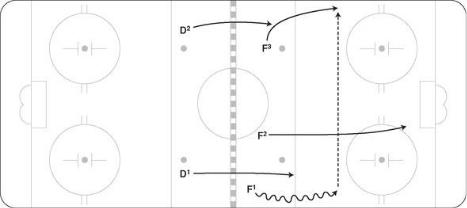
2 . Switching sides. As F1 enters the zone, he sees that all four penalty killers are on one side of the ice, so he immediately passes across the ice to F3. F1 will have to thread the puck through traffic, but it may be the only option to get immediate uncontested possession (figure 5.9).
Figure 5.9 Switching sides on the power-play entry.
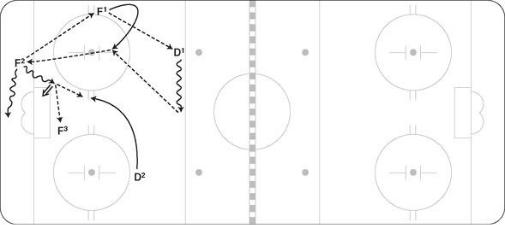
3.Recovering the dump-in. The key to recovering the dumpin is to get all three forwards quickly to the puck. Once the puck is stopped and the forwards are in a battle for possession, F1, F2, or F3 should rim or bank the puck back to the blue line as soon as they get it on their stick. The defensemen should be ready at the corners of the blue line and expect the quick rim pass. The penalty-killing team will probably have three players in the corner for the battle, so this will give the power play time to set up (figure 5.10).
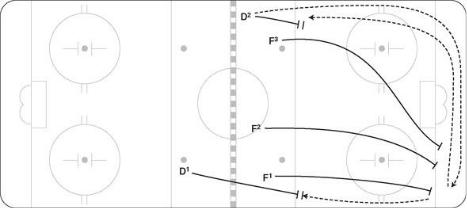
Figure 5.10 Recovering the dump-in.
Zone Setup
Once the players gain possession, they can set up in the zone and use one of the following formations. This section discusses the options for three different power-play formations: the overload, 1- 3-1, and split power play. Within each are the descriptions of the various plays and responsibilities of each player. As mentioned earlier, coaches can pick which option suits their players and team. During the season you may change to another setup, but it does take a while to learn all the options and execute properly. Give the players time to get it right.
Overload Power Play
When using the overload power play, either side can be the strong side, with left-hand shots quarterbacking from the half boards on the right side and right shots on the left side. This gives the player a shooting and passing advantage from that area. As the name implies, the setup is overloaded to the strong side, with four players on that half of the ice. In this setup, much like most powerplay setups, net presence is critical for success. It is important that the net player be in a screen position most of the time but also available to pop out into a scoring area. When setting up the overload and moving the puck, the team should try to twist the box around by having the strong-side D move quickly across the blue line and even go beyond the halfway point before passing back to the half boards or over to D2.
Half-Boards Player
The half-boards player is the key quarterback of this setup, with D1 playing a secondary role. The half-boards player must slide up and down the boards, distribute the puck, and shoot from the outside, all while under pressure. He has to be calm and poised with the puck and quick to recognize where to move the puck. Penalty killers will either force the half-boards player with their D from down low or their forward from the top, so this player must be able to move with the pressure, protect the puck, and make a play.
Strong-Side Point Man
The strong-side defenseman is the other key player in this overload setup. He along with the half-boards player will have the puck the most and be the ones to settle the play down and set up. Keep your feet on the blue line to create space between yourself and the penalty killers. This extra room will give you time to make decisions or step into a shot, while drawing out the penalty killers and creating seams in behind. This player needs to have a shooting mentality and always be a threat to shoot. The number one way to score and create chances on the power play is still to take a point shot with net traffic. Sometimes the shot can be a wrist shot, and other times the D should shoot hard. The penalty killers shouldn’t know whether the D is going to shoot or pass—have good deception. When pressured, move the puck to the half-boards player or the back-side D, or make a quick, low play.
Low Walk Player
The low walk player should have his feet on the goal line and stay close to the net in order to attack quickly and also move in to screen the goaltender or get a rebound. If this player drifts too far to the outside, he cannot do either. The low walk player must be versatile and quick. At times he will switch with the half-boards player, usually when there is no option available as the halfboards player drives the net. This tactic forces the penalty killers to adjust quickly and often creates passing options. Before the game, find out how the other team forces—will they pressure quickly with the low defenseman, or will they hold the front of the net? This information will help determine what option might be
available and where the pressure will come from.
Net Man
The net player’s main job is to screen the goaltender on all shots and then be ready to play rebounds. Although it sounds simple, it requires courage to stand in front of shots and a lot of skill to deflect them. When the puck is moved low, the net player should slide out to the low slot or back door (on the back post away from coverage) to wait for a pass. Either option is good, but it should be predetermined before the game so the low player knows where to pass the puck. Sometimes the net player is so anxious to get available for a low play that he loses the screen position when players above him are ready to shoot. The screen is very important because you want the opposing goaltender to have to work to see the puck. Make the goaltender’s job tough.
Sliding Back-Side D
The back-side defenseman initially provides a release to get the puck away from pressure and also supports the strong-side D when he is under pressure. He will be a threat to score because he is outside the vision of the penalty killers. He sometimes gets lost as the penalty killers focus on the overload side. Move up and down the far side of the ice, staying in line with the position of the puck. Go down as far as the goal line and up as high as the blue line. If you recover a loose puck on the far side, set up on the half boards and then briefly work the setup from there.
Zone Options for the Overload Power Play
The following are the options for the overload power play. All need to become automatic in practice in order for them to be executed well in the game. Depending on the skill level of the players involved and also on how the opposing penalty killers force, certain options will be more successful than others. Coaches should prepare the players for the resistance they may face from the penalty killers so they know ahead of time what plays to concentrate on.
■ BACK-SIDE D SLIDE AND SHOOT
Move the puck around to D2, who slides down the back side and looks to shoot and score, shoot for a deflection, or pass across to F1 for a one-timer (figure 5.11). The play back to F1 is a more difficult play to execute because of the skill required to shoot off the pass. F1 should be wide and prepared to receive a pass around the top of the opposite circle.
Figure 5.11
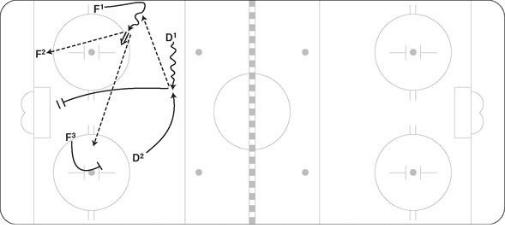
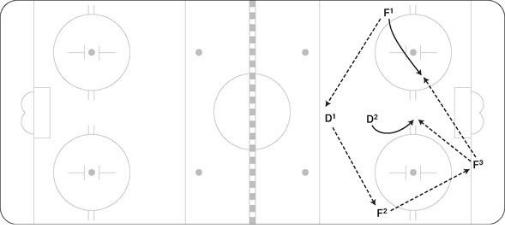
■ STRONG-SIDE D SHOT
Move the puck from F2 to F1 to D1. D1 slides across the blue line, looking to take a slapshot or wrist the puck through to the net (figure 5.12). F3 must be in a tight screen position. F2, F1, and D2 must be ready to converge on rebounds. D1 must fake the shot against teams that block and look to get the puck by the screen. Establishing a shot from this area on a consistent basis always results in the most power play chances but D1 must have deception along with a good shot.
Figure 5.12
■ HALF-BOARDS SHOT
F2 moves the puck up to F1, who passes to D1. D1 walks across the line, drawing a penalty killer with him (figure 5.13). D1 fakes a shot and passes back to F1. F1 should have followed D1 up the half boards, initially staying wide . Once F1 receives the pass he moves off the boards and shoots. F3 screens while F2 and D2 converge for rebounds.
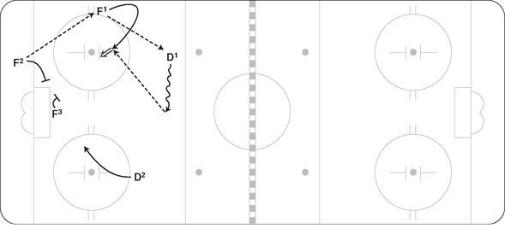
Figure 5.13
■ LOW PLAY OPTION
F2 passes to F1, who passes to D1 (figure 5.14). D1 fakes a shot and passes back to F1, who rolls off the half boards, fakes a shot, and passes to F2. F2 now has the option of taking the puck to the net and shooting, taking the puck to the net and passing to F3 on the back side or to F3 in the slot area. The decision for F3 to be on the backdoor or in the slot depends on how the other team plays this situation. It is best if teams vary where F3 goes so the opponent never knows where he is going to be. D2 should move opposite to F3 and move to the slot or back side. F2 also has the option on this low play to take the puck behind the net and pass out to F3 or back to F1 or D2.
Figure 5.14
■ HALF-BOARDS INTERCHANGE
After the players learn the previous options, it is important to add some interchange so that the penalty killers’ job becomes more difficult. Whenever F1 passes the puck to F2 and no immediate play results, they should get in the habit of switching positions. F1 passes to F2 and drives the net, looking to get the puck back (which he may). If there is no play, F2 cycles up the boards and starts to look for new options. F1 replaces F2 low (figure 5.15).
Figure 5.15

■ SLIDING D INTERCHANGE
This is a more complicated maneuver, but it adds a lot of confusion to the penalty killers’ alignment. After D1 slides along the blue line and passes back to F1 (figure 5.16), he may move to the net (this should be predetermined). As D1 goes to the net, F3 slides out to the side, and D2 moves up top on the blue line. F1 now makes a quick play as this is happening. F1 may use any of the previous options because the alignment is the same. D1 holds a strong position at the net and remains there until a goal is scored or the puck is cleared.
Figure 5.16
1-3-1 Power Play
The 1-3-1 power play is one of the newer power-play formations used by several teams today. Essentially there are two strong sides, with the puck being able to be controlled on either half boards. It is easy to switch sides either up top or behind the net to settle the puck out when under pressure or to create chances. Once again, net presence is critical. The key to success with this formation is for the top three players to focus on shooting or onetiming the puck. This power play is difficult for pressure penaltykilling units to defend because of the side-to-side options.
Right and Left Side Half-Boards Players
Set up with the right shot on the left boards and the left shot on the right. These two players are definitely the quarterbacks. Both must be a threat to shoot or fake the shot and pass while also being calm under pressure. They should work the puck up to the high D as number one option, and don’t force plays through the box—often the play through the box will open up after recovering a rebound.
Mid-Ice Point Man
An important strategy for this defenseman is to keep his feet on the blue line to allow more room to make a play or step into a shot. Slide along the line with deception while looking to find an open lane to the net. Quickly work the puck from left to right if the shot
isn’t there, and then look to shoot again. Wrist shots to the net are also good, but if there is a chance for a slapshot, use it. In the 1-3- 1 setup, the puck should revolve around this player.
Slot Player
This can be a defenseman who slides in or a forward who plays defense and then moves into the slot area. Move into this position once the puck is under control. Depending on whether this player is a right or left shot, from one side he must be ready for a quick release shot and from the other side a shot pass. The shot pass is a play where the outside players shoot to the stick of the slot player for a redirect on the net. The slot player should move around in the space to distract the penalty killers. It is key that this player is ready to support both half-boards players when they are in trouble.
Net Man
The net man, as the name indicates, plays the net area unless support is needed to settle the puck out. He may release to the strong side for a low pass and the potential to make a quick inside play. This is a good strategy, but the player has to read whether the high players are shooting or whether they need a low option. Stay active, and get into shooting lanes at the right time.
Zone Options for the 1-3-1 Power Play
The following are four options for the 1-3-1 power play. As with the overload power play, all need to become automatic in practice in order to be executed well in the game.
Depending on the skill level of the players involved and also on how the opposing penalty killers force, certain options will be more successful than others. Coaches should prepare the players for the resistance they may face from the penalty killers so they know ahead of time what plays to concentrate on. Note that all options may be run from either side.
■ POINT SHOT
F1 passes to D1. D1 passes to F2, who passes back to D1 for a shot (figure 5.17). This may be a one-timer depending on what shot the defenseman is. All players should fake a shot before passing. F3 keeps a tight screen. D2, F1, and F2 converge on the rebound.
Figure 5.17
■ HALF-BOARDS SHOT OR CROSS-ICE PASS
F1 passes to D1 (figure 5.18). D1 passes to F2, who has the option of shooting or passing to F1. There will be several times during the power play when the cross-ice seam will be available. Remember this is a more difficult option to execute because of the skill level required to thread the pass across ice and one time the puck. Good deception from F2 will create an open lane to F1. F3 keeps a tight screen. D2, F1, and F2 converge on the rebound.
Figure 5.18
■ INSIDE PLAY
F1 passes to D1, who passes to F2 (figure 5.19). F2 fakes the shot and passes inside to D2 for a one-timer or redirect play. This inside play can be made from either side. D2 must be ready for a pass at all times. F3 keeps a tight screen. F1 and F2 converge on the rebound. Depending on which shot D2 is, this may be on opportunity for a quick release shot or shot pass deflection.
Figure 5.19
■ LOW-RELEASE PLAY
F1 passes to D1 (figure 5.20). D1 passes to F2. F3 releases from the net (in this case he would be a left shot). F2 passes to F3. F3 makes an inside play to D2 or back-side play to F1. F3 could also take the puck to the net. This option is tough to defend against.
Figure 5.20
Split Power Play
The third power-play option in this section is the split power play. With two strong sides, it has more of a spread look to it, and like the 1-3-1 it is easy to switch sides either up top or behind the net. Once again, net presence is critical. It is important that the two defensemen up top be prepared to shoot. When this happens, they will find that seams will open up for the forwards down low. This power play is also difficult for pressure penalty-killing units because of the side-to-side options. The split power play can easily be twisted into an overload setup and back again.
Two Blue Line Defensemen
The two defensemen on the blue line need to keep their feet on the line to create more space between them and the penalty killers. They should be about dot width apart. Once the puck is moved up top, always quickly relay it from D to D to spread out the penalty killers. Work the puck from left to right while looking to shoot. The defensemen may slide along the line with deception to find an open lane to the net. If there isn’t much time or space, wrist shots to the net are also good.
Right and Left Side Half-Boards Players
These players set up and operate in a similar way to the 1-3-1 power play, with the left shot on the right boards and the right shot
on the left boards. Both players should be a threat to shoot or fake the shot and pass. Stay calm under pressure. The number one option should be to work the puck up to the high Ds especially when being pressured low. Don’t force plays through the box— often the play through the box will open up after recovering a rebound.
Net Man
With most of these power-play setups the net man’s job description doesn’t change much. This player should stay at the net unless support is needed to settle the puck out but may release to either side for a low pass. Stay active, and get into shooting lanes at the right time. Support the half-boards players when they are in trouble and under pressure by sliding out to the side of the net. To settle the puck out when pressured down low, simply relay the puck behind the net to the opposite half-boards player.
Zone Options for the Split Power Play
The following are the options for the split power play. Practice all options so the players can do them automatically. Then in a game, they will be able to pick the best option depending on how the penalty killers react to the puck movement and shots. Coaches should prepare the team for the resistance they may face from the penalty killers so they know ahead of time what plays to concentrate on. Note that all options may be run from either side.
■ D-TO-D POINT SHOT
F1 passes to D1, who passes to D2 (figure 5.21). D2 slides down a step for a shot. This may be a one-timer depending on what shot the defenseman is. F3 keeps a tight screen on the goaltender. F1 and F2 converge on the rebound. Usually if the shot is low the goaltender will have trouble keeping the rebound from going to one of the side players F1 or F2.
Figure 5.21

■ D-TO-D AND BACK
F1 passes to D1, who passes to D2 (figure 5.22). D2 slides down a step for a fake shot. D2 passes back to D1 in mid-ice for a shot. This may be a one-timer depending on what shot the defenseman is. F3 keeps a tight screen. F1 and F2 converge on the rebound.
Figure 5.22

■ D-TO-D CROSS-SEAM PASS
F1 passes to D1, who passes to D2 (figure 5.23). D2 slides down a step for a fake shot. D2 passes to F1 for a one-timer or quickrelease shot. F3 keeps a tight screen. F2 converges on the rebound.
Figure 5.23
■ DOUBLE-SEAM PASS
F1 passes to D1, who passes to D2 (figure 5.24). D2 slides down a step for a fake shot. D2 passes to F1, who fakes the shot and passes cross-ice to F2 for a one-timer or quick-release shot. F3 keeps a tight screen. F1 converges on the rebound.
Figure 5.24

■ LOW-RELEASE PLAY
F1 passes to D1, who passes to D2. D2 slides down a step and passes back to D1 in mid-ice (figure 5.25). D1 fakes a shot and passes to F1. F1 fakes a shot and passes low to F3 at the side of the net. F3 takes the puck to the net or passes to F2 on the back door.
Figure 5.25