

Neutral Zone Face-Offs
At one time, many coaches gave little thought to draws in the neutral zone, especially European coaches. Their feeling was that they were not important and didn’t lead to anything. Most times their players would line up and halfheartedly take the draw. Now almost all coaches realize the importance of winning the face-off and gaining puck possession. As a result of the change in emphasis on neutral zone draws, many new strategies have evolved to create a quick attack off this faceoff or to apply forechecking pressure when the draw is lost.
Neutral Zone: Won Draws
There are only a few face-off plays that create an offensive advantage in the neutral zone. Opponents will press with one or two players off a lost face off in the neutral zone, taking away passing lanes or closing ice, so having a plan with the puck is crucial. These actions tend to emulate neutral zone regroup options for moving the puck up ice. Described here are seven face-off plays from the center-ice and blue-line faceoff dots.
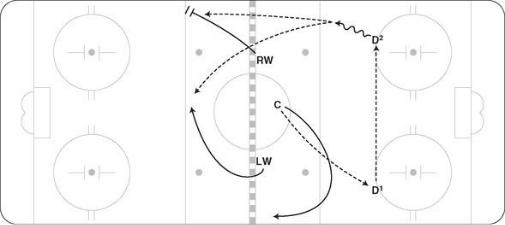
■ CENTER ICE, THREE OPTIONS
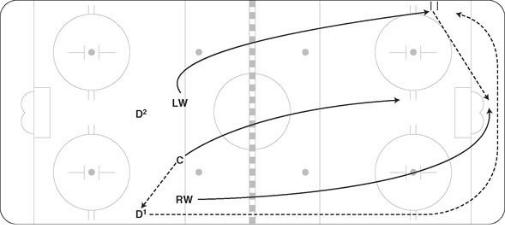
C draws the puck back to D1, who passes to D2 (figure 11.11). C swings away and builds up speed. RW stretches to the far blue line. LW slants in to the middle of the blue line. D2 has the option to pass up to RW on the stretch, to LW in the mid-ice seam, or to C wide. D2 may also skate the puck to the red line and dump it in for C on the wide side.
Figure 11.11
■ HIGH DEFLECTION
This face-off play also takes place at the center circle. Once C wins the draw, he moves above the red line (figure 11.12). Both wingers go out to the top corner of the blue line. D1 passes to D2, who looks to pass to C for a quick chip into the corner for RW. D1 may also pass to RW, who chips the puck behind the defense for C to pick up. This is a good play to start the game and apply quick forechecking pressure against the opponent.
Figure 11.12
■ FORWARD BACK
LW drops back for the draw, with LD up (figure 11.13). C pushes the puck to the left side. Anticipating the draw, LW shoots through the hole and looks to skate or chip the puck by the opposing defenseman. RW also jumps quickly with LW.
Figure 11.13
■ WEAK-SIDE SLANT
This face-off takes place at the defensive blue line. C draws the puck back to D1, who passes to D2 (figure 11.14). D2 skates to mid-ice. LW picks or screens the player inside so that D2 has more time with the puck. RW goes hard to the corner of the far blue line. D2 banks the puck to the high blue line area for RW to skate to. C jumps up through the middle to potentially create a two on one on the opposing defenseman.
Figure 11.14
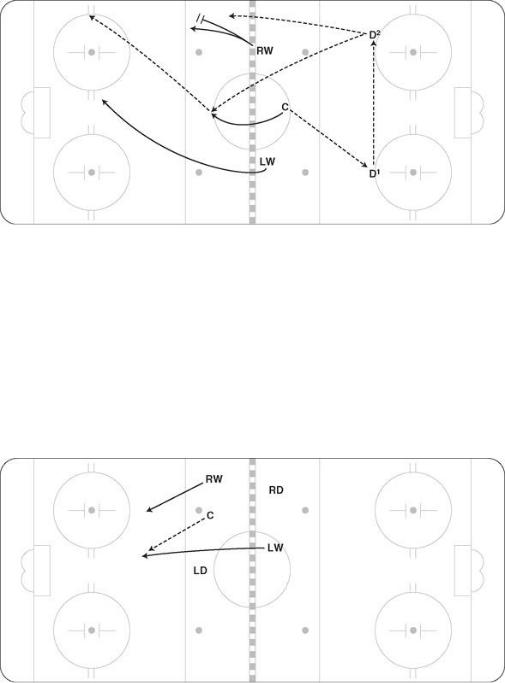
■ CENTER SLASH
C wins the puck back, and D2 passes to D1 (figure 11.15). RW reads clear possession and sprints to the far blue line. C blocks the opposing C and then sprints through the middle lane. LW stays wide and low for a cross-ice support pass. D2 drops to support D1. D1 has pass options to C or RW sprinting to the far blue line and, if neither is open, has the wide pass back to LW.
Figure 11.15
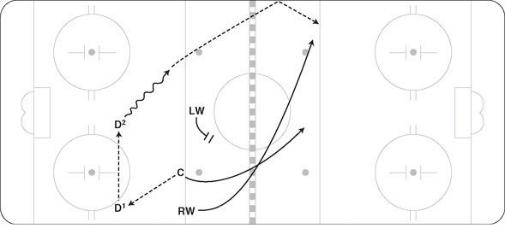
■ CENTER SWING-AWAY
Off a won draw, C swings away from the D-to-D pass (figure 11.16). LW sprints toward the boards, and RW fills the middle lane. D2 may pass to LW or RW, but the main option is to get the puck wide to C who has built up a lot of speed.
Figure 11.16
■ HARD RIM
This face-off is used in leagues with touch icing when the team desperately needs to get possession in the offensive zone and create a quick scoring chance. There is a risk of icing the puck. C draws the puck back to D1, who quickly shoots it hard along the boards into the far end (figure 11.17). LW races to the puck, trying to beat the opposing D. Once LW gets the puck, he bumps it behind the net to RW, who then looks to bring it to the net.
Figure 11.17
Neutral Zone: Lost Draws
To regain possession of the puck off a lost draw, these strategies may be used on any of the five neutral zone face-off circles. In most situations, this sets up a team’s neutral zone forecheck.
■ DOUBLE PRESS
When the draw is lost, both wingers move quickly to pressure the opposing defense (figure 11.18). C locks the mid-ice area, preventing any passes to the other team’s center. D1 and D2 are ready to take away passes up the boards and to move up quickly to pinch on the pass.
Figure 11.18
■ BOARD-SIDE PRESS
On the lost draw, the board-side winger (LW) forces the defense
to pass the puck across the ice, into traffic (figure 11.19). C locks the middle. RW takes away the far boards. D1 and D2 keep a tight gap in mid-ice.
Figure 11.19
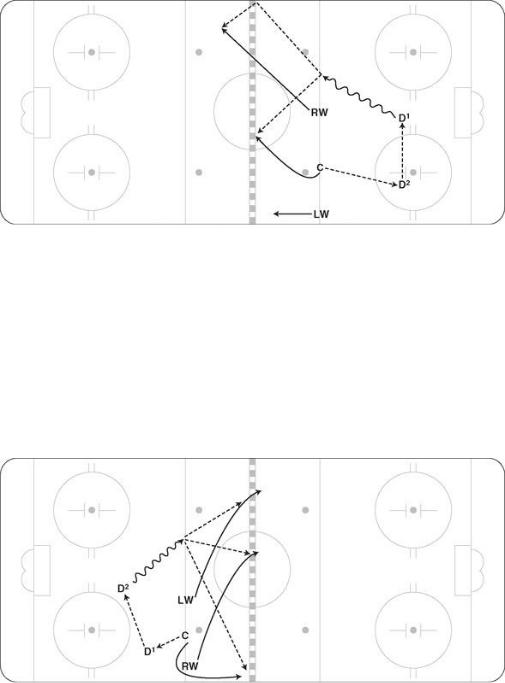
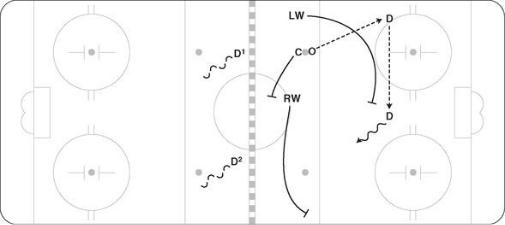
■ INSIDE-OUT PRESS
When the draw is lost, C quickly moves up between the two opposing defensemen and angles the puck carrier to the outside (figure 11.20). As C forces the play to the right, RW takes away the boards and any passes to that winger. LW locks the middle. D1 is ready to get any chip plays in behind RW. D2 plays mid-ice while being aware of passes to the wide side.
Figure 11.20
