


Chapter 9
Putting SQL to Work
In Chapter 6, Storing Local Data, on page 120, we explored keeping data around in preferences and in plain files. That works fine when the amount of data is small or when the data is all one type (such as a picture or an audio file). However, there is a better way to store large amounts of structured data: a relational database.
For the past thirty years, databases have been a staple of enterprise application development, but until recently they were too expensive and unwieldy for smaller-scale use. That is changing with small embedded engines such as the one included with the Android platform.
This chapter will show you how to use Android’s embedded database engine, SQLite. You’ll also learn how to use Android’s data binding to connect your data sources to your user interface. Finally, you’ll look at the ContentProvider class, which allows two applications to share the same data.
9.1Introducing SQLite
SQLite1 is a tiny yet powerful database engine created by Dr. Richard Hipp in 2000. It is arguably the most widely deployed SQL database engine in the world. Besides Android, SQLite can be found in the Apple iPhone, Symbian phones, Mozilla Firefox, Skype, PHP, Adobe AIR, Mac OS X, Solaris, and many other places.
1. http://www.sqlite.org
SQL 101  179
179
SQLite License
The SQLite source code contains no license because it is in the public domain. Instead of a license, the source offers you this blessing:
May you do good and not evil.
May you find forgiveness for yourself and forgive others.
May you share freely, never taking more than you give.
There are three reasons why it is so popular:
•It’s free. The authors have placed it in the public domain and don’t charge for its use.
•It’s small. The current version is about 150KB, well within the memory budget of an Android phone.
•It requires no setup or administration. There is no server, no config file, and no need for a database administrator.
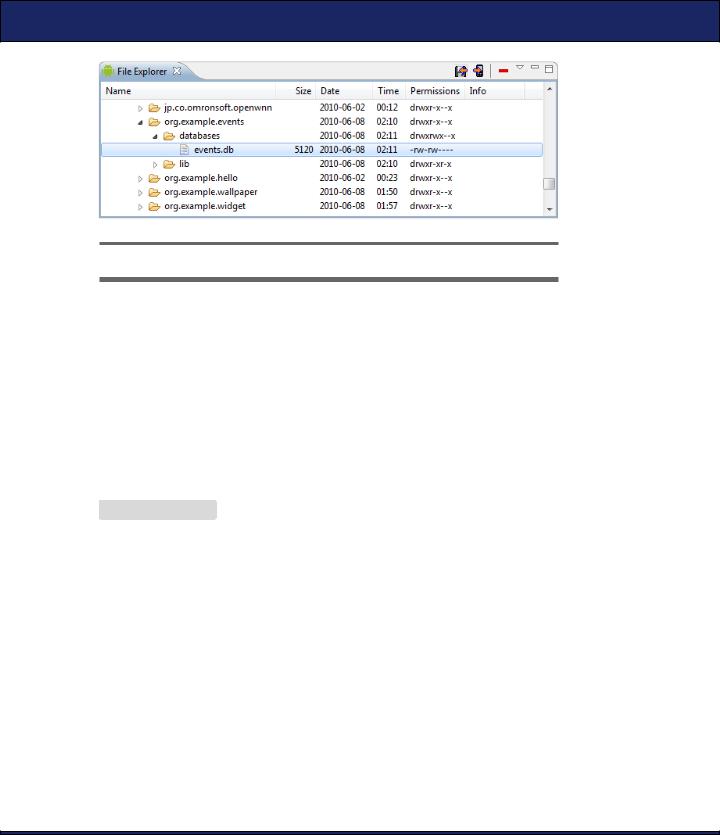
A SQLite database is just a file. You can take that file, move it around, and even copy it to another system (for example, from your phone to your workstation), and it will work fine. Android stores the file in the /data/data/packagename/databases directory (see Figure 9.1, on the next page). You can use the adb command or the File Explorer view in Eclipse (Window > Show View > Other... > Android > File Explorer) to view, move, or delete it.
Instead of calling Java I/O routines to access this file from your program, you run Structured Query Language (SQL) statements. Through its helper classes and convenience methods, Android hides some of the syntax from you, but you still need to know a bit of SQL to use it.
9.2SQL 101
If you’ve used Oracle, SQL Server, MySQL, DB2, or other database engines, then SQL should be old hat to you. You can skip this section and go to Section 9.3, Hello, Database, on page 181. For the rest of you, here’s a quick refresher.
SQL 101  180
180
Figure 9.1: SQLite stores an entire database in one file.
To use a SQL database, you submit SQL statements and get back results. There are three main types of SQL statements: DDL, Modification, and Query.
DDL Statements
A database file can have any number of tables. A table consists of rows, and each row has a certain number of columns. Each column of the table has a name and a data type (text string, number, and so forth). You define these tables and column names by first running Data Definition Language (DDL) statements. Here’s a statement that creates a table with three columns:
Download SQLite/create.sql
create table mytable (
_id integer primary key autoincrement, name text,
phone text );
One of the columns is designated as the PRIMARY KEY, a number that uniquely identifies the row. AUTOINCREMENT means that the database will add 1 to the key for every record to make sure it’s unique. By convention, the first column is always called _id. The _id column isn’t strictly required for SQLite, but later when we want to use an Android
ContentProvider, we’ll need it.
Note that, unlike most databases, in SQLite the column types are just hints. If you try to store a string in an integer column, or vice versa, it will just work with no complaints. The SQLite authors consider this to be a feature, not a bug.
HELLO, DATABASE  181
181
Modification Statements
SQL provides a number of statements that let you insert, delete, and update records in the database. For example, to add a few phone numbers, you could use this:
Download SQLite/insert.sql
insert into mytable values(null, 'Steven King', '555-1212'); insert into mytable values(null, 'John Smith', '555-2345'); insert into mytable values(null, 'Fred Smitheizen', '555-4321');
The values are specified in the same order you used in the CREATE TABLE statement. We specify NULL for _id because SQLite will figure that value out for us.
Query Statements
Once data has been loaded into a table, you run queries against the table using a SELECT statement. For example, if you wanted to get the third entry, you could do this:
Download SQLite/selectid.sql
select * from mytable where(_id=3);
It’s more likely you’d want to look up a person’s phone number by name. Here’s how you’d find all the records containing “Smith” in the name:
Download SQLite/selectwhere.sql
select name, phone from mytable where(name like "%smith%");
Keep in mind that SQL is case insensitive. Keywords, column names, and even search strings can be specified in either uppercase or lowercase.
Now you know just enough about SQL to be dangerous. Let’s see how to put that knowledge to work in a simple program.
9.3Hello, Database
To demonstrate SQLite, let’s create a little application called Events that stores records in a database and displays them later. We’re going to start simple and build up from there. Open a new “Hello, Android” program using these values in the project wizard:
Project name: Events
Build Target: Android 2.2
Application name: Events

HELLO, DATABASE  182
182
Package name: org.example.events
Create Activity: Events
Min SDK Version: 8
As always, you can download the complete source code from the book’s website.
We need somewhere to hold a few constants describing the database, so let’s create a Constants interface:
Download Eventsv1/src/org/example/events/Constants.java
package org.example.events;
import android.provider.BaseColumns;
public interface Constants extends BaseColumns { public static final String TABLE_NAME = "events";
// Columns in |
the Events database |
||
public |
static |
final String |
TIME = "time"; |
public |
static |
final String |
TITLE = "title"; |
}
Each event will be stored as a row in the events table. Each row will have an _id, time, and title column. _id is the primary key, declared in the BaseColumns interface that we extend. time and title will be used for a time stamp and event title, respectively.
|
Using SQLiteOpenHelper |
|
Next we create a helper class called EventsData to represent the database |
|
itself. This class extends the Android SQLiteOpenHelper class, which |
|
manages database creation and versions. All you need to do is provide |
|
a constructor and override two methods. |
|
Download Eventsv1/src/org/example/events/EventsData.java |
Line 1 |
package org.example.events; |
- |
|
-import static android.provider.BaseColumns._ID;
-import static org.example.events.Constants.TABLE_NAME; 5 import static org.example.events.Constants.TIME;
-import static org.example.events.Constants.TITLE;
-import android.content.Context;
-import android.database.sqlite.SQLiteDatabase;
-import android.database.sqlite.SQLiteOpenHelper;
10
-public class EventsData extends SQLiteOpenHelper {
-private static final String DATABASE_NAME = "events.db";
-private static final int DATABASE_VERSION = 1;
-

HELLO, DATABASE  183
183
15 /** Create a helper object for the Events database */
-public EventsData(Context ctx) {
-super(ctx, DATABASE_NAME, null, DATABASE_VERSION);
-}
-
20 @Override
-public void onCreate(SQLiteDatabase db) {
-db.execSQL("CREATE TABLE " + TABLE_NAME + " (" + _ID
-+ " INTEGER PRIMARY KEY AUTOINCREMENT, " + TIME
-+ " INTEGER," + TITLE + " TEXT NOT NULL);");
25 |
} |
- |
|
-@Override
-public void onUpgrade(SQLiteDatabase db, int oldVersion,
-int newVersion) {
30 db.execSQL("DROP TABLE IF EXISTS " + TABLE_NAME);
-onCreate(db);
-}
-}
The constructor starts on line 16. DATABASE_NAME is the actual filename of the database we’ll be using (events.db), and DATABASE_VERSION is just a number we make up. If this were a real program, you would increase the version number whenever you had to make significant changes to the database design (for example, to add a new column).
The first time you try to access a database, SQLiteOpenHelper will notice it doesn’t exist and call the onCreate( ) method to create it. On line 21, we override that and run a CREATE TABLE SQL statement. This will create the events table and the events.db database file that contains it.
When Android detects you’re referencing an old database (based on the version number), it will call the onUpgrade( ) method (line 28). In this example, we just delete the old table, but you could do something smarter here if you like. For example, you could run an ALTER TABLE SQL command to add a column to an existing database.
Defining the Main Program
Our first attempt at the Events program will use a local SQLite database to store the events, and it will show them as a string inside a TextView.
HELLO, DATABASE  184
184
Joe Asks. . .
Why Is Constants an Interface?
It’s a Java thing. I don’t know about you, but I dislike having to repeat the class name every time I use a constant. For example, I want to just type TIME and not Constants.TIME. Traditionally, the way to do that in Java is to use interfaces. Classes can inherit from the Constants interface and then leave out the interface name when referencing any fields. If you look at the BaseColumns interface, you’ll see the Android programmers used the same trick.
Starting with Java 5, however, there’s a better way: static imports. That’s the method I’ll use in EventsData and other classes in this chapter. Since Constants is an interface, you can use it the old way or the new way as you prefer.
Unfortunately, as of this writing, Eclipse’s support for static imports is a little spotty, so if you use static imports in your own programs, Eclipse may not insert the import statements for you automatically. Here’s a little trick for Eclipse users: type a wildcard static import after the package statement (for example, import static org.example.events.Constants.*;) to make things compile. Later, you can use Source > Organize Imports to expand the wildcard and sort the import statements. Let’s hope this will be more intuitive in future versions of Eclipse.
Define the layout file (layout/main.xml) as follows:
Download Eventsv1/res/layout/main.xml
<?xml version="1.0" encoding="utf-8"?>
<ScrollView xmlns:android="http://schemas.android.com/apk/res/android" android:layout_width="fill_parent" android:layout_height="fill_parent">
<TextView android:id="@+id/text"
android:layout_width="fill_parent" android:layout_height="wrap_content" />
</ScrollView>
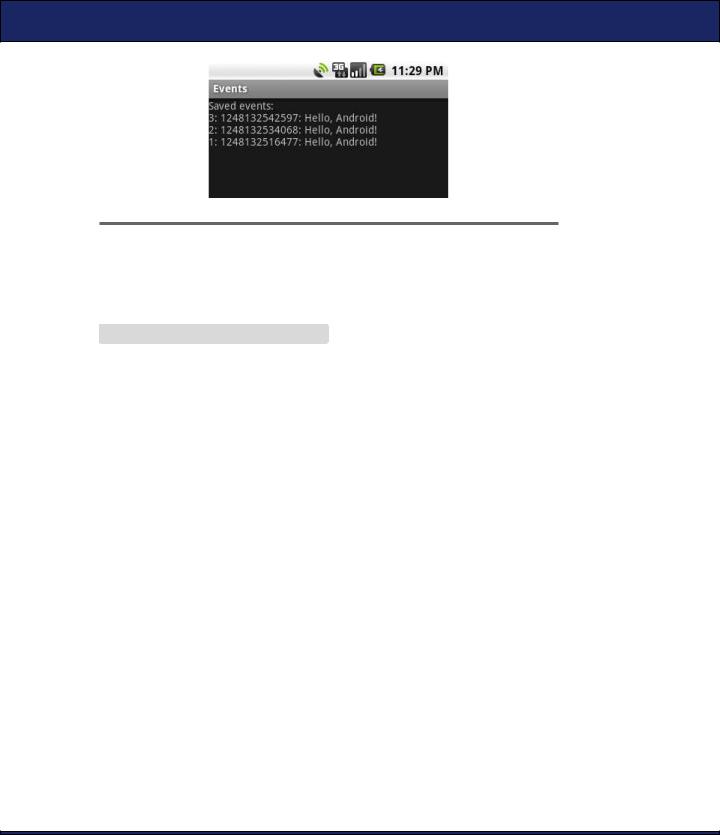
This declares the TextView with an imaginative ID of text (R.id.text in code) and wraps it with a ScrollView in case there are too many events to fit on the screen. You can see how it looks in Figure 9.2, on the next page.
HELLO, DATABASE  185
185
|
Figure 9.2: The first version displays database records in a TextView. |
|
|
|
|
|
The main program is the onCreate( ) method in the Events activity. Here’s |
|
the outline: |
|
Download Eventsv1/src/org/example/events/Events.java |
Line 1 |
package org.example.events; |
- |
|
-import static android.provider.BaseColumns._ID;
-import static org.example.events.Constants.TABLE_NAME; 5 import static org.example.events.Constants.TIME;
-import static org.example.events.Constants.TITLE;
-import android.app.Activity;
-import android.content.ContentValues;
-import android.database.Cursor;
10 import android.database.sqlite.SQLiteDatabase;
-import android.os.Bundle;
-import android.widget.TextView;
-
- public class Events extends Activity {
15 private EventsData events;
-
-@Override
-public void onCreate(Bundle savedInstanceState) {
-super.onCreate(savedInstanceState);
20 setContentView(R.layout.main);
-events = new EventsData(this);
-try {
-addEvent("Hello, Android!");
-Cursor cursor = getEvents();
25 showEvents(cursor);
-} finally {
-events.close();
-}
-}
30 }

HELLO, DATABASE  186
186
On line 20 of onCreate( ), we set the layout for this view. Then we create an instance of the EventsData class on line 21 and start a try block. If you look ahead to line 27, you can see we close the database inside the finally block. So even if an error occurs in the middle, the database will still be closed.
The events table wouldn’t be very interesting if there weren’t any events, so on line 23 we call the addEvent( ) method to add an event to it. Every time you run this program, you’ll get a new event. You could add menus or gestures or keystrokes to generate other events if you like, but I’ll leave that as an exercise to the reader.
On line 24, we call the getEvents( ) method to get the list of events, and finally on line 25, we call the showEvents( ) method to display the list to the user.
Pretty easy, eh? Now let’s define those new methods we just used.
Adding a Row
The addEvent( ) method cuts a new record in the database using the string provided as the event title.
Download Eventsv1/src/org/example/events/Events.java
private void addEvent(String string) {
//Insert a new record into the Events data source.
//You would do something similar for delete and update. SQLiteDatabase db = events.getWritableDatabase(); ContentValues values = new ContentValues(); values.put(TIME, System.currentTimeMillis()); values.put(TITLE, string);
db.insertOrThrow(TABLE_NAME, null, values);
}
Since we need to modify the data, we call getWritableDatabase( ) to get a read/write handle to the events database. The database handle is cached, so you can call this method as many times as you like.
Next we fill in a ContentValues object with the current time and the event title and pass that to the insertOrThrow( ) method to do the actual INSERT SQL statement. You don’t need to pass in the record ID because SQLite will make one up and return it from the method call.
As the name implies, insertOrThrow( ) can throw an exception (of type SQLException) if it fails. It doesn’t have to be declared with a throws keyword because it’s a RuntimeException and not a checked exception. However, if you want to, you can still handle it in a try/catch block like any

HELLO, DATABASE  187
187
other exception. If you don’t handle it and there is an error, the program will terminate, and a traceback will be dumped to the Android log.
By default, as soon as you do the insert, the database is updated. If you need to batch up or delay modifications for some reason, consult the SQLite website for more details.
Running a Query
The getEvents( ) method does the database query to get a list of events:
Download Eventsv1/src/org/example/events/Events.java
private static String[] FROM = { _ID, TIME, TITLE, }; private static String ORDER_BY = TIME + " DESC"; private Cursor getEvents() {
//Perform a managed query. The Activity will handle closing
//and re-querying the cursor when needed.
SQLiteDatabase db = events.getReadableDatabase();
Cursor cursor = db.query(TABLE_NAME, FROM, null, null, null, null, ORDER_BY);
startManagingCursor(cursor); return cursor;
}
We don’t need to modify the database for a query, so we call getReadableDatabase( ) to get a read-only handle. Then we call query( ) to perform the actual SELECT SQL statement. FROM is an array of the columns we want, and ORDER_BY tells SQLite to return the results in order from newest to oldest.
Although we don’t use them in this example, the query( ) method has parameters to specify a WHERE clause, a GROUP BY clause, and a HAVING clause. Actually, query( ) is just a convenience for the programmer. If you prefer, you could build up the SELECT statement yourself in a string and use the rawQuery( ) method to execute it. Either way, the return value is a Cursor object that represents the result set.
A Cursor is similar to a Java Iterator or a JDBC ResultSet. You call methods on it to get information about the current row, and then you call another method to move to the next row. We’ll see how to use it when we display the results in a moment.
The final step is to call startManagingCursor( ), which tells the activity to take care of managing the cursor’s life cycle based on the activity’s life cycle. For example, when the activity is paused, it will automatically deactivate the cursor and then requery it when the activity is restarted. When the activity terminates, all managed cursors will be closed.

HELLO, DATABASE  188
188
Displaying the Query Results
The last method we need to define is showEvents( ). This function takes a Cursor as input and formats the output so the user can read it.
Download Eventsv1/src/org/example/events/Events.java
Line 1 private void showEvents(Cursor cursor) {
-// Stuff them all into a big string
-StringBuilder builder = new StringBuilder(
-"Saved events:\n");
5while (cursor.moveToNext()) {
-// Could use getColumnIndexOrThrow() to get indexes
-long id = cursor.getLong(0);
-long time = cursor.getLong(1);
-String title = cursor.getString(2);
10 builder.append(id).append(": ");
-builder.append(time).append(": ");
-builder.append(title).append("\n");
-}
-// Display on the screen
15 TextView text = (TextView) findViewById(R.id.text);
-text.setText(builder);
-}
In this version of Events, we’re just going to create a big string (see line 3) to hold all the events items, separated by newlines. This is not the recommended way to do things, but it’ll work for now.
Line 5 calls the Cursor.moveToNext( ) method to advance to the next row in the data set. When you first get a Cursor, it is positioned before the first record, so calling moveToNext( ) gets you to the first record. We keep looping until moveToNext( ) returns false, which indicates there are no more rows.
Inside the loop (line 7), we call getLong( ) and getString( ) to fetch data from the columns of interest, and then we append the values to the string (line 10). There is another method on Cursor, getColumnIndexOrThrow( ), that we could have used to get the column index numbers (the values 0, 1, and 2 passed to getLong( ) and getString( )). However, it’s a little slow, so if you need it, you should call it outside the loop and remember the indexes yourself.
Once all the rows have been processed, we look up the TextView from layout/main.xml and stuff the big string into it (line 15).
If you run the example now, you should see something like Figure 9.2, on page 185. Congratulations on your first Android database program! There is plenty of room for improvement, though.