

USING ALTERNATE RESOURCES |
55 |
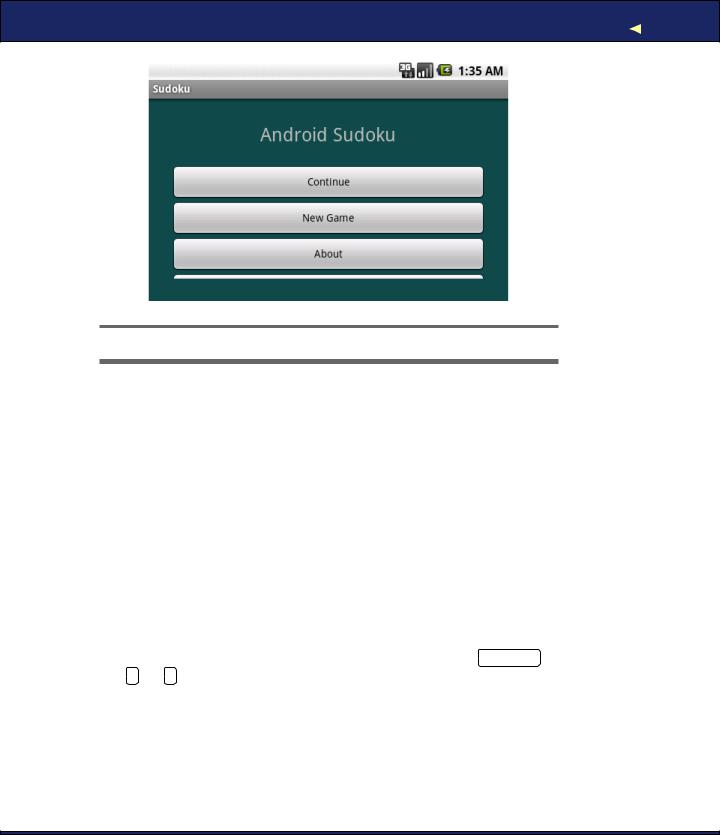
Figure 3.5: In landscape mode, we can’t see the Exit button.
In this version, we introduce a new syntax, @+id/resid. Instead of referring to a resource ID defined somewhere else, this is how you create a new resource ID to which others can refer. For example, @+id/about_ button defines the ID for the About button, which we’ll use later to make something happen when the user presses that button.
The result is shown in Figure 3.4, on page 53. This new screen looks good in portrait mode (when the screen is taller than it is wide), but how about landscape mode (wide-screen)? The user can switch modes at any time, for example, by flipping out the keyboard or turning the phone on its side, so you need to handle that.
3.4Using Alternate Resources
As a test, try switching the emulator to landscape mode ( Ctrl+F11 or the 7 or 9 key on the keypad). Oops! The Exit button runs off the bottom of the screen (see Figure 3.5). How do we fix that?
You could try to adjust the layout so that it works with all orientations. Unfortunately, that’s often not possible or leads to odd-looking screens. When that happens, you’ll need to create a different layout for landscape mode. That’s the approach we’ll take here.
USING ALTERNATE RESOURCES |
56 |
Create a file called res/layout-land/main.xml (note the -land suffix) that contains the following layout:
Download Sudokuv1/res/layout-land/main.xml
<?xml version="1.0" encoding="utf-8"?>
<LinearLayout xmlns:android="http://schemas.android.com/apk/res/android" android:background="@color/background" android:layout_height="fill_parent" android:layout_width="fill_parent"
android:padding="15dip" android:orientation="horizontal"> <LinearLayout
android:orientation="vertical" android:layout_height="wrap_content" android:layout_width="fill_parent" android:layout_gravity="center" android:paddingLeft="20dip" android:paddingRight="20dip"> <TextView
android:text="@string/main_title" android:layout_height="wrap_content" android:layout_width="wrap_content" android:layout_gravity="center" android:layout_marginBottom="20dip" android:textSize="24.5sp" />
<TableLayout android:layout_height="wrap_content" android:layout_width="wrap_content" android:layout_gravity="center" android:stretchColumns="*">
<TableRow>
<Button android:id="@+id/continue_button"
android:text="@string/continue_label" /> <Button
android:id="@+id/new_button" android:text="@string/new_game_label" />
</TableRow>
<TableRow>
<Button android:id="@+id/about_button"
android:text="@string/about_label" /> <Button
android:id="@+id/exit_button" android:text="@string/exit_label" />
</TableRow>
</TableLayout>
</LinearLayout>
</LinearLayout>

IMPLEMENTING AN ABOUT BOX |
57 |
Figure 3.6: Using a landscape-specific layout lets us see all the buttons.
This uses a TableLayout to create two columns of buttons. Now run the program again (see Figure 3.6). Even in landscape mode, all the buttons are visible.
You can use resource suffixes to specify alternate versions of any resources, not just the layout. For example, you can use them to provide localized text strings in different languages. Android’s screen density support depends heavily on these resource suffixes (see Section 13.5,
All Screens Great and Small, on page 267).
3.5Implementing an About Box
When the user selects the About button, meaning that either they touch it (if they have a touch screen) or they navigate to it with the D-pad (directional pad) or trackball and press the selection button, we want to pop up a window with some information about Sudoku.
After scrolling through the text, the user can press the Back button to dismiss the window.
We can accomplish this in several ways:
•Define a new Activity, and start it.
•Use the AlertDialog class, and show it.

IMPLEMENTING AN ABOUT BOX |
58 |
• Subclass Android’s Dialog class, and show that.
For this example, let’s define a new activity. Like the main Sudoku activity, the About activity will need a layout file. We will name it res/layout/ about.xml:
Download Sudokuv1/res/layout/about.xml
<?xml version="1.0" encoding="utf-8"?>
<ScrollView xmlns:android="http://schemas.android.com/apk/res/android" android:layout_width="fill_parent" android:layout_height="fill_parent" android:padding="10dip">
<TextView android:id="@+id/about_content" android:layout_width="wrap_content" android:layout_height="wrap_content" android:text="@string/about_text" />
</ScrollView>
We need only one version of this layout because it will look fine in both portrait and landscape modes.
Now add strings for the title of the About dialog box and the text it contains to res/values/strings.xml:
Download Sudokuv1/res/values/strings.xml
<string name="about_title">About Android Sudoku</string> <string name="about_text">\
Sudoku is a logic-based number placement puzzle. Starting with a partially completed 9x9 grid, the objective is to fill the grid so that each
row, each column, and each of the 3x3 boxes (also called <i>blocks</i>) contains the digits 1 to 9 exactly once.
</string>
Note how a string resource can contain simple HTML formatting and can span multiple lines. In case you’re wondering, the backslash character (\) in about_text prevents an extra blank from appearing before the first word.
The About activity should be defined in About.java. All it needs to do is override onCreate( ) and call setContentView( ). To create a new class in Eclipse, use File > New > Class. Specify the following:
Source folder: Sudoku/src
Package: org.example.sudoku
Name: About

IMPLEMENTING AN ABOUT BOX |
59 |
Edit the class so it looks like this:
Download Sudokuv1/src/org/example/sudoku/About.java
package org.example.sudoku;
import android.app.Activity; import android.os.Bundle;
public class About extends Activity { @Override
protected void onCreate(Bundle savedInstanceState) { super.onCreate(savedInstanceState); setContentView(R.layout.about);
}
}
Next we need to wire all this up to the About button in the Sudoku class. Start by adding a few imports that we’ll need to Sudoku.java:
Download Sudokuv1/src/org/example/sudoku/Sudoku.java
import android.content.Intent; import android.view.View;
import android.view.View.OnClickListener;
In the onCreate( ) method, add code to call findViewById( ) to look up an Android view given its resource ID, and add code to call setOnClickListener( ) to tell Android which object to tickle when the user touches or clicks the view:
Download Sudokuv1/src/org/example/sudoku/Sudoku.java
@Override
public void onCreate(Bundle savedInstanceState) { super.onCreate(savedInstanceState); setContentView(R.layout.main);
// Set up click listeners for all the buttons
View continueButton = findViewById(R.id.continue_button); continueButton.setOnClickListener(this);
View newButton = findViewById(R.id.new_button); newButton.setOnClickListener(this);
View aboutButton = findViewById(R.id.about_button); aboutButton.setOnClickListener(this);
View exitButton = findViewById(R.id.exit_button); exitButton.setOnClickListener(this);
}
While we’re in here, we do the same for all the buttons. Recall that constants like R.id.about_button are created by the Eclipse plug-in in
R.java when it sees @+id/about_button in res/layout/main.xml.
IMPLEMENTING AN ABOUT BOX |
60 |
The setOnClickListener( ) method needs to be passed an object that implements the OnClickListener Java interface. We’re passing it the this variable, so we had better make the current class (Sudoku) implement that interface, or we’ll get a compiler error. OnClickListener has one method in it called onClick( ), so we have to add that method to our class as well:3
Download Sudokuv1/src/org/example/sudoku/Sudoku.java
public class Sudoku extends Activity implements OnClickListener { // ...
public void onClick(View v) { switch (v.getId()) {
case R.id.about_button:
Intent i = new Intent(this, About.class); startActivity(i);
break;
// More buttons go here (if any) ...
}
}
}
To start an activity in Android, we first need to create an instance of the Intent class. There are two kinds of intents: public (named) intents that are registered with the system and can be called from any application and private (anonymous) intents that are used within a single application. For this example, we just need the latter kind. If you run the program and select the About button now, you will get an error (see Figure 3.7, on the following page). What happened?
We forgot one important step: every activity needs to be declared in AndroidManifest.xml. To do that, double-click the file to open it, switch to XML mode if necessary by selecting the AndroidManifest.xml tab at the bottom, and add a new <activity> tag after the closing tag of the first one:
<activity android:name=".About" android:label="@string/about_title">
</activity>
Now if you save the manifest, run the program again, and select the About button, you should see something like Figure 3.8, on page 62. Press the Back button ( Esc on the emulator) when you’re done.
3. If you’re a Java expert, you may be wondering why we didn’t use an anonymous inner class to handle the clicks. You could, but according to the Android developers, every new inner class takes up an extra 1KB of memory.