

SCRAPBOOK Cards Лето 2006
.pdfSomething Special
S u m m e r 2 0 0 6
Sun Kissed By Heather Hildebrand, Crystal City, MB |
Supplies: Cardstock, Bazzill, other cardstock handmade by girls in photo, Alyssa & Kari • Ink, Versa Mark |
• Embellishments, Making Memories, My Sentiments Exactly!, Ranger, Stampin’ Up!, chalk, cotton fabric |
Sun Kissed Summer “The best part of summer for me is seeing the fun you have with your friends in the pool … You two spent almost every waking hour in the water … Every night you went to bed tired, happy and “Sun Kissed”.
Interested in sharing some of your favorite memories with Scrapbook & Cards Today’s readers? Send us your layouts and journaling to ideas@scrapbookandcards.com.
Scrapbook & Cards Today Summer ‘06 |
11 |
www.scrapbookandcards.com |

Q Q. What type of paper should I use when printing my digital pictures at home?
 AA.
AA.
Have a question, or need help? Ask our expert designers and editorial staff, they can help!
Q. What is the best way to adhere ribbon to a layout?
A. There are several methods to adhering ribbon to a layout. Here are our favorite tips (all of which we use in our layouts and cards!):
a.Flip your ribbon over (so the underside is facing up) and cover it with 3M Scotch double-sided tape. Make sure you cover every part for a smooth look.
b.Try using a stapler for a different look. Staples come in different colours if you want to match them to your ribbon colour and they add an additional layer to your layout or card.
c.Try sewing your ribbon on! Hand or machine stitch using a straight stitch will give a neat look, use wavy or zig zag stitching for a funkier look. You can use clear thread if you don't want the stitches to be too visible.
d.Brads and eyelets are also great for attaching ribbon to paper.
e.Try cutting small slits in your paper then weave your ribbon through these slits to give your layout or card a beautiful pattern.

Lots of new themes!
Look for our New Stickers, 2 idea books and wonderful vintage images!
For store locator and lots of inspiring ideas
www.craftysecrets.com

Fairytales
do come True
By Adri Spyker
In all fairytales, there is a prince and a princess and a quest to find true love. In the end, the couple lives happily ever after … or do they? Once the storybook closes, we rarely get a glimpse into ‘ever after’ and can only assume the ending. Do they remain happy? Have a family? Well, I’m here to tell you the ending of one such fairytale, a true story about
a love that spans continents and decades … a real life ‘lives happily ever after’ fairytale!
This fairytale opens with a young prince that grew up far, far away, in a country called The Netherlands. It was there that he would ride his bicycle to the sea, where he would watch ships load and set sail across the ocean, and he would dream of following them one day. Then, his day came and he did just that - at eighteen, he left home to ‘pick the gold up off of the streets' in Canada.
Meanwhile, in Canada, the princess of this story grew up with a longing to see the world, all the while yearning for true love. After working in a variety of places away from her home, she moved back to find that love was waiting for her there!
After moving to Canada, the young prince had joined the Canadian Army Reserves and was based not far from where she lived. He saw her and knew he had found the ‘gold’ he had hoped for – but to his surprise, it was not in the form of money, but in love. The princess knew instantly deep within her heart that she had found her prince charming!
They were married in an all white ceremony on July 1st, 1960 – Canada Day. For their honeymoon, the newlyweds visited Holland so the prince could
show his new bride his boyhood home and she could meet her husband’s family for the first time. Sound like a fairytale? Maybe, but this is a true story of love that has lasted for over 45 years! Our prince and princess are as in love today as they were when they first met. They have lived happily ever after, and had a family, a daughter – me! The prince and princess are my parents. I can truly say
that fairytales really do come true, they do have happy endings, and the prince and princess do live happily ever after … the End!
Supplies: Cardstock, Bazzill, DMD, Georgia-Pacific
• Embellishments, Stickopotamus, Gift Co.Ltd., EK Success, Pressed Petals Inc., Offray, Karen Foster Design, American Tombow, All Night Media Plaid Enterprises Inc., 3M, MS/Word/Microsoft ®
14 Scrapbook & Cards Today Summer ‘06

“For the first time, I understood the charm of adding wording to a layout.”
Journaling for the First Time
For the first time, I understood the charm of adding wording to a layout. I’d always seen scrapbooking as a visual medium, but I’ve since changed my mind. Journaling with pictures really adds dimension to a design and now I’m hooked. In this case, I wrote their story in the third person to give it life. The result is a layout based on two greeting cards, alternated by two flaps with journaling and pictures inside.
“It all started with cobblestones and rain …”
Scrapbook & Cards Today Summer ‘06 |
15 |
www.scrapbookandcards.com |

Beginner
 Beyond
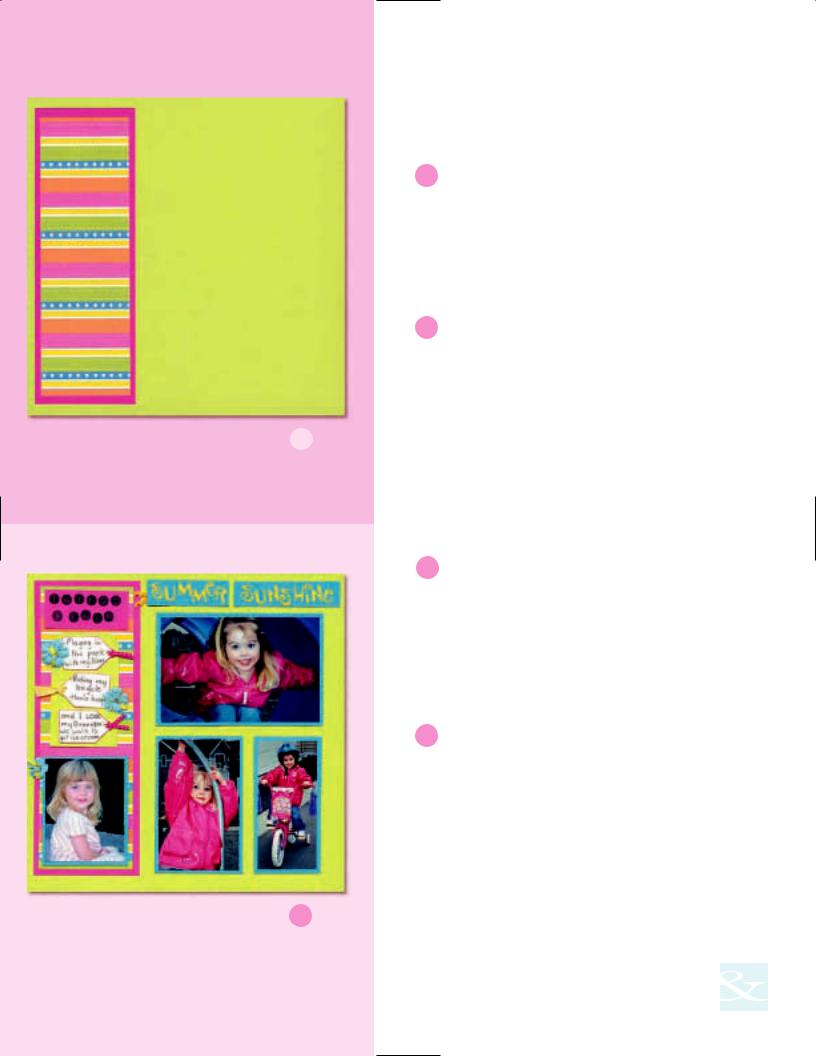
Colour blocking is a classic technique that is simple in its design; solid blocks of colour are used together on a layout to achieve visual interest. Once you have chosen photographs that you would like to display in a layout, choose a patterned paper that you like that has a similar ‘feeling’ as your photos. Our designer Dianne Glass chose a bright, fun paper that coordinates well with these summer girly photos.
The next step is to use the colours within your patterned paper to find a couple of matching cardstock colours. By choosing colours from your patterned paper, you are guaranteed to have a coordinating layout.
• • • • • • • • • • • • • • • • • • • • • • • • • • • • • • • • • • • • • • • • |
|
When creating your colour blocked layout or card, |
A |
keep these simple basics in mind. |
|
Photos
•Choose your pictures – you may want to consider choosing your favourite close-ups and clear shots that express what it is you want to share with
those that will be looking at your layout. |
• • • • • • |
• • • • • • • • • • • • • • • • • • • • • • • • • • • • |
Mats
•Create a frame around your photo by cutting a piece of cardstock slightly larger than the photograph. For a special focal photo, you may choose to double mat it with two colours of cardstock to make it stand out.
Tip: Don’t feel as though you need to mat every photograph; varying the number of mats keeps the layout interesting.
•Adhere your matted photographs to the layout on top of the colour block pieces.
Titles and Journaling
•Cut a piece of solid cardstock for the title ‘block’.
Tip: If you have a short title, or extra small photos, include some of the photos as part of the title block.
•Die cuts, letter stickers and alphabet stamps are ideal for creating titles.
•Tags or smaller colour blocks are great for adding journaling. Depending on the amount of journaling, you can add more photos or embellishments to this colour block.
Embellishments
•Choose embellishments that match your cardstock and patterned paper.
•If you’d like to draw attention to your title, attach a small piece of ribbon or ric rac to the side of your title.
•Odd numbers of embellishments form a “visual triangle” creating visual appeal.
•Embellishments perform double duty when used to attach die cut accents.
C
16 Scrapbook & Cards Today Summer ‘06
|
|
A |
cardstock in |
|
was used in |
|
this example.) Cut two blocks of 5” X 5” |
|
patterned paper. Adhere these four |
|
blocks to the ‘base’ cardstock, leaving |
|
equal spaces between the squares. |
B |
Begin with your base cardstock. |
|
Add a 4” X 11 1/4” strip of a second |
|
colour of cardstock along the left side |
|
of the base, leaving about 1/4” from the |
|
edge. (Pink was used in this example.) |
|
Center a 3 1/5” X 10 3/4” strip of pat- |
B |
terned paper on the pink cardstock. |
• • • • • • • • • • • • • • • • • • • • • • • • • • • • • • • • • • • • • • • • •
• • • • • • • • • • • • • • • • • • • • • • • • • • • • |
• • • • • • |
C Dianne cropped her photos into squares. Tip: The four blocks you create do not need to be square. Varying the size and shape of your ‘blocks’ will customize your layouts. To achieve an even, balanced feel, keep the blocks similar to each other in shape and size.
D The two lower photos are cropped to the same height, so they would coordinate with one another. Dianne chose three flower accents and three tags to demonstrate how embellishments in threes create visual appeal.
Supplies: Cardstock, Bazzill • Patterned Paper, Creative Imaginations •
Embellishments, QuicKutz, May Arts, My Sentiments Exactly!
D
Scrapbook & Cards Today Summer ‘06 |
17 |
www.scrapbookandcards.com |

the many faces of
Chipboard
By Kelly Parker
a.Acrylic paint is always a great option and you can even match it to your paper and embellishments.
b.Coloured rub-ons are a no fuss way to dress up ordinary chipboard.
c
your photo on and use a utility knife to trim away the excess making sure to follow the shape of your chipboard.
d.Sand looks right at home on a beach layout!
e.Everyone loves to stamp ... try using a stamp that fits your
It is everywhere ... raw, undressed, two-sided, and it comes in monograms, circles, rectangles and pretty much any and all shapes and sizes. What is it?
Chipboard!
Chipboard has been around forever. It is often used to strengthen envelopes and mailers, however, scrapbookers tapped into its versatility within the last couple of years, using it in a wide variety of ways. Chipboard is generally kraft coloured, acid free, made of recycled paper and comes in different weights (thicknesses).
To demonstrate its versatility, I have designed the A – Z of altering chipboard, but this is just a starting point. Try using two or three of these ideas on one chipboard accent and I’m sure you will be thrilled with the results. I do recommend that if you are making your own chipboard accents that you check to make sure that the chipboard is acid free using a ph testing pen.
So go on, get creative and start altering those chipboard accents to suit your design style!
theme and choose an ink colour that works great with your design.
f.Beads adhered with Glossy Accents, Diamond Glaze or Crystal Lacquer make your chipboard glamorous.
Ink directly onto chipboard – try pigment ink and fluid chalk ink.
Alphabet stickers make a great collage on chipboard.
Use liquid adhesive or glue dots to adhere buttons on chipboard.
Supplies: All chipboard monograms are Undressed by BasicGrey.
|
a. Deco Art acrylic paint by DA 18, Glossy Accents by Ranger, ribbon by Making Memories |
|
18 |
b. |
Rub-ons by SEI Kaboom, fine tip marker in red by Creative Memories |
c. |
Xyron Adhesive, a photo and fibre by unknown |
|
|
d. Sparkling Sand by Magic Scraps |
|
|
e. |
Deco Art acrylic paint by DA 18, Black Soot Distress Ink by Ranger, Inkadinkadoo stamp 93083-X |
f.Deco Art acrylic paint by DA 18, Glossy Accents by Ranger, clear micro beads by unknown
g.Versa Color water based pigment ink in Cyan by Tsukineko, daisy appliqué by Tiffany
h.Stickers by American Crafts Monograms
i.Xyron adhesive, assorted buttons by unknown

“
pick:
A surefire winner is to combine a
painted letter, with ribbon and a Prima flower! ”
n.Embossing a stamped design is fun – try finishing it off with a dot of Glossy Accents in the center of each flower and sprinkling some micro beads over top.
o.Cover your chipboard with flowers – ah, simply flowers!
p.Want that stucco look? Try Texture Magic by Delta.
r.Ultra Thick Embossing Enamel (UTEE) by Ranger comes in a rainbow of colours and offers a high gloss finish. This is one of my favourite ways to alter chipboard!
j. |
favourite – try spray adhesive |
|
or a Xyron machine to give an even distribution |
|
of adhesive before laying it on your chipboard. |
k.Krylon leafing pens should be a staple - not only do they make they task of gold and silver leafing easy and mess-free, but they last FOREVER and can be used to jazz up anything.
l.Cover your shape with fibre or yarn – or try wrapping it around for another great look.
m.Try painting your chipboard then laying Magic Mesh over top.
j. |
Xyron adhesive, ribbon by Making Memories and Offray, button by unknown |
Glossy Accents by Ranger, Blue Micro beads by unknown, Sparkle and Shine Gel-a-tins by Scraptivity! |
|
|
k. |
18kt gold leafing pen by Krylon, small watch face by L’il Davis |
o. |
Prima flowers by Prima Marketing Inc. |
19 |
l. |
Fibre by unknown |
p. |
Delta Texture Magic in French Blue |
|
m. |
Black Magic Mesh, Deco Art acrylic paint by DA 18 |
r. |
Versa Mark stamp pad, white UTEE by Ranger, flower stamp by Village Arts Press |
|
n. |
Versa Mark Stamp pad, clear embossing powder by Scraptivity!, Deco Art acrylic paint by DA 18, |
|
|
|
|
|
|
|
|

q. Like the look of stone? Deco Art has a line of stone-like textural acrylics that mimic the look of stone, but goes on like paint.
Paper is a great standby for altering chipboard and is great when trying to match embellishments to your cardstock or patterned paper.
Fabric scraps are fabulous to dress-up your chipboard!
Metallic rub-ons are easy to use and offer nice coverage on chipboard.
Velvet is warm and cozy and has a great brushed look ... if you like velvet, check out SEI’s line of velvet papers!
Trims found at your local fabric store can be cut up and used on chipboard.
Don’t forget about the trusty paper punch or paper ‘shaper’ as we now call them ... add some itty bitty beads in the centre of some of the flowers to add that little extra flair.
Cork is great for natural, earthy looking pages.
For a full description on how Kelly “dressed” her chipboard please visit our website,
www.scrapbookandcards.com/magazine.
q. |
Deco Art sandstones in Golden Fleck |
v. |
Metallic rub-ons colour kit |
Craf-T Products Inc., Glossy Accents by Ranger |
s. |
Versa Mark stamp pad, Stamp-n-Stuff embossing powder in Red Tinsel by Stampendous, large clear |
w. |
Velvet paper, 2005 |
line, by SEI |
|
flower jewels by Heidi Swapp |
x. |
Trim unknown |
|
t. |
Heirlooms pattern paper by Daisy D Attic |
y. |
Cardstock by Bazzill, |
by unknown |
u. |
Denim fabric by unknown |
z. |
Cork by Magic Scraps |
|
|
|
|
|
|
20 Scrapbook & Cards Today Summer ‘06