

- •Practical Unit Testing with JUnit and Mockito
- •Table of Contents
- •About the Author
- •Acknowledgments
- •Preface
- •Preface - JUnit
- •Part I. Developers' Tests
- •Chapter 1. On Tests and Tools
- •1.1. An Object-Oriented System
- •1.2. Types of Developers' Tests
- •1.2.1. Unit Tests
- •1.2.2. Integration Tests
- •1.2.3. End-to-End Tests
- •1.2.4. Examples
- •1.2.5. Conclusions
- •1.3. Verification and Design
- •1.5. Tools Introduction
- •Chapter 2. Unit Tests
- •2.1. What is a Unit Test?
- •2.2. Interactions in Unit Tests
- •2.2.1. State vs. Interaction Testing
- •2.2.2. Why Worry about Indirect Interactions?
- •Part II. Writing Unit Tests
- •3.2. Class To Test
- •3.3. Your First JUnit Test
- •3.3.1. Test Results
- •3.4. JUnit Assertions
- •3.5. Failing Test
- •3.6. Parameterized Tests
- •3.6.1. The Problem
- •3.6.2. The Solution
- •3.6.3. Conclusions
- •3.7. Checking Expected Exceptions
- •3.8. Test Fixture Setting
- •3.8.1. Test Fixture Examples
- •3.8.2. Test Fixture in Every Test Method
- •3.8.3. JUnit Execution Model
- •3.8.4. Annotations for Test Fixture Creation
- •3.9. Phases of a Unit Test
- •3.10. Conclusions
- •3.11. Exercises
- •3.11.1. JUnit Run
- •3.11.2. String Reverse
- •3.11.3. HashMap
- •3.11.4. Fahrenheits to Celcius with Parameterized Tests
- •3.11.5. Master Your IDE
- •Templates
- •Quick Navigation
- •Chapter 4. Test Driven Development
- •4.1. When to Write Tests?
- •4.1.1. Test Last (AKA Code First) Development
- •4.1.2. Test First Development
- •4.1.3. Always after a Bug is Found
- •4.2. TDD Rhythm
- •4.2.1. RED - Write a Test that Fails
- •How To Choose the Next Test To Write
- •Readable Assertion Message
- •4.2.2. GREEN - Write the Simplest Thing that Works
- •4.2.3. REFACTOR - Improve the Code
- •Refactoring the Tests
- •Adding Javadocs
- •4.2.4. Here We Go Again
- •4.3. Benefits
- •4.4. TDD is Not Only about Unit Tests
- •4.5. Test First Example
- •4.5.1. The Problem
- •4.5.2. RED - Write a Failing Test
- •4.5.3. GREEN - Fix the Code
- •4.5.4. REFACTOR - Even If Only a Little Bit
- •4.5.5. First Cycle Finished
- •‘The Simplest Thing that Works’ Revisited
- •4.5.6. More Test Cases
- •But is It Comparable?
- •Comparison Tests
- •4.6. Conclusions and Comments
- •4.7. How to Start Coding TDD
- •4.8. When not To Use Test-First?
- •4.9. Should I Follow It Blindly?
- •4.9.1. Write Good Assertion Messages from the Beginning
- •4.9.2. If the Test Passes "By Default"
- •4.10. Exercises
- •4.10.1. Password Validator
- •4.10.2. Regex
- •4.10.3. Booking System
- •Chapter 5. Mocks, Stubs, Test Spies
- •5.1. Introducing Mockito
- •5.1.1. Creating Test Doubles
- •5.1.2. Expectations
- •5.1.3. Verification
- •5.1.4. Conclusions
- •5.2. Types of Test Double
- •5.2.1. Code To Be Tested with Test Doubles
- •5.2.2. The Dummy Object
- •5.2.3. Test Stub
- •5.2.4. Test Spy
- •5.2.5. Mock
- •5.3. Putting it All Together
- •5.4. Example: TDD with Test Doubles
- •5.4.2. The Second Test: Send a Message to Multiple Subscribers
- •Refactoring
- •5.4.3. The Third Test: Send Messages to Subscribers Only
- •5.4.4. The Fourth Test: Subscribe More Than Once
- •Mockito: How Many Times?
- •5.4.5. The Fifth Test: Remove a Subscriber
- •5.4.6. TDD and Test Doubles - Conclusions
- •More Test Code than Production Code
- •The Interface is What Really Matters
- •Interactions Can Be Tested
- •Some Test Doubles are More Useful than Others
- •5.5. Always Use Test Doubles… or Maybe Not?
- •5.5.1. No Test Doubles
- •5.5.2. Using Test Doubles
- •No Winner So Far
- •5.5.3. A More Complicated Example
- •5.5.4. Use Test Doubles or Not? - Conclusion
- •5.6. Conclusions (with a Warning)
- •5.7. Exercises
- •5.7.1. User Service Tested
- •5.7.2. Race Results Enhanced
- •5.7.3. Booking System Revisited
- •5.7.4. Read, Read, Read!
- •Part III. Hints and Discussions
- •Chapter 6. Things You Should Know
- •6.1. What Values To Check?
- •6.1.1. Expected Values
- •6.1.2. Boundary Values
- •6.1.3. Strange Values
- •6.1.4. Should You Always Care?
- •6.1.5. Not Only Input Parameters
- •6.2. How to Fail a Test?
- •6.3. How to Ignore a Test?
- •6.4. More about Expected Exceptions
- •6.4.1. The Expected Exception Message
- •6.4.2. Catch-Exception Library
- •6.4.3. Testing Exceptions And Interactions
- •6.4.4. Conclusions
- •6.5. Stubbing Void Methods
- •6.6. Matchers
- •6.6.1. JUnit Support for Matcher Libraries
- •6.6.2. Comparing Matcher with "Standard" Assertions
- •6.6.3. Custom Matchers
- •6.6.4. Advantages of Matchers
- •6.7. Mockito Matchers
- •6.7.1. Hamcrest Matchers Integration
- •6.7.2. Matchers Warning
- •6.8. Rules
- •6.8.1. Using Rules
- •6.8.2. Writing Custom Rules
- •6.9. Unit Testing Asynchronous Code
- •6.9.1. Waiting for the Asynchronous Task to Finish
- •6.9.2. Making Asynchronous Synchronous
- •6.9.3. Conclusions
- •6.10. Testing Thread Safe
- •6.10.1. ID Generator: Requirements
- •6.10.2. ID Generator: First Implementation
- •6.10.3. ID Generator: Second Implementation
- •6.10.4. Conclusions
- •6.11. Time is not on Your Side
- •6.11.1. Test Every Date (Within Reason)
- •6.11.2. Conclusions
- •6.12. Testing Collections
- •6.12.1. The TDD Approach - Step by Step
- •6.12.2. Using External Assertions
- •Unitils
- •Testing Collections Using Matchers
- •6.12.3. Custom Solution
- •6.12.4. Conclusions
- •6.13. Reading Test Data From Files
- •6.13.1. CSV Files
- •6.13.2. Excel Files
- •6.14. Conclusions
- •6.15. Exercises
- •6.15.1. Design Test Cases: State Testing
- •6.15.2. Design Test Cases: Interactions Testing
- •6.15.3. Test Collections
- •6.15.4. Time Testing
- •6.15.5. Redesign of the TimeProvider class
- •6.15.6. Write a Custom Matcher
- •6.15.7. Preserve System Properties During Tests
- •6.15.8. Enhance the RetryTestRule
- •6.15.9. Make an ID Generator Bulletproof
- •Chapter 7. Points of Controversy
- •7.1. Access Modifiers
- •7.2. Random Values in Tests
- •7.2.1. Random Object Properties
- •7.2.2. Generating Multiple Test Cases
- •7.2.3. Conclusions
- •7.3. Is Set-up the Right Thing for You?
- •7.4. How Many Assertions per Test Method?
- •7.4.1. Code Example
- •7.4.2. Pros and Cons
- •7.4.3. Conclusions
- •7.5. Private Methods Testing
- •7.5.1. Verification vs. Design - Revisited
- •7.5.2. Options We Have
- •7.5.3. Private Methods Testing - Techniques
- •Reflection
- •Access Modifiers
- •7.5.4. Conclusions
- •7.6. New Operator
- •7.6.1. PowerMock to the Rescue
- •7.6.2. Redesign and Inject
- •7.6.3. Refactor and Subclass
- •7.6.4. Partial Mocking
- •7.6.5. Conclusions
- •7.7. Capturing Arguments to Collaborators
- •7.8. Conclusions
- •7.9. Exercises
- •7.9.1. Testing Legacy Code
- •Part IV. Listen and Organize
- •Chapter 8. Getting Feedback
- •8.1. IDE Feedback
- •8.1.1. Eclipse Test Reports
- •8.1.2. IntelliJ IDEA Test Reports
- •8.1.3. Conclusion
- •8.2. JUnit Default Reports
- •8.3. Writing Custom Listeners
- •8.4. Readable Assertion Messages
- •8.4.1. Add a Custom Assertion Message
- •8.4.2. Implement the toString() Method
- •8.4.3. Use the Right Assertion Method
- •8.5. Logging in Tests
- •8.6. Debugging Tests
- •8.7. Notifying The Team
- •8.8. Conclusions
- •8.9. Exercises
- •8.9.1. Study Test Output
- •8.9.2. Enhance the Custom Rule
- •8.9.3. Custom Test Listener
- •8.9.4. Debugging Session
- •Chapter 9. Organization Of Tests
- •9.1. Package for Test Classes
- •9.2. Name Your Tests Consistently
- •9.2.1. Test Class Names
- •Splitting Up Long Test Classes
- •Test Class Per Feature
- •9.2.2. Test Method Names
- •9.2.3. Naming of Test-Double Variables
- •9.3. Comments in Tests
- •9.4. BDD: ‘Given’, ‘When’, ‘Then’
- •9.4.1. Testing BDD-Style
- •9.4.2. Mockito BDD-Style
- •9.5. Reducing Boilerplate Code
- •9.5.1. One-Liner Stubs
- •9.5.2. Mockito Annotations
- •9.6. Creating Complex Objects
- •9.6.1. Mummy Knows Best
- •9.6.2. Test Data Builder
- •9.6.3. Conclusions
- •9.7. Conclusions
- •9.8. Exercises
- •9.8.1. Test Fixture Setting
- •9.8.2. Test Data Builder
- •Part V. Make Them Better
- •Chapter 10. Maintainable Tests
- •10.1. Test Behaviour, not Methods
- •10.2. Complexity Leads to Bugs
- •10.3. Follow the Rules or Suffer
- •10.3.1. Real Life is Object-Oriented
- •10.3.2. The Non-Object-Oriented Approach
- •Do We Need Mocks?
- •10.3.3. The Object-Oriented Approach
- •10.3.4. How To Deal with Procedural Code?
- •10.3.5. Conclusions
- •10.4. Rewriting Tests when the Code Changes
- •10.4.1. Avoid Overspecified Tests
- •10.4.2. Are You Really Coding Test-First?
- •10.4.3. Conclusions
- •10.5. Things Too Simple To Break
- •10.6. Conclusions
- •10.7. Exercises
- •10.7.1. A Car is a Sports Car if …
- •10.7.2. Stack Test
- •Chapter 11. Test Quality
- •11.1. An Overview
- •11.2. Static Analysis Tools
- •11.3. Code Coverage
- •11.3.1. Line and Branch Coverage
- •11.3.2. Code Coverage Reports
- •11.3.3. The Devil is in the Details
- •11.3.4. How Much Code Coverage is Good Enough?
- •11.3.5. Conclusion
- •11.4. Mutation Testing
- •11.4.1. How does it Work?
- •11.4.2. Working with PIT
- •11.4.3. Conclusions
- •11.5. Code Reviews
- •11.5.1. A Three-Minute Test Code Review
- •Size Heuristics
- •But do They Run?
- •Check Code Coverage
- •Conclusions
- •11.5.2. Things to Look For
- •Easy to Understand
- •Documented
- •Are All the Important Scenarios Verified?
- •Run Them
- •Date Testing
- •11.5.3. Conclusions
- •11.6. Refactor Your Tests
- •11.6.1. Use Meaningful Names - Everywhere
- •11.6.2. Make It Understandable at a Glance
- •11.6.3. Make Irrelevant Data Clearly Visible
- •11.6.4. Do not Test Many Things at Once
- •11.6.5. Change Order of Methods
- •11.7. Conclusions
- •11.8. Exercises
- •11.8.1. Clean this Mess
- •Appendix A. Automated Tests
- •A.1. Wasting Your Time by not Writing Tests
- •A.1.1. And what about Human Testers?
- •A.1.2. One More Benefit: A Documentation that is Always Up-To-Date
- •A.2. When and Where Should Tests Run?
- •Appendix B. Running Unit Tests
- •B.1. Running Tests with Eclipse
- •B.1.1. Debugging Tests with Eclipse
- •B.2. Running Tests with IntelliJ IDEA
- •B.2.1. Debugging Tests with IntelliJ IDEA
- •B.3. Running Tests with Gradle
- •B.3.1. Using JUnit Listeners with Gradle
- •B.3.2. Adding JARs to Gradle’s Tests Classpath
- •B.4. Running Tests with Maven
- •B.4.1. Using JUnit Listeners and Reporters with Maven
- •B.4.2. Adding JARs to Maven’s Tests Classpath
- •Appendix C. Test Spy vs. Mock
- •C.1. Different Flow - and Who Asserts?
- •C.2. Stop with the First Error
- •C.3. Stubbing
- •C.4. Forgiveness
- •C.5. Different Threads or Containers
- •C.6. Conclusions
- •Appendix D. Where Should I Go Now?
- •Bibliography
- •Glossary
- •Index
- •Thank You!
Chapter 4. Test Driven Development
first it should fail, thus repeating the observed buggy behaviour. Later on, you should fix the code so the test passes.
If you think about it, you will realize that writing a test after a bug has been found really amounts to a test-first approach. You write a test which fails (because you want to mimic the bug), and then you implement the code.
The big issue here is to pinpoint the bug precisely, so that you are able to write a unit test which exposes it. This might be really tricky. It may be that multiple bugs are turning up in your business logic in the course of your clicking the UI of your application. It is not so easy to tell exactly which class is responsible for some particular bit of erroneous behaviour. This is usually solved by first writing a higher-level test (i.e. an end-to-end test), and then gradually gathering information on the cause, narrowing the search field by writing more focused tests: first integration, and then eventually unit, tests.
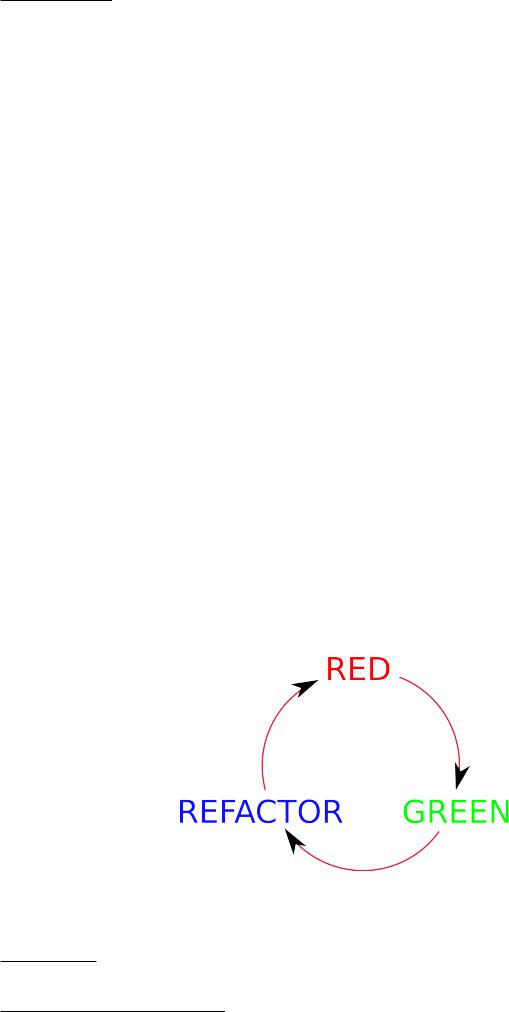
4.2. TDD Rhythm
The nice thing about test-first coding is that it consists of a few very simple steps repeated over and over again. And – which comes as quite a surprise the first time one encounters it – these simple steps lead to a great coding experience and great results. Pure magic, isn’t it?
Now, I would like you to take a look at Figure 4.1. This picture is simplified. It does not tell the whole truth. We will enhance it further to include some more details. Yet, this is THE picture that should hang over your desk2. It gives you the rhythm of your work:
1.Write a test that fails (RED).
2.Make the code work (GREEN).
3.Eliminate redundancy (REFACTOR).
It also gives you a simple rule to follow: never write code without a failing test!
Figure 4.1. The most important picture
The next picture - Figure 4.2 - gives some more insight into the TDD rhythm. It shows how you start with a list of tests, choose one of them, and then follow the red-green-refactor cycle, making sure you end up with green.
2If I had to choose one thing that I would like you to remember from this book, it would be this picture!
41