

simulated time duration is always associated with new Transactions being taken from the
FEC.
When you use the INTEGRATE Command to automatically maintain a continuous variable, a mathematical integration algorithm is employed between discrete time instants to update the continuous variables. Such mixed simulations proceed in alternating discrete and continuous phases. But more on this later, in the lesson on continuous modeling.
That’s all for now. Go ahead and end the GPSS World Session.
CLICK ON The X-Upper Right of the Model Window
and answer the questions asked in the dialog boxes. We have added a TERMINATE Block wince we saved the model. If you want to use the model in the next lesson, no to the "Do you want to save the simulation" and "yes" to the save question for the model. Once we add a new block in the next lesson, we would have to retranslate the model to create a new simulation.
In the simple simulation we studied in this lesson, the Transactions which represented the customers did not do anything! They entered the store and disappeared in the same instant. To be realistic, we must have the customers spend time before departing. We obviously must have a way to cause a time delay in the simulation. This is discussed in the next lesson. See you then.
Lesson 6 - The ADVANCE Block
Before starting this lesson, let’s review how a simulation works. Remember that the Future Events Chain, the FEC, is a chain of Transactions in increasing order of scheduled times. When all the Transactions scheduled for the current time have done all they can do, the most imminent Transaction(s) are taken from the FEC, and the system clock is advanced. Such Transactions are kept in a first come first served (within priority) holding area called the Current Events Chain, or CEC.
The highest priority Transaction on the CEC is the Active Transaction. A simulation consists of the Active Transaction entering first one GPSS Block, then the next, until it can enter no more. When the Active Transaction can no longer move, it is removed from the CEC. Then another Transaction becomes the Active Transaction. If the CEC is empty, the next Active Transaction must come from the FEC, by moving one or more Transactions from the FEC, to the CEC. Remember, it is precisely the act of taking the most imminent Transaction(s) from the FEC that makes the system clock advance.
In the last lesson we learned how GPSS World simulates time durations by placing Transactions on the FEC, and moving them to the CEC at the end of the simulated duration. This was controlled by a GENERATE Block. In this lesson, you will learn how to use the ADVANCE Block to cause existing Transactions to experience simulated delays.
Let’s take another look at the simulation we used in the last lesson. It simulated the arrival of customers at a store. Recall that in the simulation, we represent the situation where customers arrive precisely 60 seconds apart.
Let’s begin. Start a GPSS World Session. See Lesson 1 if you are unsure of how to do this. If you have not deleted MYMODEL.GPS from Lesson 5, open it now otherwise,
CHOOSE File/ New and since the model type is already selected
SELECT OK
TYPE GENERATE 60 ;Create a new Transaction
and on the next line
TYPE TERMINATE 1 ;Destroy a Transaction
Save the model using Save As like we did in Lesson 5.
Create the simulation.
CHOOSE Command / Create Simulation
Now, open the Blocks Window.
CHOOSE Window / Simulation Window / Blocks Window
Now set up a Stop Condition that will cause the simulation to stop on each attempted entry into the TERMINATE Block.
CLICK ON The TERMINATE Block
and in the Blocks Window
CLICK ON The Place Icon in the Debug Toolbar at the Top of the Window
to place a Stop condition on the TERMINATE Block and then return to the Journal / Simulation Window
CLICK ON Anyplace on the Journal / Simulation Window.
then
CHOOSE Command / START
and in the dialog box replace the 1,
TYPE 1000
SELECT OK
This sets the Termination Count to 1000, and begins the simulation. But remember that we have set up a Stop Condition. That is why the simulation stops on the first attempt to enter the TERMINATE Block. Now, look at the Current Events Chain and the Future Events Chain. Remember, if you are using the Student Version, you will have to do a Report ,Now in order to see the CEC and FEC.
CHOOSE Window / Simulation Snapshot / FEC Snapshot
and
CHOOSE Window / Simulation Snapshot / CEC Snapshot
CLICK ON The Plus Sign in the CEC Snapshot Window
Transaction 1 is on the Current Events Chain, and Transaction 2 is on the Future Events Chain, ready to enter the GENERATE Block when the simulated clock time becomes 120 seconds. Transaction number 1 does all its Block entries at time 60, and then the clock is advanced. Transaction 1 is about to be destroyed by entering the TERMINATE Block.
Before we continue, close the FEC and CEC Snapshots.
CLICK ON The Block Icon in the Upper Left of Each Window
Now, let’s continue. Make sure that the focus is on the Blocks Window.
PRESS p
to step one Block entry.
Let’s look at the simulated clock time.
CHOOSE Command / SHOW
and in the dialog box
TYPE AC1
The current time is 120.000, the simulation entry time for Transaction 2 is shown in the
Status Line of the Main Window. Let’s load the SHOW command into s if you haven’t already done so in the last lesson.
CHOOSE Edit / Settings
In the notebook go to the Function Keys page and to the right of F8
TYPE SHOW AC1
SELECT OK
Transaction 1 is gone. Since that depleted the Current Events Chain, the simulation jumped to the next scheduled time at 120 seconds. Transaction 2 was taken off the Future Events Chain and placed on the Current Events Chain, thereby advancing the system clock to 120.
Transaction 1 did not spend any time in the simulation. All its Block entries occurred at a single simulated instant, namely when the system clock was at 60 seconds. In the case of a simulation of customer arrivals, we would have to interpret this as a succession of customers arriving, but spending no time in the store. We must get each Transaction back onto the Future Events Chain to simulate the passage of time while the Transaction is still in the simulation. Then the Transaction would be taken off the Future Events Chain after the system clock had advanced. The GPSS ADVANCE Block is what we need! Operand A of the ADVANCE Block is the time increment at which the Transaction should be scheduled to come off the Future Events Chain. Let’s set this up for Transaction 2 in our simulation. First, insert the ADVANCE Block. Insert a line after the GENERATE Block. In the Model Window, position the cursor at the end of the GENERATE Block line and
PRESS e
or
CHOOSE Edit / Insert Line
then
TYPE v ADVANCE v 61 v ;Cust browses 61 sec.
Now that you have added a new Block, you will have to retranslate the model. Make sure that the focus is on the Journal Window to keep track of messages as we Step through the simulation.
CLICK ON Anyplace on the Journal / Simulation Window
and
CHOOSE Command / Retranslate
In the simulation in the last lesson, Transaction 2 left the simulation at time 120, before Transaction 3 arrived (at 180). Now, however, Transaction 2 will stay in the simulation 61 time units. The ADVANCE Block will cause this to happen. This means that Transaction 3 will arrive before Transaction 2 leaves. Lets see if this is true. First let Transaction 2 enter the GENERATE Block. This will create, and schedule Transaction 3 to come in at time 180.
In the Blocks Window we had put a Stop Condition on the TERMINATE Block before we Retranslated. Stops work by block number and survive a Retranslation.The TERMINATE was Block number 2. Now, the ADVANCE Block is block 2 and the Stop will be on it. Start the simulation.
CHOOSE Command / START
In the dialog box replace the 1,
TYPE 1000
SELECT OK
The simulation will stop when Transaction 1 tries to enter the Advance Block.
PRESS p
to make the Transaction enter the ADVANCE Block.
Look at the CEC, and the FEC as we did before by opening the appropriate Snapshot Windows. If you don’t remember how to do this, look back to the beginning of this chapter.
Do you see Transaction 1 on the FEC at time 121 as well as Transaction 2 on the CEC scheduled to move at time 120? Your windows should look like this.

Figure 6—1 FEC Snapshot.
Figure 6—2. CEC Snapshot-Expanded View.
PRESS s
and you will see (in the Status line of the Main Window) that the clock has been updated to time 120. Step twice more.
PRESS p
two times. Now, check the time again by pressing:
PRESS s
Notice that since Transaction 2 was the last Transaction on the Current Events Chain, the system clock was advanced immediately when Transaction 1 was taken from the FEC at time 121. The time is now 121. Once again, you should look at the FEC and CEC to understand which Transaction is on which chain. Notice that Transaction 2 is on the FEC, and will not be active until time 181. Let’s continue. Step two more times.
PRESS p
two times and then look at the location of the Transactions on the chains. When you stepped, you should have caused Transaction 1 to leave the ADVANCE Block and be TERMINATEd. Then, Transaction 3, which has been scheduled to enter the simulation at time 180, will enter the GENERATE Block. Show the current time.
PRESS s
Transaction 3 has entered the GENERATE Block creating Transaction 4. Transaction 3 will take its turn entering the ADVANCE Block next.
Please take time now to understand what is happening. Transaction 3 is about to be placed on the FEC behind Transaction 2 and 4, at time 241 (180+61). The current time is 180, and Transaction 2 will become active at time 181. For the simulated second between time 180 and 181 both Transactions will be on the FEC using up part of their 61 second browsing intervals. This is the first second of Transaction 3’s interval and the last second of Transaction 2’s interval. For this one simulated second, both customers are browsing in the store.
PRESS p
and
PRESS s
Now, notice that Transaction 2 has become active, and that the time is now 181. Transaction 2 is about to leave the simulation at this time since it will enter the TERMINATE Block next. It has just left the ADVANCE Block. Look at snapshots of the CEC and FEC as we did before to establish which Transactions are on which chain. When you have studied the SNAPSHOTS and feel comfortable with the location of the Transactions and their movement times,
PRESS p
PRESS s
Transaction 2 has left the simulation. It arrived at time 120, and left at time 181. That means we have simulated its browsing time to be 61 seconds. That’s exactly what we wanted the ADVANCE Block to do for us.
If we interpret Transaction 2 to represent "customer number 2", we conclude that the customer browsed in the store for 61 seconds, leaving 1 second after the arrival of customer number 3.
GPSS is much more than a programming language. Unlike programming languages, GPSS has many points of control. When you interrupt a program written in C or BASIC you need only know which statement is next. GPSS is different. There’s usually more than one Transaction in the simulation at any instant, and each one can be ready to enter a different GPSS Block! So, we see that unlike a programming language, which always knows which one statement is to be executed next, GPSS has a place marker for each Transaction. This allows you to have each customer in a simulation doing or waiting for a different thing. The use of multiple place markers is one of the reasons that GPSS is a more powerful simulation language than are programming languages like BASIC or FORTRAN or C. Each Transaction in GPSS knows which Block it is to enter next, and there may be thousands of Transactions.
Once again, we now leave you on your own. Your assignment is to continue to use the STEP, and SHOW commands and the Chain Snapshot Windows until you are quite comfortable with the action of the ADVANCE Block to represent a simulated time delay. Use pencil and paper to calculate when future events should be scheduled. Feel free to experiment. Try modifying the ADVANCE Block, but don’t forget you must retranslate after you make changes. You can make the simulation more realistic by using operand B of ADVANCE to randomize the delay times. If you want to venture this far, you should read about the ADVANCE, GENERATE, and TERMINATE Blocks in Chapter 7 of the GPSS World Reference Manual. Return to the tutorial when you are ready.
Welcome back. Did you see that the ADVANCE Block simply places a Transaction back on the FEC to simulate a time delay? It causes the delayed Transaction to be processed at precisely the right simulated time.
Remember that simulated clock time advances every time a Transaction must be taken from the Future Events Chain. A simulation usually consists of many Block entries at a given clock time, followed by a sudden jump to the next clock time. As far as the interpretation of the simulation goes, all GPSS Block entries occurring at a given clock time are occurring instantaneously!
If you want to experiment some more with the ADVANCE Block, please do so. For now,
CLICK ON The X-Upper Right Corner All Open Windows
You decide if you want to save the Simulation or the Model with the ADVANCE block for further experimentation. This will end the GPSS World Session.
Well, now we can simulate customers browsing in the store. But what about when customers want to engage a salesman? A salesman will certainly only talk to one customer at a time. If we do nothing other than add an ADVANCE Block, we will simulate the case where more than one customer has engaged the salesman at the same time. Remember how both Transaction 2 and Transaction 3 were using up their 61 second delays during the same simulated second (180-181) ?
If a customer needs a full 61 seconds of the salesman’s time, we must not start counting until the customer begins talking to the salesmen. In other words, we cannot allow a Transaction to enter the ADVANCE Block until it has engaged the salesman. And we must
stop any Transaction that tries to engage a busy salesman.
As you might expect, GPSS provides Blocks (SEIZE and RELEASE) to do this. We’ll discuss them in the next lesson. See you then.
Lesson 7 - The SEIZE and RELEASE
Blocks: Facility Entities
Before starting this lesson, let’s review how a simulation works. Remember that the Future Events Chain, the FEC, is a chain of Transactions in increasing order of scheduled times. When all the Transactions scheduled for the current time have done all they can do, the most imminent Transaction is taken from the FEC, and the system clock is advanced. All transaction scheduled for the new time are removed. Such Transactions are kept in a first come first served (within priority) holding area called the Current Events Chain, or CEC. The top Transaction on the CEC is called the "Active Transaction". A simulation consists of a series of Active Transactions, each entering as many GPSS Blocks as possible. When one Active Transaction has nothing more to do, another Transaction is chosen to be the Active Transaction. Block entries at a single clock time occur instantaneously, with no simulated time duration.
Good. Now that that’s out of the way, let’s recall what happened in the last lesson. We simulated customers browsing in the store, but we did not cause them to engage a salesman, one at a time. Let us assume that each customer must spend 61 seconds talking to a single salesman. To simulate this, we cannot let a Transaction enter an ADVANCE Block immediately, because that would start counting off the 61 second interval, even if the salesman were talking to another customer. If the salesman is talking to one customer, we want any succeeding Transactions to be prevented from entering the ADVANCE Block. To do this, we can use a GPSS Entity called a Facility, and the associated Blocks, SEIZE and RELEASE. The Facilities Window is available for viewing Facility entities.
A GPSS Facility Entity has several attributes, the most important of which is ownership. When a Facility is owned by a Transaction, it is said to be busy. Otherwise, it is said to be idle. Only one Transaction can own a Facility, and ownership is acquired by entering a SEIZE Block which names that Facility in its A operand. Transactions attempting to acquire ownership of a Facility by entering a SEIZE Block are denied entry into the SEIZE Block until the Facility is idle. This prevents the movement of Transactions that are waiting to gain ownership of the Facility. The would-be SEIZEing Transaction stops moving in the simulation until its turn for ownership comes up. Such Transactions are removed from the CEC, and placed on the Facility’s "Delay Chain" until they can assume ownership of the Facility.
An owning Transaction continues to move in the simulation, and owns the Facility until it enters a RELEASE Block naming that Facility in its A operand. As you can see, the SEIZE and RELEASE Blocks are exactly what we need to keep our "customer" Transactions from entering the ADVANCE Block before they have engaged the salesman. In our Current Model, only when a Transaction comes off the FEC and enters a RELEASE Block, does the next simulated customer get to talk to the salesman.
Let’s try out these new Blocks.
Start a GPSS World Session as we have before. See Lesson 1 if you are unsure of how to do this,
CHOOSE File / Open
Since you know how to enter statements in building a model, we have provided this one for you. All you have to do is select SEIZEMOD from the model list. You will see that the model has the following Blocks.
GENERATE 20 ;Customer arrives and
SEIZE SALESMAN ;Customer engages salesman
and
ADVANCE 41 ;Customer talks to salesman and
RELEASE SALESMAN ;Customer gives up salesman and
TERMINATE 1 ;Customer leaves
Create a simulation.
CHOOSE Command / Create Simulation
Now, let's put a STOP on the GENERATE Block
CHOOSE Window / Simulation Window / Blocks Window
Next,
CLICK ON The GENERATE Block
CLICK ON The Place Icon in the Debug Toolbar at the Top of the Window
SELECT OK
This will set up a Stop Condition that will cause the simulation to stop on each attempted entry into the GENERATE Block.
CHOOSE Command / START
in the dialog box, replace the 1
TYPE 1000
and
SELECT OK
or
PRESS e
The Function key p is also set to cause you to be able to step through the simulation with a
single keystroke. Function key s has been set to show us the clock time. Remember, you
can set any of the function keys to SHOW expressions or System Numerical Attributes (SNAs) that you wish to view as the simulation runs.
Let’s move the first Transaction one step into the GENERATE Block.
PRESS p
Look at the Journal Window. The message will tell you that Transaction 1 is about to enter the SEIZE Block. It will be able to do so because the salesman is idle. Let’s also view the Current and Future Events Chains.
CHOOSE Window / Simulation Snapshot / CEC Snapshot and in the CEC Snapshot Window,
CLICK ON The + Sign
for a closer look at the individual Transaction on the chain.
CHOOSE Window / Simulation Snapshot / FEC Snapshot
After you have viewed the Events Chains, close them. If you want to print them first, select
File / Print.
Transaction 1 is on the CEC ready to enter the SEIZE Block. Transaction 2 is on the FEC scheduled to enter the simulation at time 40.
Give the Blocks Window the focus.
CLICK ON Anyplace on the Blocks Window
Now, let’s allow Transaction 1 to gain ownership of a Facility Entity used to represent the salesman.
PRESS p
Transaction 1 is still the Active Transaction, i.e., first on the CEC. It is now the owner of the Facility that represents the salesman. Let’s check by opening the Facilities Window.
CHOOSE Window / Simulation Window / Facilities Window
This is a representation of the Facility Entity that represents the salesman. Don’t worry about the details of this window, as we will study it later. For now, find the "Owner XN" heading and notice that Transaction 1 is the owner. Transaction 1 is ready to begin the 41 second interval during which the customer will be talking to the salesman, by entering the ADVANCE Block.
PRESS p
and
CHOOSE Window / Simulation Snapshot / FEC Snapshot
PRESS s
The ADVANCE Block has placed Transaction 1 on the FEC. The customer it represents will disengage the salesman at time 61. Notice that the time is 40.
Before we go any further, let’s look at the Blocks Window.
CLICK ON Any place on the Blocks Window
to make it the Active Window. You can do this on any exposed part of the window. Now, let’s move the current Transaction, number 2 one more Block.
PRESS p
Transaction 2 is about to attempt to SEIZE the salesman at time 40. It will not be able to do so. Transaction 1 owns the salesman.
PRESS p
and
PRESS s
and
CHOOSE Window / Simulation Snapshot / FEC Snapshot
and
CHOOSE Window / Simulation Snapshot / CEC Snapshot
What happened to Transaction 2? Where is it? Transaction 2 attempted to enter the SEIZE Block but was denied entry and placed on the Delay Chain of the salesman Facility. By refusing to let Transaction 2 enter the ADVANCE Block, we have not yet started on the 41 seconds that Transaction 2 must pass while owning the salesman Facility. Let’s look at the Facilities Window.
CLICK ON Any place on the Facilities Window
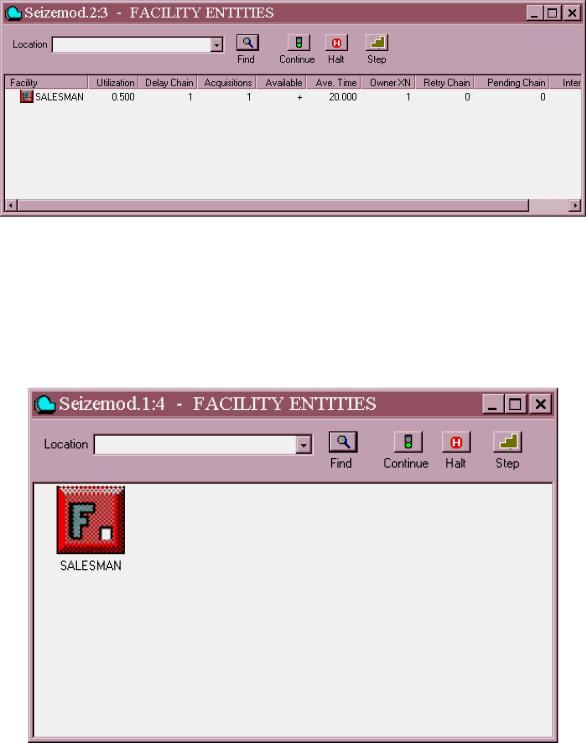
Figure 7—1. Facilities Window. Detailed View.
You will see that there is one Transaction on the Delay Chain for the Facility.
CHOOSE View / Entity Details
We are now looking at the Non-Detailed View of the salesman Facility. See the small column representing a queue containing one Transaction? Transaction 2 is on the Delay Chain of the Facility Entity that represents the salesman.
Figure 7—2. Facilities Window. Non-detailed View.
Let’s continue.
PRESS p
PRESS s
The removal of Transaction 2 from the CEC depleted it. Since Transaction 3 was next on the FEC, the system clock has been advanced to 60. Transaction 1 will be finished talking to the salesman at time 61, and will be ready to disengage by entering the RELEASE Block. Make the Blocks Window the active window
CLICK ON Any place on the Blocks Window

PRESS p
What happened? Where did Transaction 2 come from? Transaction 1 gave up ownership of the salesman Facility when it entered the RELEASE Block. This made the Facility idle. Since Transaction 2 was next on the Delay Chain of the salesman Facility, it was automatically given ownership and allowed to enter the SEIZE Block. Transaction 3 is now on the Delay Chain waiting its turn with the salesman. Now make the Facility Window active
CLICK ON Any place on the Facilities Window
and return to the Detailed View.
CHOOSE View / Entity Details
Figure 7—3. Facilities Window. Detailed View.
See? Transaction 2 owns the Facility, and there is 1 Transaction waiting to own it.
Just a quick note here: You can minimize any of these windows when you don’t want them open on the desktop by clicking on the minimize button (smallest button) in the upper right of the window. Then you can quickly reopen the window by clicking on the window's icon in the lower left of the Main Window. However, always be aware that when on-line windows are minimized or open, they will slow the running of your simulation.
Transaction 1 has entered the RELEASE Block, thereby allowing Transaction 2 to enter the SEIZE Block. Transaction 2 will enter the ADVANCE Block when it gets its turn as the Active Transaction. Transaction 2 immediately takes possession of the Facility even though it is not the active Transaction. It does so by entering the SEIZE Block. This prevents a Transaction that might be transferred from elsewhere in the simulation to the SEIZE Block from jumping ahead of the next rightful owner, Transaction 2.
Transaction 2 is ready to enter the ADVANCE Block, now that it has engaged the salesman. But first, Transaction 1 will leave the simulation by entering the TERMINATE Block.
PRESS p
and
CHOOSE Window / Simulation Snapshot / FEC Snapshot
Figure 7—4. FEC Snapshot.
and

CHOOSE Window / Simulation Snapshot / CEC Snapshot
CLICK ON The + Sign
Figure 7—5. CEC Snapshot, Expanded View.
to view the Expanded View of the CEC and
PRESS s
That gets rid of Transaction 1. Notice that the time is 61 and that Transaction 2 still has not started its 41 second interval. Had we not inserted the SEIZE Block, Transaction 2 would not have been delayed before entering the ADVANCE Block, and both it, and Transaction 1, would have been on the FEC. Both Transactions would have been using up their 41 second interval at the same time. In other words, we would have had two customers talking to the salesman at the same time. The use of the SEIZE Block prevented this.
As before, we again leave you on your own. Your assignment is to continue to use the STEP, and SHOW commands and the various windows until you are quite comfortable with the action of the SEIZE Block to serialize (make one-at-a-time) the movement of Transactions into the ADVANCE Block.
Notice that when a Transaction is on a Delay Chain it cannot be on the FEC or the CEC. That makes sense. The Transaction cannot be on the FEC because it wants to gain ownership of the Facility as soon as possible. There’s no point in putting the Transaction back on the CEC until it can enter the SEIZE Block. All these considerations are handled automatically by GPSS World.
Go ahead and switch to the Blocks Window and the Facilities Window to view the simulation from different viewpoints. Verify that the SEIZE Block allows no more than one Transaction at a time in the ADVANCE Block.
When you feel comfortable with the use of Facility entities to force Transactions to proceed one at a time, go ahead and END the Session.
CLICK ON The X-Upper Right of all open Windows
If you got this far fairly, you are doing just fine. If you are having difficulty with the Future Events Chain and the Current Events Chain, you should go back to Lesson 5. If you are not at ease with how a Transaction must wait on a Facility Delay Chain until it gains ownership, please begin Lesson 7 again.
In the next lesson we will look at how easy it is to get dynamic histograms out of GPSS World simulations.
Lesson 8 - QUEUE and DEPART Blocks:
Queue and Qtable Entities
Unlike the GPSS Blocks studied so far, the QUEUE and DEPART Blocks do nothing other than gather statistics. The statistics are kept in a GPSS Entity called a Queue Entity. Just as with a Facility Entity, a Queue Entity is created automatically when needed. You do not have to define a Queue Entity explicitly.

The most important attribute of a Queue Entity is a number called the "Queue Content". When a Transaction enters a QUEUE Block, the Queue Content of the associated Queue Entity is increased. When a Transaction enters a DEPART Block the Queue Content of the Queue Entity is reduced. The advantage of using Queue entities is that GPSS World will keep statistics automatically for Queue entities. These statistics are written in the Standard Report, and are available during the simulation as several System Numeric Attributes. In addition you can define Qtable entities, which are visible as histograms in a Table Window. Also, you can open a QUEUE Window on the current Queue entities in your simulation and see all the statistics displayed dynamically.
Start a GPSS World Session reading in the SAMPQUE.GPS Program File.
CLICK ON The GPSS World Icon in the GPSS World Folder
CHOOSE File / Open
in the dialog box as shown on the next page
SELECT sampQue
Figure 8—1. The File Open Dialog.
and
SELECT Open
; GPSS World Sample File - SAMPQUE.GPS
**********************************************************************
**
*Barber Shop Simulation *
*Time Is In Minutes *
**********************************************************************
GENERATE (Exponential(1,0,6.5)) ;Create next customer. QUEUE Barber ;Begin queue time.
QUEUE Total_time ;Total haircut time
TRANSFER Both,Barb1,Barb2 ;Choose not busy barber. Barb1 SEIZE Barber1 ;Get service by Barber1. DEPART Barber ;End queue time.

ADVANCE 10,2.5 ;Haircut takes a few minutes.
DEPART Total_time ;Leave total time queue
RELEASE Barber1 ;Give up the barber.
TRANSFER ,Next ;Used Barber1-Done with cut.
Barb2 SEIZE Barber2 ;Get service by Barber2
DEPART Barber ;End queue time.
ADVANCE 13,4 ;Haircut takes a few minutes.
DEPART Total_time ;Leave total time queue
RELEASE Barber2 ;Give up the barber.
Next SAVEVALUE Ave_Queue,QT$Barber ;Save resulting average.
TERMINATE 1 ;Customer leaves.
Recall that this is a simple simulation of a barber shop with one barber. Notice how the QUEUE Barber and DEPART Barber Blocks are used. They define the duration for the automatic queuing statistics associated with the Queue Entity named Barber. In this case, we use QUEUE and DEPART Blocks to "sandwich" the SEIZE Block. This will automatically register a queuing time for each Transaction to enter the DEPART Block. Transactions that are able to own the Facility Entity named Barber immediately, will register a 0 waiting time. The average queue length and the average queuing time will be printed automatically in the GPSS World Standard Report.
We have also placed QUEUE and DEPART Blocks to encompass the entire haircut time, including waiting. We will have statistics for waiting time and for total time to get a haircut, including the wait.
Let’s look at the queue statistics as the simulation runs. First we’ll have to create the simulation.
CHOOSE Command / Create Simulation
Then open the Queues Window to view the Queue Entity statistics as the simulation runs. Arrange the windows so you can see both Model and Queues Windows. For the present, it is not necessary to see the text in the Model Window. The Queues will start to be displayed once the simulation starts to run and the Queues are entered.
CHOOSE Window / Simulation Window / Queues Window
CHOOSE Command / START
and in the dialog box , replace the 1,
TYPE 11111
and
SELECT OK
Figure 8—2. The Queues Window. Detailed View.
Remember that you can view this window in two ways. The Detailed View comes up first. It will give you all the information that you would find in the report as well as an icon that

show that state of the queue. The Non-Detailed View will just give you an overview of the size of the queues in your simulation and is very good for a quick scan of these entities. First, let’s look at the various statistics that are available to us in the Detailed View of Queues. Now for an overview of all the queues. This simulation is set up with two barbers, but the queue for the barbers is a single one.
CHOOSE View / Entity Details
to view the Non-Detailed view of the Queues. When you have viewed this version of the window and are ready to move on, please either minimize the window by a
CLICK ON The Smallest Button in the Upper Right of the Window
or close the window by a
CLICK ON The X-Upper Right of the Window
Now, please halt the simulation.
PRESS o
GPSS World makes it extremely easy to create histograms that can even be viewed dynamically as the simulation runs. This is done by defining a TABLE or QTABLE Entity for each histogram. Let’s begin by putting all the queuing times into a histogram. Instead of an interactive definition in the simulation, here we’ll add the QTABLE definition to the model. Give the Model Window the focus. Place the cursor at the end of the last line of the model and
PRESS e
then
TYPE Waittime QTABLE Barber,2,3,20 ;Wait times Table
Figure 8—3. Addition of a QTABLE Command.
This defines our histogram, or in GPSS terms, our QTABLE Entity. Unlike Facility entities and Queue entities, Qtable entities must be specifically declared in a QTABLE command, to be created. As with all Model Statements, a QTABLE Command can be sent to an existing simulation to define a Qtable Entity interactively.
Now, retranslate the model.
CHOOSE Command / Retranslate and start the simulation running

CHOOSE Command / START
and in the dialog box, replace the 1,
TYPE 1111111
and
SELECT OK
PRESS o
Now the easy part, GPSS World has a graphics window for viewing histograms. Open the Table Window.
CHOOSE Window / Simulation Window / Table Window
In the dialog box you'll see Waittime is already selected.
SELECT OK
Make sure to expand the window to a comfortable size to be able to see the bars in the Table.
Your screen should look something like this.
Figure 8—4. The Table Window.
PRESS m
to watch the Histogram develop.
The vertical axis is a count of Transactions, and the horizontal axis has a bucket for each waiting time in a range. For example, a waiting time of up to 2 minutes will add a count of 1 to the bucket used for times 0 to 2. Let’s watch how the waiting times are changing in our original barber shop example. Do you see that the mean waiting time is around 15 minutes with some customers waiting 56 or more minutes. They must really need a haircut. This will vary depending on where you are in time. When you have seen enough, close this window and switch over to the Blocks Window.
CLICK ON The X-Upper Right of the Table Window
then

CHOOSE Window / Simulation Window / Blocks Window
Figure 8—5. The Blocks Window, Detailed View.
By observing the current Block contents of the first TRANSFER Block (Block 4), you will see that the number of Transactions varies as the customers (Transactions) wait for the barbers. They wait in the Transfer Block until they can enter one of the two SEIZE Blocks that represent ownership of the barber’s services. Close the Blocks Window.
CLICK ON The X-Upper Right of the Blocks Window
Now look at the Facility entities representing the barbers.
CHOOSE Window / Simulation Window / Facilities / Window
Figure 8—6. The Facilities Window.
Utilization of both barbers is quite high. Perhaps, there will be a high turnover rate of employees if we work them this hard.
All the Transactions waiting to get into the SEIZE Block are on Retry Chains of the Facility entities named Barber1 and Barber2. Each time a barber changes state, from busy to not busy, GPSS World checks all the chains associated with the Facilities to see who should be the next owner. In this case, the Transactions are never reaching the Delay Chain for each barber, but are being placed on the Retry Chains associated with the test at the TRANSFER Block. When both barbers are busy they are placed on Retry Chains for both barbers to try again when one becomes free.
Now, look back at the Model Window. You may have to expand it to see the text of the model. Notice, that the labels for the SEIZE Blocks and the Facility Entity names are slightly different. Block locations, i.e., names used in the label field of a Block statement, are special. You should not use Block location names to name other entity types. However, you can give Queues, Storages, Facilities, etc. the same names and it is perfectly acceptable. You could have a Queue named Barber and a Facility with the same name.
Let’s take a look at another histogram. Interrupt the simulation.
PRESS o
CLICK ON The Model Window
Notice that in our barber shop example, the first barber does not take a constant amount of time to do haircuts. Although he averages 10 minutes to do a haircut, the actual durations range from 7.5 to 12.5 minutes. Barber 2 takes from 9 to 17 minutes. The B operand of the ADVANCE Block is the half range of the Uniform distribution. If you are not familiar with operands A and B of the ADVANCE Block, please refer to Chapter 7 of the GPSS World Reference Manual.
The distribution of haircut times generated by the ADVANCE Block is called a uniform distribution. Its histogram will eventually converge to the shape of a rectangular fence. Let’s check this.
First, insert QUEUE and DEPART Blocks to gather the haircut times. Open the Blocks Input Window. In the Model Window insert the following line just before the first ADVANCE Block
TYPE QUEUE Haircut ;Length of cut--Barber 1
Now, position the cursor at the end of the ADVANCE block line and
PRESS e
then
TYPE DEPART Haircut ;Length of cut--Barber 1
Move the cursor to the end of the last line of the model,
PRESS e
and all on one line
TYPE Cuttimes QTABLE Haircut,8,0.5,10 ;Histogram of
Barber1 haircut times
This defines our histogram, or in GPSS terms, our Qtable Entity. Retranslate the model and start it running and open the Tables Window.
CHOOSE Command / Retranslate
and
CHOOSE Command / START in the dialog box, replace the 1,
TYPE 1111111
and
SELECT OK
PRESS o
to halt the simulation while you open the new Table Window, then
CHOOSE Window / Simulation Window / Table Window
in the dialog box you will see Cuttimes is already selected.
SELECT OK
then
PRESS m
to continue the simulation run.
Your screen should something like this look like this after the simulation has run for a few seconds.
Figure 8—7. Haircut Duration Histogram.
If you wish, you can print the window to a printer at any time. Just Choose File / Print in
the Main Window. You can do this at any time, but it is usually wiser to print after you have halted the simulation so you know exactly what you are printing.
Notice that although the histogram is irregular, over a long period of time, it approaches the rectangular shape of the uniform distribution. Also notice that the average haircut time converges to the 400 seconds we desired. When a tabulated duration falls exactly on a boundary, such as 200, the frequency class to the left is incremented.
Clearly our results will not be good if we do not simulate enough haircuts. One of the objectives of your study of simulation methods, is to know how long to run your simulations. This topic is covered in more detail in textbooks on simulation techniques. Also, we will discuss the GPSS World ANOVA command in a later lesson.
When you are ready, go ahead and end the GPSS World Session as we have before.
The TABLE and TABULATE statements are also used to create histograms. They are used with GPSS Table entities, and they allow you to use any expressions, not just simulated durations, in your histograms.
Let’s review. We have used the QUEUE and DEPART Blocks in association with Queue and Qtable entities. We saw how easy it is to view histograms, and we took a brief look at how probability distributions converge.
The insertion of QUEUE and DEPART Blocks does not affect the simulation because no simulated time is used, and the flow of Transactions is not affected. The only difference is that additional statistics are collected automatically.
There are many other GPSS Blocks that we will not consider in this tutorial. However, the examples in Chapter 2 of this manual do use some of them. You must, therefore, make use of Chapter 7 of the GPSS World Reference Manual to understand the use of these Blocks.
Most people generally use only a subset of the GPSS Blocks available. However, you should have a general idea of what the remaining Blocks can do for you. Before concluding this lesson, your assignment is to read the list of Block descriptions at the beginning of