

ZAMBAK_IT_ExpressionWeb2
.pdfAdding Background Color or Picture
You can add background color to your entire table or to the selected cells.
Open Table Properties to add to the entire table or open Cell Properties to add to the selected cells.
Choose a color or a picture in the Background section.
Choosing a background color
Defining cell padding and cell spacing
Cell padding is the amount of empty space that surrounds the contents of each cell.
Cell spacing is the amount of space in the grid border between each cell.
To define cell padding and cell spacing
Open Table Properties.
Specify values for Cell padding and Cell spacing in the Layout section.
Cell padding is the space between the cell edge and text
AutoFit to Contents
You can adjust all the table columns to the exact width of their contents.
Click anywhere in the table and select Table>Modify>AutoFit to Contents.
You can also resize the column to exactly fit its content.
Point to the right border of the column. The pointer changes to a doubleheaded arrow.
Double-click the border. The column is resized to fit its contents.
Laying Out Web Pages With Tables 61

For horizontal alignments you can use also alignment buttons on the common toolbar.
Formatting a Cell
Aligning Objects in a Cell
You can align the objects in the cell horizontally or vertically.
Select the cells where you want to change the alignment.
Right click and select Cell Properties.
Change the Horizontal and Vertical alignment values how you want.
Changing alignments
The text in the cell is located at the center horizontally and at the top vertically.
Merging Cells
You can combine two or more adjacent cells to make a larger cell by merging them. This command is only available when two or more adjacent cells are selected and the selected cells form a rectangle. You can add a title at the top row.
Add a new row at the top of the table and select all cells at the top row.
Right click on the selection and select Modify>Merge Cells.
Merging
cells
The cells are merged.
Type a title in the cell.
62 Chapter 4

Splitting Cells
You can divide a cell into several columns or rows by splitting it.
Right click in the cell that you want to split and select Modify>Split Cells.
Choose if you want to split the cell into rows or columns, and how many to split into.
Splitting cells
Splitting into rows
The cell is split into two rows.
Resize the height of the cell and insert the animated picture into the cell. You can also divide a table into parts and you will have two separate tables.
Place the cursor in the cell where you want to split the table.
Select Table>Modify>Split Table.
A Table within a Table – Nested Tables
You can place a table into a cell - creating a table within a table. You may want to do this if you have a very complex graphic layout and need to align objects in particular way.
To place a table within a table:
Place the cursor in the cell into which you want to add a table.
Click the Insert Table button on the common toolbar and select how many rows and columns you want to insert.
The new table is inserted into the cell.
Nested table
Laying Out Web Pages With Tables 63
How to convert a text to table table to text
Select Table>Convert, and
Table or Table to Text
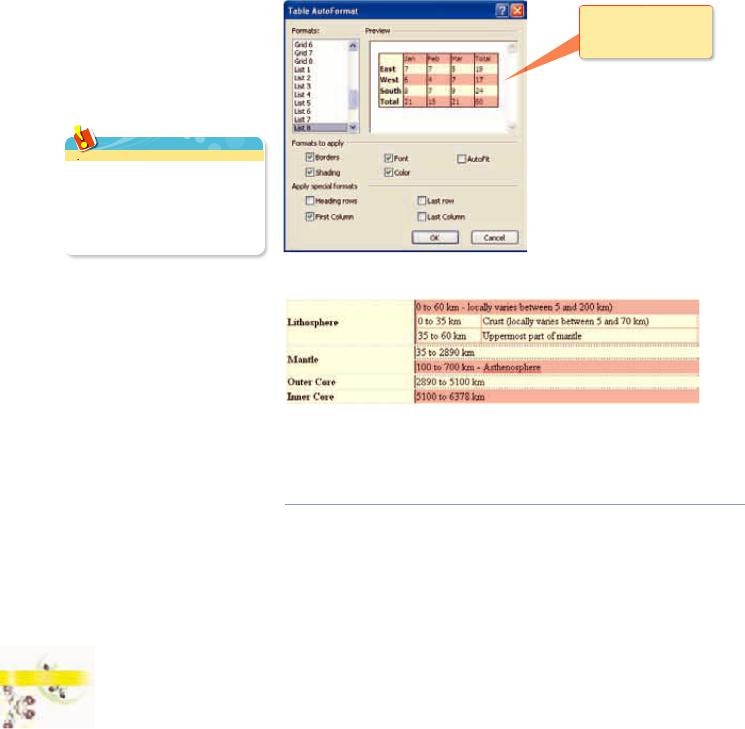
Table AutoFormat
Table AutoFormat helps you quickly create good looking tables on your web pages. Using the AutoFormat feature to apply a style automatically changes your table's size, font, borders, shading, and color.
Click anywhere in the table and select Table>Modify>Table AutoFormat.
Select a format from Formats to create the look you want and click OK.
You can see how your selected format looks in Preview
Selecting a table format
The new format is applied to the table.
Modifying a Picture
Checking Image Size and Speed
It's important to keep track of how long it will take for your page to download onto your web site visitor's computer. The bigger the image file, the longer it will take - and if your visitors have to wait too long, they may get bored and leave.
Download Statistics at the bottom of the Expression Web editor screen shows you the total download size.
Insert a picture on the default page by using the Insert Picture from File button on the common toolbar.
64 Chapter 4

Download statistics
You inserted a large picture and the total download size is 178 KB. It is too big and takes too much time for a page.
Resize the picture to make it smaller in size.
Now check the total download size to see whether it changed or not.
Although you resized the image file, the total download size is still the same.
Why?
Because you resized only the image size on the page but the image file size was left the same.
To change the image file size:
Double click on the image to open the Picture Properties dialog box.
Select the Picture File Type from General tab.
Changing the picture file type
Lowering the quality reduces the file size of the picture.
Laying Out Web Pages With Tables 65

Picture File Type
You can change picture file type by selecting another type on this window,
or
right click on the picture in the Design view, and select Change Picture File Type
Lowering the quality
After changing the picture file size and saving it, the total download size is remarkably changed.
Cropping a picture
Crop an image means to remove a portion of it. You may only want to show part - but not all - of a particular image.
To crop a picture:
Activate the Pictures toolbar by selecting View>Toolbars>Pictures.
Select the image by clicking on it.
Click the Crop button on the Pictures toolbar.
Resize the crop lines on which part |
Press the Enter key |
of the picture you want to show. |
The picture is cropped. |
Crop lines |
The cropped picture |
66 Chapter 4

Including a Text Alternative
Some people shut off the image display on their web browsers because they don't want to wait for images to download. This means they see text only - no graphics. For these visitors, you can provide alternate text to show in place of the images. And also this text appears when you keep your mouse a little on the picture.
When you insert a picture, it prompts you to enter this alternate text in the
Accessibility Properties dialog box.
If you did not enter a text here, or you want to change it:
Double click on the image to open the Picture Properties dialog box.
Select the General tab and type the alternate text into the Accessibility Properties box.
Keep your mouse a little on the picture, and the text appears.
A picture with alternate text
Create hot spots for the planets on the picture to jump to their pages directly.
Creating hot spots
Typing an alternate text
Laying Out Web Pages With Tables 67

Saving an Attached Image
When you insert images into your web page, they are not a permanent part of the site until each one is saved individually. When you save your images, Expression Web lets you rename the files, move them to different folders or choose not to save particular files with the rest of the web page you are saving.
To save your web page and new image files:
Click the Save button on the common toolbar.
If you have not yet saved the newly inserted images, the Save Embedded Files dialog box will appear. The box will list the files you have inserted. You can preview each image by clicking on it.
Rename the picture file by clicking the Rename button and typing a new name.
Click the Change Folder button and select the images folder in your web site.
It's a good idea to save all your images in one folder to keep files organized
Click OK when you are done.
Saving your work every time you insert an image gives you the chance to change file name and location.
68 Chapter 4

Subject: Create a web site about the popular cities of your country
Required features: |
|
Background color or picture |
||
1. |
Lay out pages with tables |
|
Cell padding and spacing |
|
2. |
Change Appearance |
|
Merge or split cells |
|
4. |
Table AutoFormat |
|||
3. Create and format tables |
||||
|
|
|||
Borders |
5. Modify pictures; Image Size, Crop, Text Alternative |
|
2
5
3
4
Laying Out Web Pages With Tables 69

Questions
1.Which ones are the uses of the tables? (choose three of them)
a.Page layout
b.Displaying information in formatted tabular form
c.Adding background color and borders to blocks of text
d.Position page elements absolutely
e.Overlap, nest, and show or hide page elements on a page.
2.When the cursor is in the last cell of the table, if you press the Tab key, what happens?
a.A new column is created
b.A new row is created
c.The cursor exits the table
d.The cursor goes to the first cell of the table
e.The cursor goes to the first cell of the same row
3.How can you locate the table at the center of the page horizontally?
a.Select the table and click the Center button on the Formatting toolbar
b.Click the Center button on the Formatting toolbar
c.Select Center for Alignment on the Table Properties
d.Select Center for Horizontal alignment on the Cell Properties
e.Select AutoFit to Contents from the Table menu
4.Which one is not a way to delete a column?
a.Select the column and select Edit>Cut
b.Select the column and right click and select Delete Columns
c.Select the column and press the Delete key
d.Select the column and select Table>Delete Columns
e.Select the column and press the Alt+Delete keys
5.Which ways can be used to make table’s borders hidden? (choose two of them)
a.Set Size to No Border in the Borders section of the Table Properties dialog box
b.Select the table and select No Border from the Borders button on the Formatting toolbar
c.Set Size to none in the Borders section of the Table Properties dialog box
70 Chapter 4
d.Set Size to 0 in the Borders section of the Table Properties dialog box
e.Select the Table and press the Delete key
6.What is used to make the table border solid, instead of the default bevel style?
a.Collapse table border
b.Cell padding
c.Cell spacing
d.Solid border
e.Eraser
7.What is cell padding?
a.is used to fill in the cell
b.is the amount of space in the grid border between each cell
c.is used to make the table border solid
d.used to combine many cells
e.is the amount of empty space that surrounds the contents of each cell
8.What is used to combine two or more adjacent cells to make a larger cell?
a.Wrap Cells
b.Combine Cells
c.Split Cells
d.Merge Cells
e.Cell padding
9.Which ways can be used to change the file type of a picture? (choose two of them)
a.Select the picture and select File Type from the Format menu.
b.Select the picture, right click and select Change Picture File Type.
c.Click Picture File Type from the General tab on Picture Properties.
d.Click the Change File Type button on the Picture toolbar.
e.Click Change File Type from the General tab on Picture Properties.
10. What is this button used for?
a.For cropping pictures
b.For positioning absolutely
c.For making a hotspot
d.For resizing a picture
e.For making the picture transparent