

ZAMBAK_IT_ExpressionWeb2
.pdfAdding a New Page
Right click in the Folder List and select New>HTML.
Creating a new HTML file
Type the name of the new page, keeping the file extension .html.
Give logical file names to remember the file contents later.
Another way to rename a page Select the page
and just click one time on it
and type new name.
Double click the pages to open and modify them.
You can rename the file names in the Folder List.
Renaming a Page
Right click the file, select Rename (or press F2) and type a new file name.
If you think that one added page is unnecessary anymore, you can delete that page in the Folder List.
Deleting a Page
Right click the file and select Delete or directly press the Delete key on the keyboard. The Confirm Delete dialog box opens.
Click Yes to complete the deletion.
You have completed building your Web site with pages. Now fill in pages with text and pictures, give background colors to the pages.
After inserting the picture 7wonders.jpg, it will be necessary to align it to the left because a text should be written to the right side of the picture.
To align a picture to the left or right;
Double click on the picture to open Picture Properties.
Click the Appearance tab and select which wrapping style you
want. |
Selecting a wrapping style for picture |
Buildin Your Web Site from Scratch 41

To Hyperlink a Text
You can use the Insert Hyperlink button on the standard toolbar
or
right click after selecting the word and select Hyperlink.
The picture is aligned to the left and the text is on the right side of the picture.
You can create links (called hyperlinks) to make a connection between the pages.
Creating Links
A hyperlink is a link from one Web page or file to another, including a picture or multimedia file, or to an e-mail address or program. The expression "Surfing the Net" actually refers to the experience of jumping from one page to another using hyperlinks.
Creating a Link to another Page on the Web Site
The home page should have the hyperlinks to the pages connected to it directly because each page should have hyperlinks to the child pages.
To create a hyperlink to a page:
Select the text that you want to hyperlink.
Select Insert>Hyperlink or press the Ctrl+K keys. The Insert Hyperlink dialog box opens.
Select the page to which you want to hyperlink.
Click OK to complete the hyperlink.
Screen Tip
If you want to show a text when you rest the mouse pointer over the hyperlink,
click on the ScreenTip button
and type a text to be displayed.
Selecting a page to hyperlink
42 Chapter 3

The hyperlinked text is underlined and blue. In the Design view, when you move the mouse pointer onto the hyperlink, you should see the following message.
It means this text has a hyperlink and if you want to open the destination page in the Design view, click the hyperlink by holding down the Ctrl key.
Create hyperlinks to other pages in the same way.
To Follow a Hyperlink
Right click and select Follow Hyperlink
The hyperlinks to pages
Surfing will be more comfortable if you add a hyperlink from all pages to the Home page and the upper page (Parent page).
Creating a Link to a Web Address
A Web address is also called URL which stands for Uniform Resource Locator.
Type a Web address and press the Enter key.
The Web address is converted automatically into a hyperlink.
Creating a Link to a File
You can create a hyperlink to a file such as a picture, a compressed file etc. When you click a hyperlink that is linked to a picture, the picture opens in the browser.
To create a hyperlink to a picture:
Select the text that you want to hyperlink.
Press Ctrl+K keys and choose a picture file in the Insert Hyperlink dialog box.
Selecting a picture to hyperlink
Buildin Your Web Site from Scratch 43

To open a hyperlinked page or picture in a new window:
Click the Target Frame button. The Target Frame dialog box opens.
Select New Window and click OK.
_blank appears automatically in the Target setting.
Press F12 to see the page in your browser.
Click the hyperlink and see that the picture opens in a new window.
Selecting target frame
The picture opened in a new window
Turning a picture into a hyperlink
You can use a graphic as a navigation button that links to another page in your site or you can link a thumbnail version of an image to a larger version of the same image.
To turn a picture into a hyperlink
 Select the image by clicking on it.
Press the Ctrl+K keys. The Insert Hyperlink dialog box opens.
Select the page or picture file you want to link to and click OK.
You want to put many pictures on your page, but you know that putting lots of picture on the same page makes your page’s size bigger and page speed slower. That’s why you can use small versions of the pictures and when the visitor clicks the picture, a larger version of the same picture opens separately. A small version of the picture can be prepared using Thumbnail.
44 Chapter 3
To create a thumbnail:
Select the picture by clicking it.
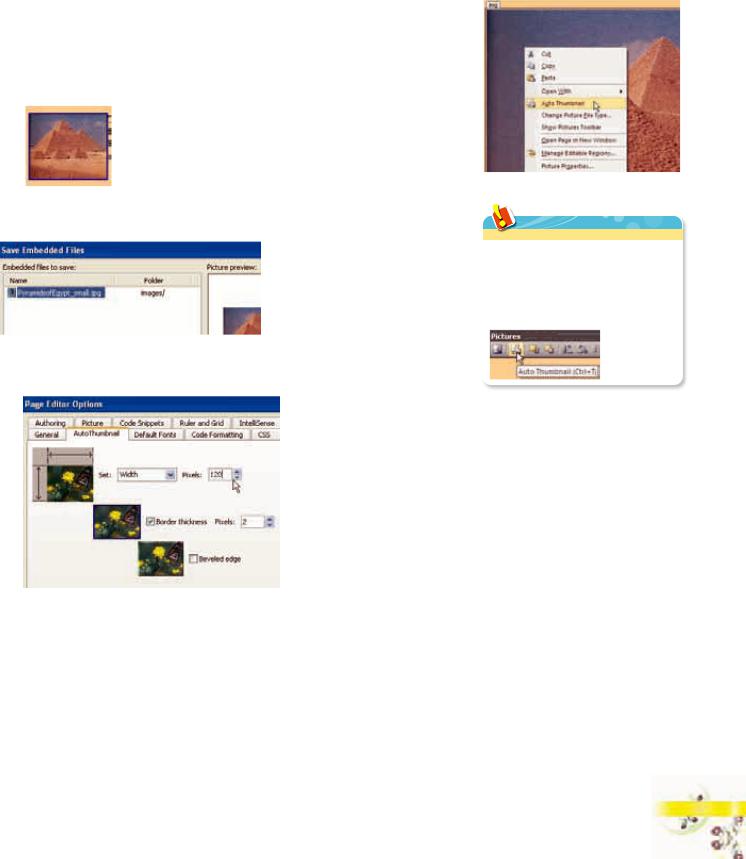
Right click on the picture and select Auto Thumbnail.
The thumbnail is created. It has a blue border since it has a hyperlink. When you click the thumbnail, the larger version of the picture opens.
Selecting Auto Tumbnail
A new file is created for the thumbnail version of the picture. When you save the
page, the file created for the thumbnail will also be saved.
Auto Thumbnail
create a thumbnail of a
picture:
Click the Auto Thumbnail button on the Picture toolbar.
You can specify some properties of a thumbnail which will be created.
Select Tools>Page Editor Options, and then click the AutoThumbnail tab.
Changing the AutoThumbnail options
You can change size and border of the thumbnail and give a beveled edge effect to it.
To create a hyperlink to a compressed file:
When you click a hyperlink that is linked to a compressed file, you are about to download the file.
Select the text that you want to hyperlink.
Press Ctrl+K keys. The Insert Hyperlink dialog box opens.
Buildin Your Web Site from Scratch 45

Select the compressed file and click OK.
Compressed File |
Press F12 to see the page in your browser. |
|
is compressed to make the in size. Working with
smaller files means working with
Click the hyperlink. The File Download dialog box opens.
internet. To compress a can use a program such
WinZip etc.
Click the Open button to open the file or
click the Save button to save the file.
If your file is an executable file, you will see Run instead of
Open.
Downloading a file
Choosing a
hotspot
Selecting an
area
Creating Hyperlinks on Different Parts of the Picture – Creating an Image Map
An image map is a single graphic that has several hyperlinked sections. These hyperlinks are called hotspots.
To add a hotspot to a picture:
Click the picture and select View>Toolbars>Pictures. The Picture Toolbar dialog box opens.
Click any of the hotspot buttons (Rectangular, Circular or Polygonal) and select an area within the image
This is the area where you want to create a hyperlink.
The Insert Hyperlink dialog box opens automatically after you outline the hotspot area.
Select the name of the Web page you want to link to and click OK.
Click the Preview button, and then click your new image map to check your linked hotspot.
Preview - A |
|
|
|
Preview - Mouseover |
picture |
|
|
|
a picture |
46 Chapter 3
You can use the highlight hotspots button  to show highlights clearly.
The highlighted hotspots
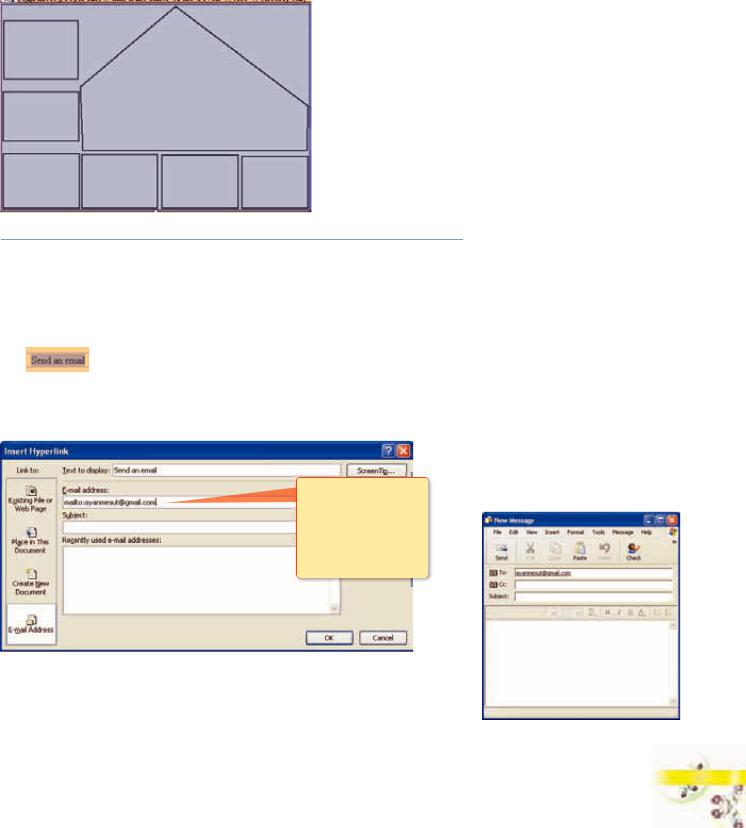
Creating an E-mail Link
An e-mail link allows the visitors to give feedback, send questions, and comments. When visitors click your e-mail hyperlink, they can send you an e-mail message by writing in the launched e-mail pop-up box.
To create an e-mail hyperlink
Select the text that you want to hyperlink.
Click the Insert Hyperlink button on the common toolbar. The Insert Hyperlink dialog box opens.
Select E-mail address in the Link to.
When you start typing an e-mail address, the word mailto will be added automatically before the e-mail address.
Typing an e-mail address
Type an e-mail address in the E-mail address box and click OK to finish.
Preview the page and click the e-mail hyperlink.
A message window appears using your installed e-mail program, Outlook. |
The installed e-mail program |
Buildin Your Web Site from Scratch 47

Creating a Link within a Web Page - Bookmark
Hyperlinks are useful not only for jumping from one Web page to another but also for quickly sending visitors to another section of the same Web page. These sections are marked with bookmarks.
This option is good when you have a long Web page with many different categories of information. For example, you want to put all seven wonders on one page. It will be a good way to bookmark the name of each wonder in a list at the top of the page. Then you can jump straight to any wonder by clicking its name. Without bookmarks, you would have to scroll down the entire page searching for that part. After jumping to the searched part, the visitors may want to get back to where they started. That’s why you should also bookmark the top of the page.
You can also bookmark an index, a table of contents, a subheading or anything else that helps to organize your Web site content.
There is a list of the seven wonders at the top of the page, SevenInOne.htm. After the list, there is some information about each wonder according to the list.
The list of seven wonders
Destination section
First of all you need to create the destination sections, bookmarks.
Creating a Bookmark
The first step in making a bookmark is to select the destination section where you jump to.
48 Chapter 3

Select Insert>Bookmark or press the Ctrl+G keys. The Bookmark dialog box opens.
Type a name for the bookmark in the Bookmark name box, and click OK. The bookmark has the following view.
Linking to a Bookmark
You have created the bookmark, now you need to link to it.
Select the text to which you want to give a hyperlink.
Typing a bookmark name
Click the Insert Hyperlink button on the common toolbar. The Insert Hyperlink dialog box opens.
Select Place in This Document in Link to and select the bookmark.
Test your new bookmark in the Design view by holding down the CTRL key and clicking the new hyperlink.
Create other bookmarks and hyperlinks to them.
Modifying Hyperlinks
Choose a bookmark to hyperlink
Editing Hyperlinks
After you create a hyperlink, it may be necessary to change the words it displays or the page to which it jumps.
Right click the hyperlink and select Hyperlink Properties.
Changing a hyperlink's options
Buildin Your Web Site from Scratch 49

You can change the type of link by changing your selection from the Link to section and edit the settings for the current selection and click OK.
To remove a hyperlink:
In the Edit Hyperlink dialog box, click Remove Link and click OK.
Changing Hyperlink Colors
Hyperlink text has a different color from the rest of the text so the visitors can identify it easily. You can choose the colors that a Web browser will use for displaying hyperlinks. If you use standard HTML attributes, you can select four colors to use for a hyperlink, depending on its state:
Hyperlink – blue - A hyperlink that has not been selected
Active hyperlink – red - A hyperlink that is currently selected
Visited hyperlink – purple - A hyperlink that has already been followed
Hovered hyperlink – red – A hyperlink that the pointer is over
To change hyperlink colors on a single Web page:
Right click on the page and select Page Properties.
Click the Formatting tab, select a different color for each hyperlink type and click OK
Opening Page
Properties
Choosing hyperlinks colors
Hyperlink |
|
Hovered |
|
Visited |
|
|
|
|
|
|
|
|
|
|
50 Chapter 3