

ZAMBAK_IT_ExpressionWeb2
.pdfSubject: Create a Web site from scratch about possible new 7 wonders |
|
|
|||
Required features: |
4. |
Create hyperlink - File |
8. |
Thumbnail |
|
1. |
Create an empty Web site |
5. |
Create hyperlinks - Picture |
9. |
Create bookmarks |
2. |
Create hyperlinks - Pages |
6. |
Create hyperlink - Email |
10. Change hyperlink colors |
|
3. |
Create a hyperlink - Web address |
7. |
Create hyperlinks - Hot spots |
|
|
17
2
10
4
6
3
9
85
3
Buildin Your Web Site from Scratch 51

Questions
1.Which one is not a way to create a hyperlink?
a.Select Format>Hyperlink
b.Select Insert>Hyperlink
c.Press the Ctrl+K keys
d.Right click and select Hyperlink
e.Click the Insert Hyperlink button on the common toolbar
2.Which one can be used if you want to show a text when you rest the mouse pointer over the hyperlink?
a.Target Frame
b.Bookmark
c.Style
d.ScreenTip
e.Text to display
3.Which ways can be used to follow a hyperlink in the Design view? (select two of them)
a.Right click and select Follow the hyperlink
b.Ctrl+click
c.Sihft+click
d.Double click
e.Click
4.What happens when you click a hyperlink which is linked to a compressed file in a browser?
a.The files in the compressed file are shown
b.The File Download dialog box opens
c.The compressed file is opened in a new window
d.The compressed file is opened in the same window
e.The file directly starts running
5.‘A new file is created for the thumbnail version of the picture.’
Is it True or False?
a.True
b.False
6.Which one in not True?
a.Hot spots can be shaped as rectangles, circles, or polygons
b.An image map is a graphic with one or more hot spots
c.The hyperlinked sections of a picture are called hotspots
d.A Hotspot is formed by image maps
e.A text on a graphic can also be a hotspot
7.When you type an e-mail in the E-mail box while creating an e-mail hyperlink, what text will be added before the e-mail?
a.email:
b.e-mail:
c.mailto:
d.mail:
e.mail:
8.What key combination is used to open the Bookmark dialog box?
a.Ctrl+G
b.Ctrl+B
c.Alt+B
d.Ctrl+K
e.Alt+K
9.Where can you change hyperlink colors on the page?
a.Tools>Application Options
b.Format>Background
c.Format>Page Transition
d.Tools>Page Editor Options
e.File>Properties>Formatting
10.How can you remove a hyperlink?
a.Select the hyperlink and select Format>Remove Formatting
b.Click the Remove Hyperlink in the Edit Hyperlink dialog box
c.Click the Remove Link in the Edit Hyperlink dialog box
d.Right click the hyperlink and select Remove Hyperlink
e.Right click the hyperlink and select Remove Link
52 Chapter 3
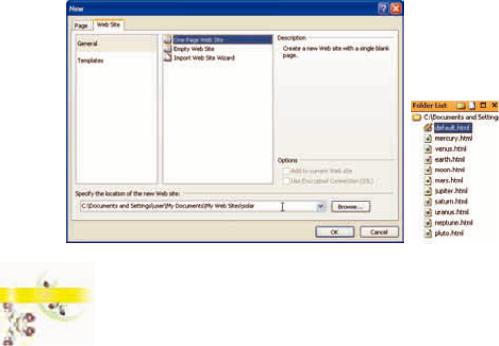
Table Uses
The traditional use of tables is to display information in columns and rows – similar to how they are used in other Microsoft Office programs: spreadsheets, word processing programs etc. Another usage of tables is to lay out text and images as a graphic design tool on your web page. Tables can firmly position text and images on the page and when the window is resized they will keep their places in the table.
However, layout tables are being replaced by CSS, because page-sized tables take longer to load than CSS-based layouts, and also tables cannot be easily adjusted to accommodate small displays, such as cell phones.
CSS is no doubt the future and it will eventually replace table layout, but you may still need to understand table layout if you're working with an older site and don't have time to bring it up to CSS standards. Table-based layout is easier to master than CSS layout, so you can get your site up much more quickly.
On web pages, tables can serve many functions:
Page layout
Displaying information in formatted tabular form
Adding background color and borders to blocks of text
In this chapter you will create a web site about the Solar System and we will cover how to build and format tables, for both Web page layout and data.
Laying Out a Web Page with Tables
You can create an easy-to-read, well-organized web page by using tables for laying out a page. You can build the structure of the page using tables. Keeping the same layout throughout the entire site gives you the possibility to come up with an overall design that is appropriate for all the pages. When you plan your web page layout, you need to consider in advance the various elements that will be placed in each page. You need to decide which page elements will be used
and their locations on the page.
You can use the predefined layout tables that are available in the Layout Tables and Cells task pane to help you get a quick start on a Web page. You can also create your own custom layout table by drawing tables and cells. Additionally, you can edit a Web page that
contains layout tables and cells.
To add a predefined layout table:
Create an empty web site and then build all web site pages.
Creating a new Web site |
The created pages |
54 Chapter 4
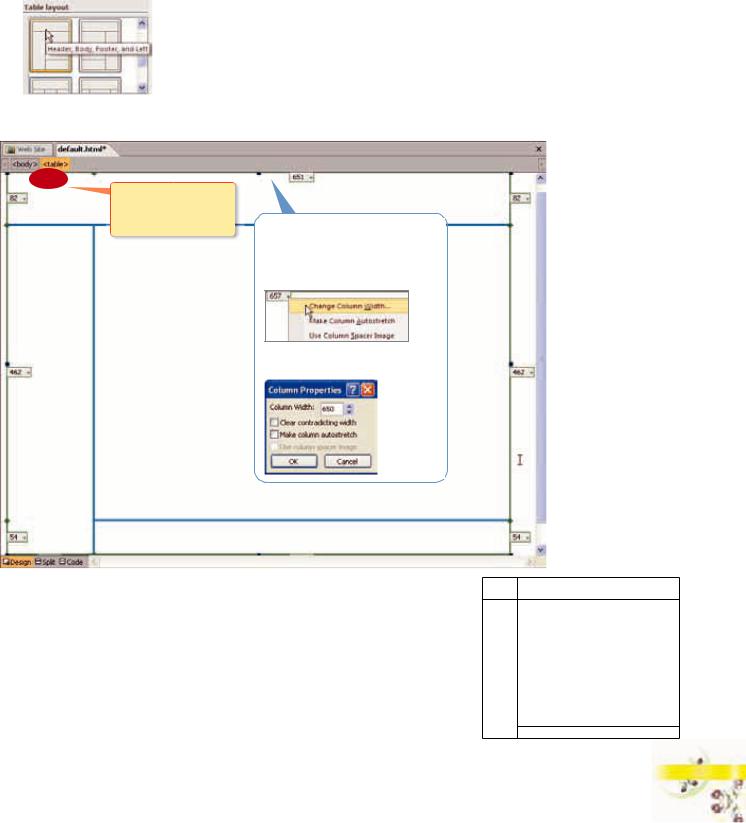
Open the default page and select Table>Layout Tables. The Layout Tables task pane opens.
Choosing a table layout
Click the Table layout which you want to use for your page.
Specify 130 for the column with of the navigation buttons
To edit the table layout
Click on the arrow,
select Change Column Width
and specify a value.
Specifying the table layout size
The selected table layout is applied to the page.
Insert your page elements into the cells, logo, banner, interactive buttons and change the background color.
Prepare all pages in the same way.
Navigation will be created by using interactive buttons.
Logo
Navigation Buttons
Banner
Web site content
Laying Out Web Pages With Tables 55
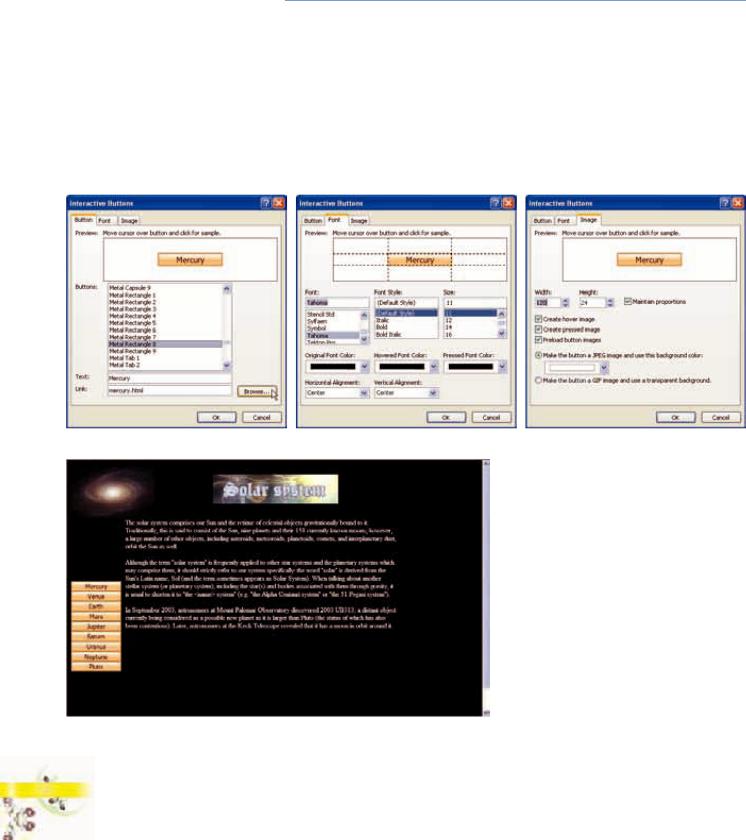
Inserting Interactive Buttons
Expression Web allows you the ability to create professional looking rollover interactive buttons for your web pages instead of using a separate graphics program. You can choose from many ready-made buttons, specify the text you want on each button, and then buttons are automatically created for normal, hovered, and pressed states.
When you create an Interactive Button, Expression Web creates the image files for states that make up the button. When you save your Web pages, it prompts you to save the button image files.
Place your mouse pointer where you want to add the button.
Select Insert>Interactive Button. The Interactive Buttons dialog box opens
Choosing a button style |
Specifying Font options |
Specifying image size |
Previewing the Web site
56 Chapter 4
On the Button tab, click a button style in the Buttons list, type your button text in the Text box.
Link the button to a page by clicking Browse, locating the file for the Link box.
You can link it to another page in the current Web site, to a site on the World Wide Web, or to an e-mail address.
On the Font tab, specify the font style, size, and color for all states of the button, including the original, hovered, and pressed states.
Change the size and proportions of the button on the Image tab.
Click OK and preview the page to see the effect.
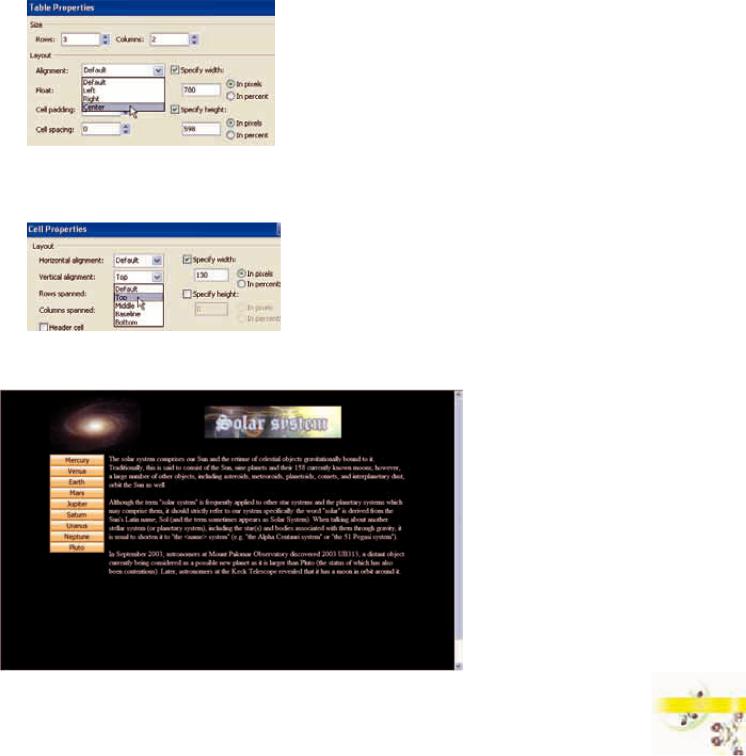
Your site appearance has been changed, but you can take the table to the center of the page and take the interactive buttons to the top of the cell to have a better view of the page.
To take the table to the center of the page;
Right click on the page, and select Table Properties.
Placing the table at the center
Select Center for the Alignment in the Layout section. To take the interactive buttons to the top of the cell;
Right click in the cell, and select Cell Properties.
Placing vertically at the top
Select Top for the Vertical Alignment in the Layout section.
Save and preview the page to see the changes.
Previewing a
Web site
Laying Out Web Pages With Tables 57
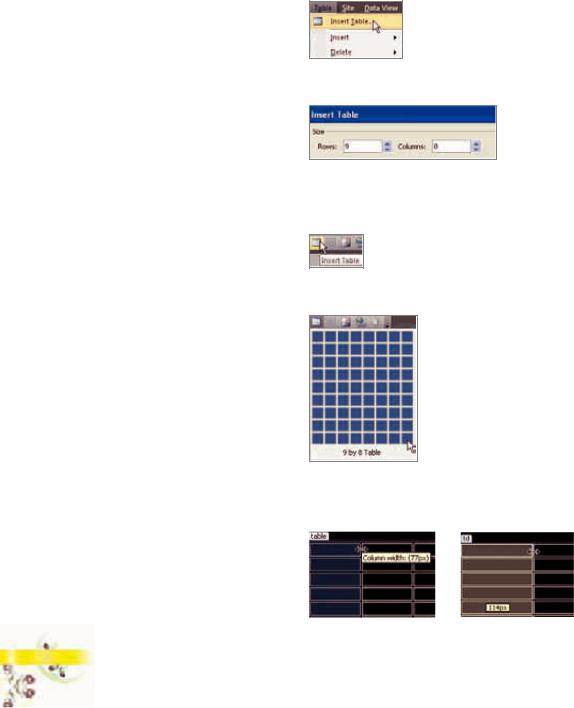
Creating a Table
Before you create a table, you must specify how many columns and rows it will contain. If it is not certain you can add or delete rows and columns later.
To insert a table:
Open the default page and place the cursor where you want to insert the table.
Select Table>Insert Table. The Insert Table dialog box opens.
Inserting a new table
Specify how many columns and rows you want to create in the Insert Table dialog box.
Specifying table size
Click OK to see the inserted table. Another way to create a table:
Click the Insert Table button on the common toolbar.
Drag the mouse over the grid, highlighting the cells that should appear on the table. When the table size has been selected, release the mouse button.
Specifying table size
The table is inserted into the web page. Tables are displayed as an empty grid when they are added to a page
Resize the cells by putting your cursor on the cell divider and dragging it.
Cursor on the |
Dragging the |
cell divider |
cell divider |
58 Chapter 4
If you have a table of varying row heights and column widths, you can equalize the width or height of selected rows or columns:
Select the rows or columns which you want to make an equal height or width.
Select Table>Modify>Distribute Rows Evenly or Distribute Columns Evenly.
Adding text to cells
Click your cursor within a cell and begin typing.
When you're filling out a table, you can press the Tab key to jump to the next cell on the right (or the next row) or press the Shift and Tab keys simultaneously to move in the opposite direction.
Formatting a Table
Changing Table Size and Alignment
Select Table>Table Properties>Table. The Table Properties dialog box opens.
Specify a value for table width that determines how big you want your table to be by using Specify width in the Table Properties dialog box.
Specify width: You can have a fixed width (In pixels) or a width relative to the page (In percent - it will be resized automatically when you resize your browser window). If not defined, your table will grow horizontally to fit the content you place inside of it.
Placing the table at the center
Select Center from the Alignment drop-down arrow to place the table at the center of the page.
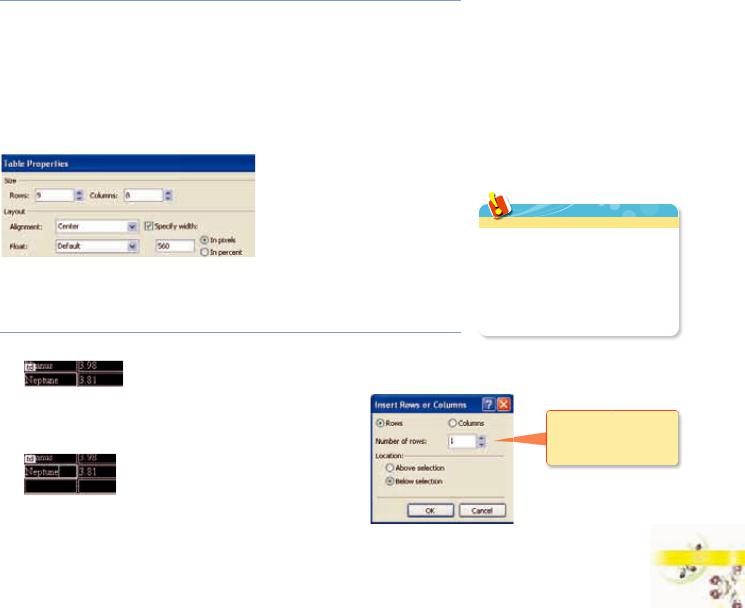
Adding Rows or Columns
Place the cursor where you want to add rows or columns
Select Table>Insert>Rows or Columns. The Insert Rows or Columns dialog box opens.
Input the desired settings and click OK.
also add rows and columns
the row or column you want to add.
click and select or Columns.
Adding a new row
Laying Out Web Pages With Tables 59
Deleting Rows or Columns
Select the row or column which you want to delete by selecting
Table>Select>Row or Column.
You can also select the row or column by moving the cursor around the border until it changes to a small black arrow that points at the table and clicking.
Before click: |
After click: |
Select Table>Delete>Delete Columns or Edit>Cut or
Right click and select Delete>Delete Rows or Delete>Delete Columns.
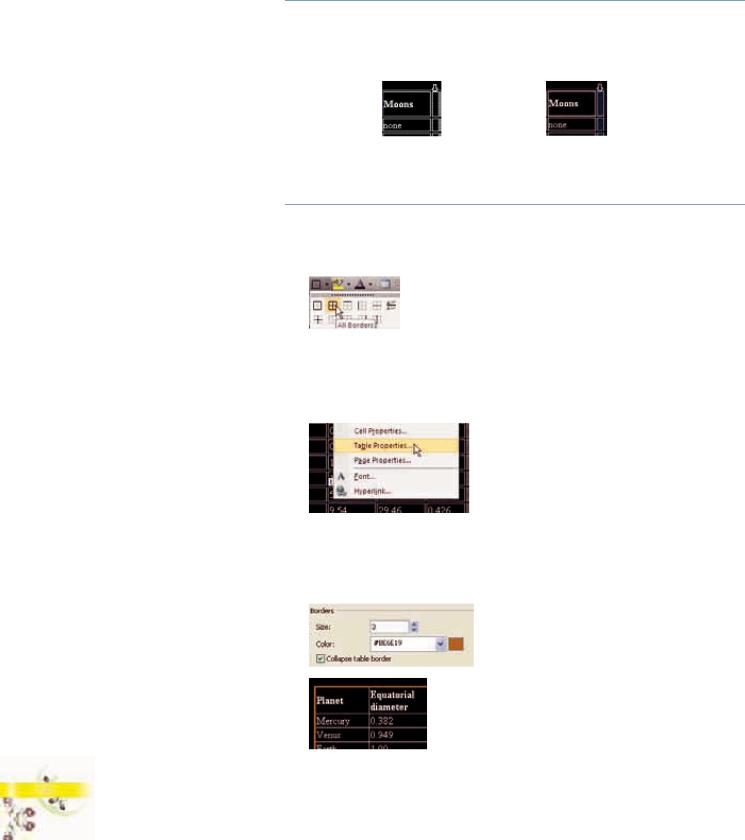
Defining Borders
To make the borders visible:
Select the table by clicking Table>Select>Table.
Select All Borders from the common toolbar.
Making table borders visible
Now the table borders are visible.
You can specify the border size and color.
Right click on the table and select Table Properties. The Table Properties dialog box opens.
Opening Table
Properties dialog box
Specify the Size and Color in the Borders section.
If you set the Size to 0, the border and all of its grid lines will disappear.
Check the Collapse table border box to make the table border solid, instead of the default bevel style.
Making table border solid
60 Chapter 4