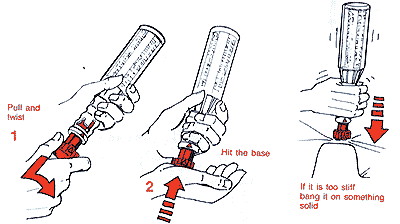
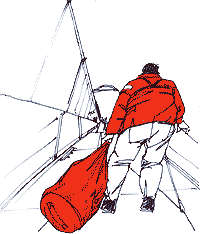
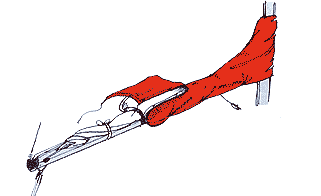
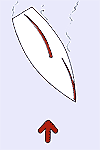
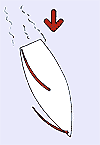
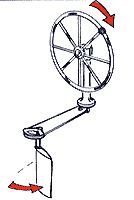
Learn how to fire them all hand flare or hand smoke
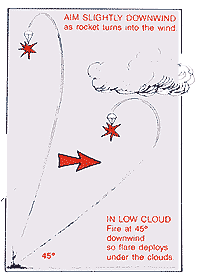
PARACHUTE ROCKET
KNOTS
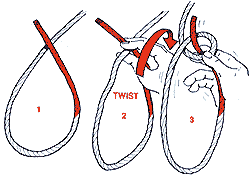
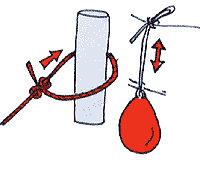
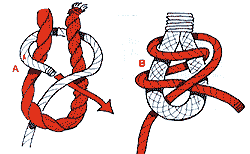
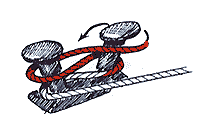
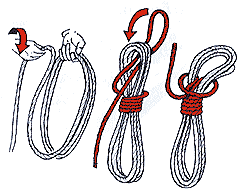
BOWLINE
The bowline is the best knot for forming an eye or loop, it doesn't jam and can be undone easily.
The first loop must be like
this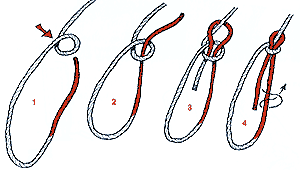
It can be tied in several ways and many people still think of it as 'the rabbit comes out of his hole, round the tree, and back down the hole again'.
On slippery rope an extra half hitch adds security.
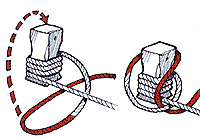
It can also be tied by twisting ...,
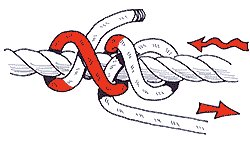
CLOVE HITCH
|
|
Quick release loop |
| |
|
SLIDING NOOSE |
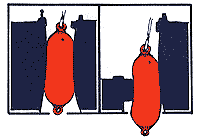
TEMPORARILY ATTACHING FENDERS | ||
ROLLING HITCH
|
Clove hitch with extra turn. |
SLIDES THIS WAY |
Taking the strain off another line |
|
|
| |
|
JAMS UNDER LOAD THIS WAY |
| |
ROUND TURN AND TWO HALF HITCHES
|
|
Very secure and can be let go under tension. |
|
|

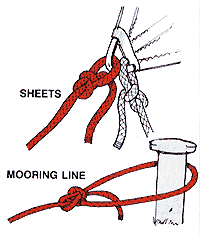
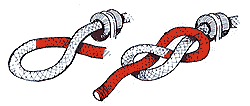
SHEET BEND
|
For quickly joining two different sized ropes. A double sheet bend B is more secure. |
Joining lines |
|
|
|
REEF KNOT

Not a very secure knot, only used for tying in reef points.
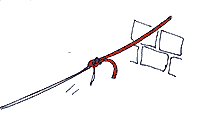
FIGURE OF '8'
|
|
Used as a 'stopper' knot so the line doesn't escape through a fitting. Doesn't jam and can be undone easily. |
The best way to learn knots is to get someone to show you - then practise, practise, practise!
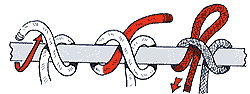
LINES UNDER LOAD
|
|
The sailor like the cowboy can control quite high loads by TAKING A TURN AROUND SOMETHING The sailor's equivalent to a saddle horn is called A CLEAT. They come in many shapes and sizes but all do the same job. |
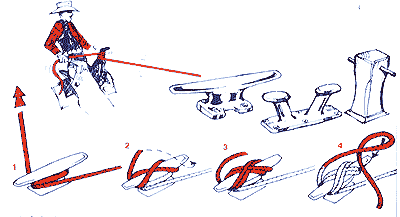
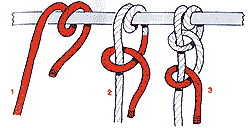
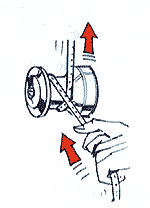
1. To control the line take a turn around the back of the cleat and pull.
2. To secure the line, start wrapping 'figure of eight' turns around the cleat.
3. Several turns produce enough friction to hold the line.
4. A 'twisted' locking turn can be added for extra security but should not be which might have to be released quickly.
|
|
|
|
Go around the back of the cleat and add 'figure of eight' turns to increase friction. |
Take several turns for friction and finish off like this. |
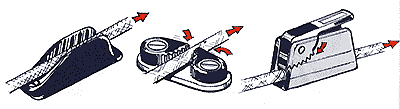
Various patent cleats use a 'wedging' action to hold the line. They grip with either a 'vee' notch or clamping jaws and are released by pulling, lifting or springing a catch.
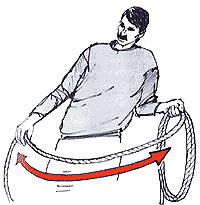
COILS
|
|
|
|
A regular rhythm of say an arm's width creates an even coil. |
Laid rope needs to be coiled clockwise and given a right hand twist in each turn. Then stowed like this. |
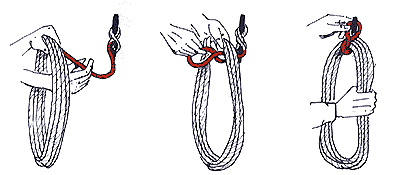
A halyard can be stowed on a mast cleat like this. Although some plaited lines tend to form 'figure'of eight' coils rather than neat circles.
THROWING A LINE
|
|
Coil the line as above and divide it in two. Swing and throw one coil underhand while releasing the other coil as you do so. |

COMING ALONGSIDE
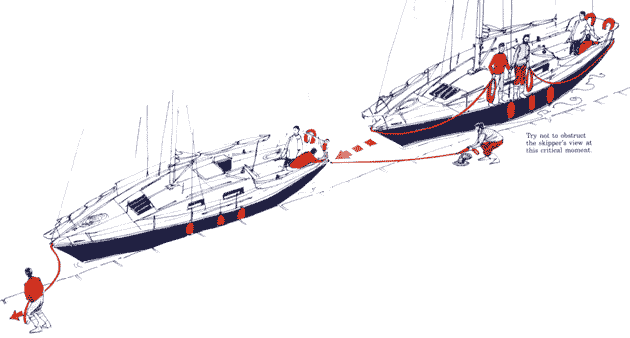
If you are mooring to a short pontoon it might be necessary to rig the stern line through a genoa fairlead like this. By quickly 'taking a turn' this line can also be used as a brake if there is a tail wind.
Once lines and fenders are prepared the shore crew should stand by the shrouds with a coiled] mooring line in one hand. Hold on with the other hand and step over the guardrail and stand outboard. Don't be too eager to leap ashore, as the skipper might decide to go around again if he's not happy with his first approach.
When given the order, step ashore and make fast the stern line followed by the bowline. If there is a bollard simply drop an eye over it otherwise make fast to a cleat or ring as pages 33-34. With a large crew, the slack will be taken up into the boat and secured. But, if you're short handed the shore crew must 'take a turn' and secure the shore line temporarily.
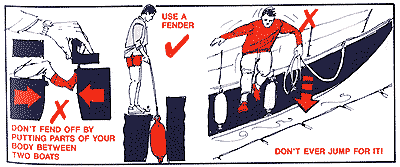
The skipper will tell you which side to rig fenders and lines (see pages 32-33) and what you'll be mooring to Fenders high for 'boat to boat" fenders low for "boat to pontoon". But always arrange them around the widest part of the boat, and tie them on be/ore you put them over the side. They can then be adjusted for height. In strong winds, when the noise can drown spoken orders, always LOOK at the skipper for the signal to step ashore.
|
|
|
|
|
|
ALWAYS LEAD LINES THRU' FAIRLEAOS & UNDER RAILS | |
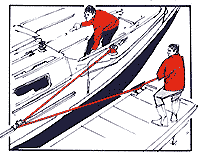

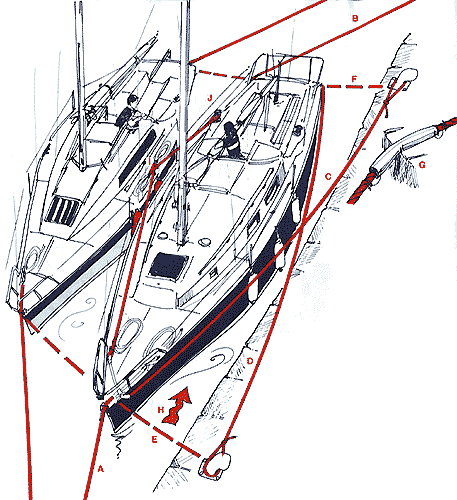
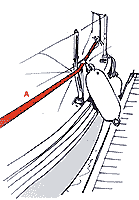
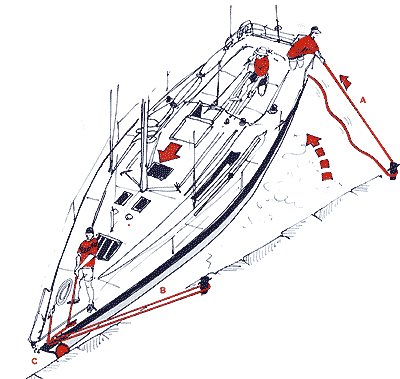
MOORING ALONGSIDE
BOW (A) and STERN LINES (B) are needed to hold her in place, while BOW (C) and STERN SPRINGS (D) stop her sawing back and forth. (E) and (F) are BREAST ROPES. (These can sometimes be left off). Guard against chafe where the lines cross hard edges (G) and rig the stern line to an outboard quarter if there is any current, (H) as this will help to hold her off the wall.
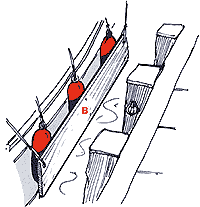
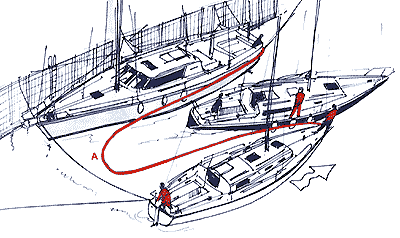
MOORING ALONGSIDE ANOTHER BOAT
After asking permission to lie alongside, another set of SPRINGS, BREAST ROPES AND BOW AND STERN LINES are rigged. Here, the breast ropes and tight springs are more important, to hold the 'raft' together. An amidship cleat (I) and sheet winch (J) have been used in this case to avoid overloading the bow and stern cleats.
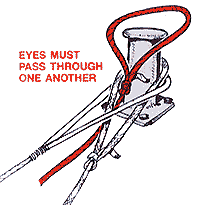
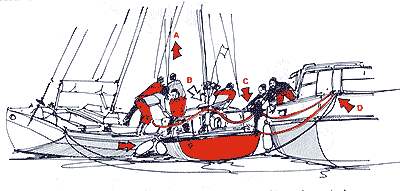
MAKING FAST ALONGSIDE
|
|
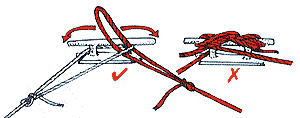
A round turn and two half hitches (A) is a good knot to use for mooring lines as it can be released under load. A howlini' (B) tied like this can rub back and forth on the ring and chafe through. A round turn together with a bowline (C) is kinder on the rope. |
|
|

Try to avoid cleating one rope on top of another, as each line cannot be released separately. Likewise, if eyes are threaded through each other, they can be released in any order.
|
|
ALLOWING FOR THE TIDAL RISE AND FALL |
|
|
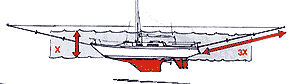
Mooring lines at least 3 times the expected rise in tide are needed. Also, care must be taken that a rising mooring line (A) will not dislodge a fender. Sometimes, fender boards (B) are needed to span the piles on a quayside.
LEAVING AN ALONGSIDE MOORING
|
Never let the lines trail in the water as they might foul the propeller. |
Always let the short end slip.
|

RIGGING SLIPS
The skipper may ask for the shore lines to be rigged as SLIPS. This simply means a loop of line passes around a bollard or ring and back to the boat. This makes casting off a lot easier as one end of the line is released and the remainder pulled on board.
(A) When there will be no load on the slip it can be rigged from the cleat, round the bollard and back to the crew's hand above the rail. But, the skipper may want to power againt the slip to push the boat out. In that case the line must come back onboard through a fairlead and a turn be taken around a cleat (B). Also, an extra fender (C) needs to be placed at the bow or stern to cushion the turning boat.
LEAVING A RAFT
Normally, a boat will leave an inside berth in a raft down tide so the current will push the boats together again. An extra long line (A) is rigged behind her and outside of everything to help pull the pack together again. All her mooring lines and shorelines are cast off leaving her breast ropes made up as slips. Once she's clear (A) is tensioned up and all the shorelines re-rigged.
THINGS TO WATCH OUT FOR
Usually there are many willing helpers to ease the boat out. But, this can be a mixed blessing as their concentrated weight on one side can heel the boat and foul the rigging (A). Also, make sure the extra line does not foul the danbuoy (B) or stowed outboard (C) and be sure all your lines have been released (D). Fenders also have the nasty habit of becoming entangled at awkward moments!
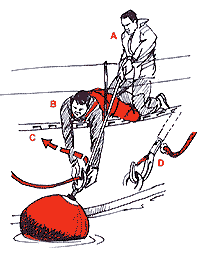
MOORING BUOYS
Mooring buoys usually have a ring (A) to make fast to or some form of 'pick-up buoy'. The pick-up buoy can either be attached to the chain strop on the large buoy (B) or to a ground chain (C) with an eye in it.

|
| |
|
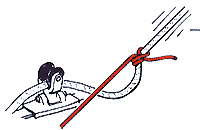
To help the helmsman judge direction and distance point the boathook like a spear. |
Grab the pick-up buoy and bring it in under the rail. Haul in the line until you reach the chain strop and drop the eye over a cleat. |

|
|
Round turn and two half hitches |
Round turn and a bowline |
Chain |
|
| |||
|
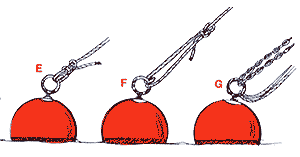
To attach a line; one crew member hooks the buoy with a boathook (A) while another lies down and passes a line through the ring (B). The line is then handed up to the first person who takes it forward (C). A 'snap-on' boat hook (D) makes the job easier. The boat can be attached by (E) or (F) (gets the knot nearer the boat) or (G) if it's going to be rough. If the load on a boathook becomes too great LET IT GO, otherwise you could overbalance and fall in! | |||
ANCHORING
A. Understand how the length of chain is marked, so the correct amount can be flaked down on deck.
B. Flaking down lets the chain run out freely.
C. Secure the cleat so you can always let out more line.
D. A buoyed line (tripping line) is used to free the anchor if it gets fouled.The skipper will tell you if he needs it.
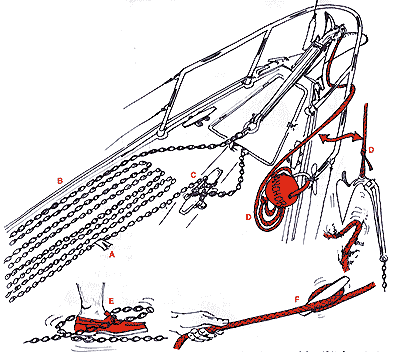
The anchor chain (cable) should be lowered hand over hand under control but if it does start snaking out (E) STAND WELL CLEAR! If asked to 'SNUB' the cable by taking a turn -KEEP YOUR HANDS WELL BACK FROM THE CLEAT (F).
|
LETTING GO |
|
|
WEIGHING THE ANCHOR (Getting up) |
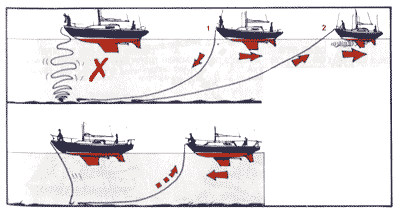
The idea is to let the anchor go when the boat is going backwards so the chain is laid along the seabed rather than in a heap on top of the anchor. Cleat the cable and give a touch of reverse power to 'set' (dig-in) the anchor. Likewise, a touch of ahead power might be given to help the crew haul in the anchor. If cleated when 'straight up' the boat's momentum will break out a difficult anchor.
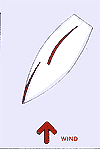
POINTS OF SAIL AND SAILING TERMS
|
|
CLOSE HAULED is as close to the wind as the boat will sail (say about 45°) 'Ib sail towards the wind a boat must TACK or zig-zag. (Also known as beating.) STARBOARD TACK is when the wind conies over the starboard side. PORT TACK is when the wind comes over the port side. TO TACK OR GO ABOUT is to change from one tack to the other by putting the bow through the wind. FINE OR CLOSE REACH is a course between close-hauled and a beam reach. TO LUFF-UP is to steer the boat towards the wind. TO BEAR AWAY is to steer away from the wind. BEAM REACHis when the wind comes over the beam (ie. 90°). TO GYBEis to let the mainsail change sides by putting the stern through the wind. BROAD REACH is when the wind comes over the quarter. DEAD RUN OR RUNNING BEFORE THE WIND is when the wind is blowing over the stern. LOOK UP WATCH THE WIND INDICATOR!
|

SAILS
Headsails can be attached to the stay by a grooved foil (A) or clipped on with hanks (B).
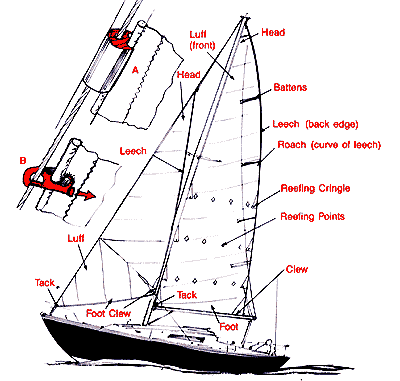
The mainsail can be made smaller (reefed) when the windspeed increases. But the headsails (below) are changed to match the weather conditions.
|
| ||||||
|
SPINNAKER Set flying on a pole. |
CRUISING SHUTE Fixed to a stay top and bottom. |
NO 1 GENOA Headsail that overlaps the mast |
NO 2 GENOA |
NO 1 JIB |
NO 2 JIB |
NO 3 JIB |
|
As the numbers get bigger the sails get smaller. | ||||||
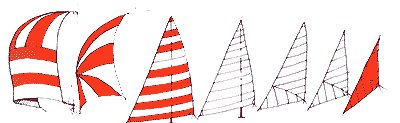
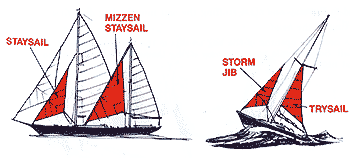
|
|
In very rough weather conditions these very small sails can be set. |
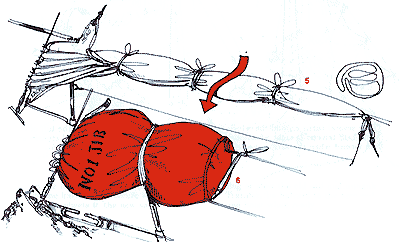
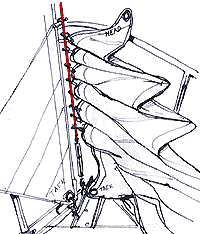
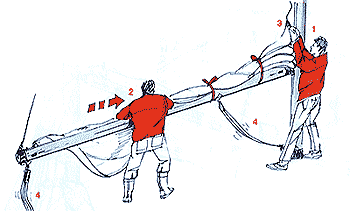
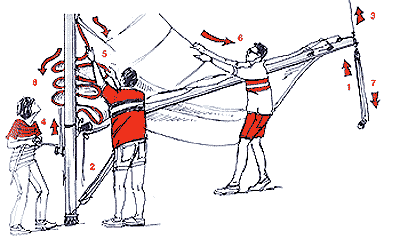
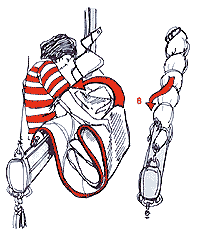
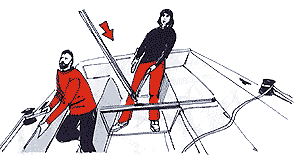
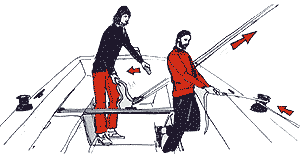
STOWING SAILS
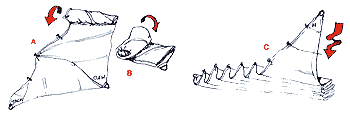
Small headsails can be rolled (A) from head to tack and then (B) tack to clew, this minimi creases. Larger sails (C) can be flaked down, but this is usually only possible in harbour.

STOWING AT SEA
Sails can be folded at sea but most people simply stuff them into a sailbag.
1. Secure the bag so it doesn't blow away.
2. Remove the sheets and halyard and secure them.
3. Leave the sail hanked to the stay and start stuffing the sail into the bag clew first.
4. Unhank the sail starting at the head.
5. Make sure the tack is near the opening of the bag as this is the first corner to be rigged when bending on a sail. Some people pass the draw string through the tack to make identification easier at night.
BENDING ON SAILS
|
1. The tack is pulled out of the bag and fixed on first. 2. The sail is then hanked on starting at the tack and working up to the head. TAKE CARE NOT TO GET THE LUFF TWISTED. 3. The sheets are attached with small loop and long tail bowlines. Make sure they are led back in the correct manner. 4. Prior to hoisting, the halyard can be attached and held down by hanking the top hank to the rail. 5. The sail can be either lashed to the rail and folded so the rain runs off or stowed hanked on in its bag (6). |
|

HOISTING
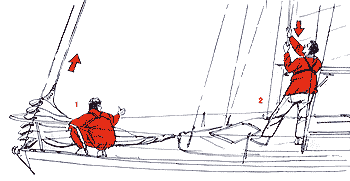
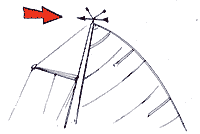
1. The bow man checks the hanks, sheets and halyard, gets to weather and signals it's OK to hoist.
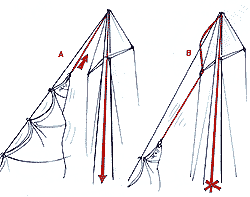
2. The crew on the halyard LOOKS UP (A) and checks the halyard is not twisted around the forestay or fouling the spreaders (B).
3. If it is clear, the halyard is hauled in smartly either by pulling directly or by taking a turn-around the halyard winch (C).
4. Take several turns around the winch and use the winch handle to tension the luff of the sail. (Luff tension is right when horizontal luff creases disappear but vertical creases are not formed when the sail is sheeted in.) Coil and cleat the halyard (see page 35).
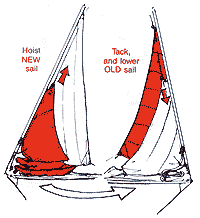
CHANGING HElDSAILS
|
|
|
|
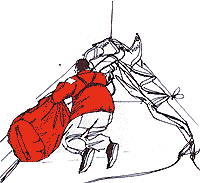
1. Drag the bagged sail along the windward sidedeck and make sure you are hooked on in heavy weather. |
2. Hank on the new sail (starting at the tack) below the first hank of the old sail. Secure the bag. |
|
|
3. Tension is kept on the halyard by letting it slip around the winch as the sail is pulled down. |
|
|
|
|
4. Pull on the luff of the old sail to lower it. Remove the halyard and secure it. Transfer the sheets to the new sail. |
5. Bag or stow the old sail and unhunk. Transfer the halyard to the new sail and hoist when ready. |
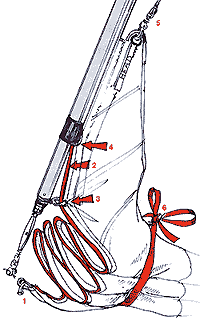
HEADFOILS
|
Insert half a metre before hoisting
|
|
Some boats have headsails which run up grooves in a HEADFOIL. This makes for very quick sail changes especially when racing. Sails can often be kept in their special bag while the tack (I) and sheets are attached. The bolt rope (2) is fed through the pre-feeder CD and into the foil (4). The halyard (5) is fixed on. The sail tie (6) and bag are removed ready for hoisting. The new sail can be hoisted inside or outside the old one and if the halyards and sheets are right, a fast TACK CHANGE can be made. |
|
| ||

Flake the old sail down on deck and secure it with a sail tie. Fold it like this so the TACK (1), HEAD (2) and CLEW (U) are readily accessible in the bag. Bags vary in design, but usually have a full length zip which can sometimes just be pulled apart. ALWAYS TIE THE BAG TO THE BOAT.
|
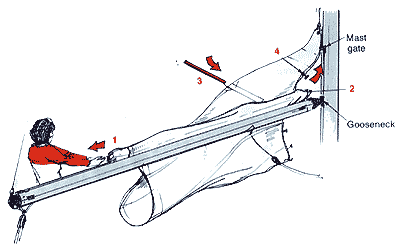
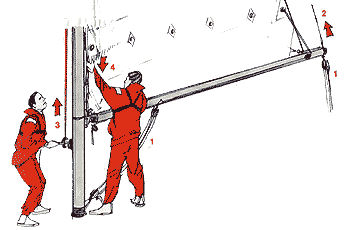
BENDING ON THE MAINSAIL 1. The CLEW is fed into the groove in the boom. 2. The TACK is fixed to the gooseneck and the foot of the sail tcnsioned at the clew. 3. BATTENS are slid into their pockets. 4. The LUFF SLIDES ure fed into the groove in the mast via a mast gate and the gate closed. |
|
|
SAIL COVERS The bent-on sail is usually protected by a sail cover which can be fastened in a variety of ways. It's removed by rolling or flaking like this. |
|
|
SAIL TIES The furled sail is secured by a number of SAIL TIES. These can be made of rope, tape or elastic. The ties can be secured in a number of ways, but a simple bow is as good as any. Ask the skipper how he wants them secured but be very careful of elastic as it can sometimes hit you in the eye. |
|
HOISTING THE MAINSAIL
|
1. Check all sail slides are in groove. 2. Remove sail ties, working forward. 3. Attach halyard. 4. Free sheet and kicking strap. |
|
|
5. Look up to check halyard is clear. 6. Hoist the sail When on a CLOSE REACH. |
|
|
7. Tension halyard and outhaul 8. Ease topping lift. 9. Tension kicker and sheet. 10. Coil and stow halyard. |
|


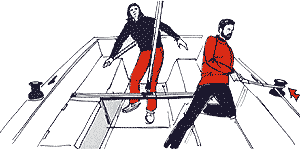
REEFING
|
1. Ease kicker and sheet 2. I'm .urn topping lift. 3. Ease halyard. 4. Pull luff down. |
|
|
| |
|
5. Hook on reefing cringle and re ten.sion halyard. 6. Haul down the leech reefing pennant. LOOK UP FOR SNAGS. | |
|
7. Take up slack in other reefing pennants. 8. Ease topping lift, tension kicker and sheet. 9. Tidy up the loose bunt of the sail and secure it with reef knots (see page 33). These should not be so tight as to cause creases (as here) and also should not trap the other reefing lines. Remember, always work on the high (windward) side of the boom. |
|
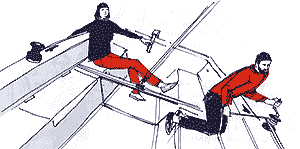
SHAKING OUT A REEF
|
|
1. Work on the weather (high) side. 2. Remove ties. 3. Ease kicker and sheet. 4. Tension topping lift. |
|
|
5. Ease all pennants. 6. Ease halyard. 7. Unhook reef cringle. |
|
|
8. Tension luff with halyard. 9. Ease topping lift. 10. Tension kicker and adjust sheet if needed. |
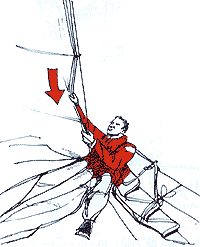
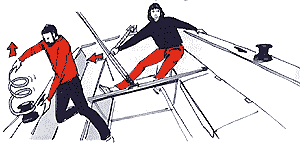
HANDING THK MAINSAIL(Lowering)
|
1. Ease the main sheet. 2. Ease kicker. 3. Tension topping lift. 4. Ease halyard. |
5. Pull luff down. 6. Pull sail aft. 7. When the sail is down tighten the main sheet to steady the boom. 8. Try to Hake the sail down or. |

|
8.....form a sort of pocket in the sail and push the folds of the sail into it. The top of the pocket can be folded over the sail to act as a cover and let any rain run off. |
In heavy weather and short handed add a safety tuck to the main sheet (as shown) and haul the sail aft tying it down as you work your way forward. |
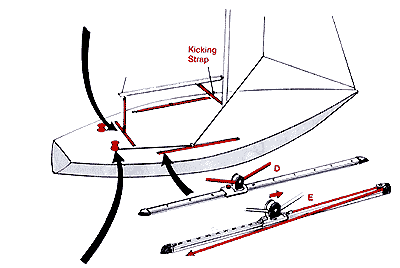
SAIL CONTROLS
|
|
The mainsail is controlled by a powerful blofek and tackle system called the mainsheet. A small force on the mainsheet tail (A) is multiplied by the pulleys to a large force (B). Subtle sail adjustments can be made by moving the mainsheet across the boat on the mainsheet track. Another smaller set of lines, blocks and cleats (C) are used to control this movement. The kicking strap helps control the shape of the sail and stops the boom lifting when the main sheet is let full out. |
|
| |
|
|
The headsails are controlled by the jib or genoa sheets, these are led aft through fairleads or jib or genoa cars. To get the correct angular pull, the cars can be moved to set positions on the track (D) or adjusted by a line and pulley system (E). The sheets finally arrive back at the cockpit and are controlled by wrapping them clockwise around a winch. A winch handle adds extra leverage and sometimes has a lock to save it falling out and a ratchet to make turning it easier. |


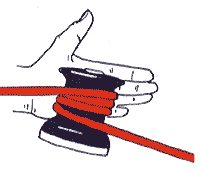
USING FRICTION
|
|
The more turns you make with a rope the more friction you get. So very large forces can be controlled with the minimum of effort. Winches use this principle. |

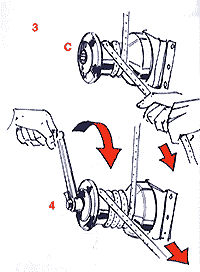
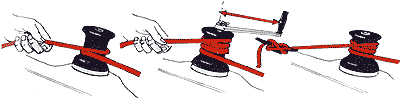
USING WINCHES
|
| ||
|
Use only one turn to pull in the slack jib sheet, because if you use more it will probably jam. |
As the load comes on the sheet add more turns to increase friction. But, keep pulling on the tail. |
The winch handle is used to increase leverage. Wind in the sheet the required amount and secure to cleat. |
|
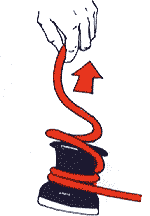
SELF-TAILING WINCH |
RELEASING |
|
|
|
|
|
|
Here the tail is gripped by the top of the winch so both hands can be used on the handle. |
To let the sheet out slightly, ease the turns round the drum with the palm of the hand, while keeping your fingers clear. |
To release quickly, flick the turns off the top of the winch. |

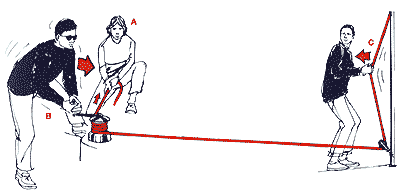
For speed, one person can tail (A) (pull the end of the sheet) while the other winds (B), putting his whole weight behind the handle. Pulling a loaded line at right angles and quickly taking up the slack is called swigging or sweating (C).
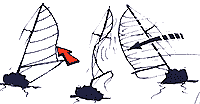
TACKING or going about is putting the bow through the wind.
|
|
|
|
Helmsman says 'READY ABOUT' and the crew uncleats the sheet, without easing it and says'READY'. The helmsman says 'LEE-OH' and pushes the tiller over and the crew releases the sheet. | |
|
|
|
|
As the boat goes through the wind the crew moves to the other side and starts pulling in the sheet by taking a turn on the winch. The helmsman also changes sides keeping the helm over. | |
|
|
|
|
The helmsman can help the crew by slowing the turn (giving a luff) allowing most of the sheet to be pulled in before the sail fills. Extra turns are put on the winch and the sheet tensioned. | |

GYBING
Putting the stern through the wind.
|
|
|
|
The helsman says 'STAND BY TO GYBE' and the crew prepares the new sheet and says 'READY' The helmsman puts the wind on one quarter and the boom on the other by hardening (pulling in) the mainsheet. | |
|
|
|
|
The helmsman says 'GYBE-OH' and turns the stern through the wind. As the boom comes across the main-sheet is released letting the friction in the blocks slow the boom down and the tiller is centred to slow the turn. The crew releases the old sheet and pulls in the new. | |
|
|
|
|
When the boom is safely across the new course is steered and the main trimmed by pulling in the mainsheet. The crew trims the headsail for the new course. ALWAYS MIND YOUR HEAD AS THE BOOM SWINGS ACROSS THE BOAT. | |

|
| |
|
|
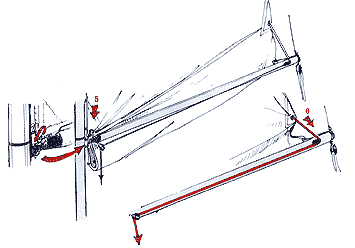
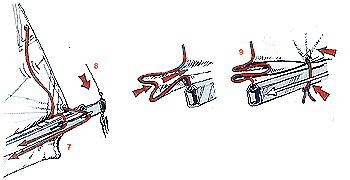
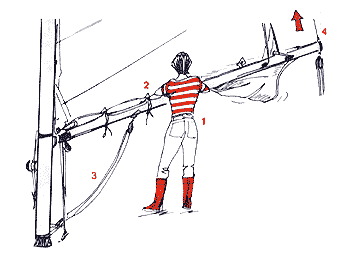
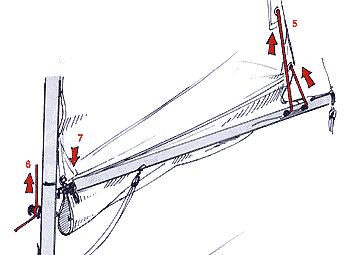
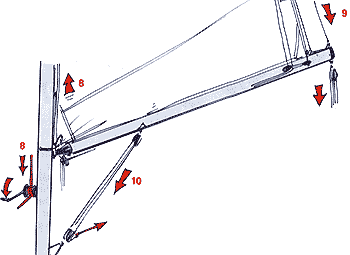
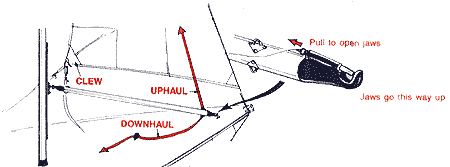
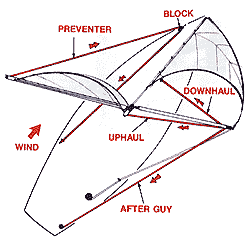
POLING OUT THE JIB With the wind astern the jib is often held out with a spinnaker or whisker pole. 1 Main and jib are sheeted in on a broad reach and the DOWNHAUL is connected to the pole while it is still stowed on deck. 2. Clip the pole to the mast keeping the front end on deck. 3. Clip on the UPHAUL. 4 Rig the AFTER GUY through a block right aft and outside everything. 5. With the pole end still on deck clip the LAZY JIB SHEET into the pole jaws. 6. Lift the pole with the UPHAUL to the height of the jib clew. 7. Haul the pole back until it nearly touches the shrouds. 8. Tighten the DOWNHAUL. 9 The pole is now fixed in the right position held by three lines. 10. The jib is still on the same side as the main, so the crew go back to the cockpit and pull in on the new sheet bringing the jib across until its clew is at the pole end. The main boom can be held out with a PREVENTER. (Stops the boom crashing across in an accidental gybe). |
|
| |

STEERING
|
The tiller (A) is moved AW4V from the direction you want to turn. The force of the water on the rudder (B) pushes the stern across and the boat roughly pivots about a point just aft of the mast (C). Here we might hit the wall with the stern! |
A wheel is moved IN THE SAME direction as you want to go. |
|
|

COMPASS COURSE When there are no landmarks the boat is steered by compass.
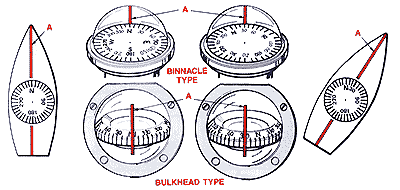
The compass always STANDS STILL pointing North while the boat swings around it The LUBBER LINE (A) represents the centre line of the boat. Compasses are usually read trom the top as with the BINNACLE TYPE (note the card markings and the position of the Lubber Line) or from behind like the BULKHEAD TYPE (note how the card markings are reversed and the Lubber Line is the other side).
To turn the boat from North to 030° STEER THE LUBBER LINE around to the number. With a bulkhead compass 'push the titter towards the number you want. This may a confusing but is much simpler when you try it.
STEERING
|
|
|
|
When you're on the correct course, find something ahead that lines up with a piece of the boat. This saves always staring at the compass. |
But, don't get transfixed by your steering mark and ignore what is going on around you. ALWAYS keep a good lookout all around especially behind you. |
|
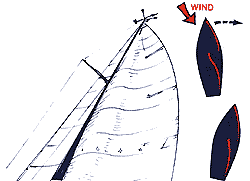
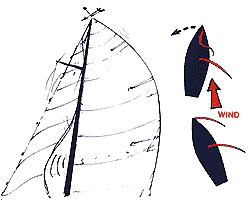
STEERING TO WINDWARD (Towards the wind or 'ON THE WIND') With the sails trimmed correctly the helmsman must guard against the wind getting on the other side of the sail. The first indication of this is the front of the mainsail or jib starts to belly or back so steer the bow away from the wind. |
|
|
|
|
|
STEERING OFF THE WIND (Away from the wind) Here the helmsman must not let the wind get on the other side of the sail or it will gybe violently as above. The first indication of this is the back of the jib lifting. Steer the bow towards the wind. (With a tiller push it towards the boom) |
|
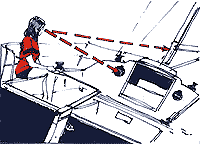
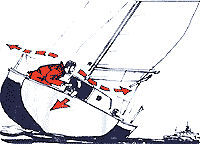
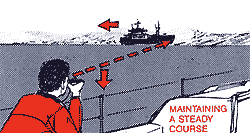
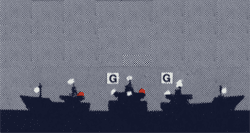
IS HE GOING TO HIT US?
|
Does the background move from behind him?
|
|
Always warn the skipper of any approaching boats. Don't assume they've seen you or know the rule of the road. (You know how some people drive on the road!) |
If vessel maintains the same bearing to you, there will be a collision. Check with a compass or line him up with a stanchion. Also see if the background is moving. |
|
|
|
|
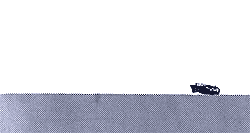
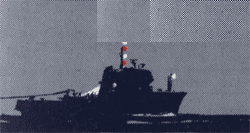
Always keep a good look out all around -especially astern and behind the genoa. Modern ships travel at high speeds, so this can. |
... turn into a huge container ship travelling at over 30 knots and could be on top of you in less than 10 minutes. |
|
|
|
|
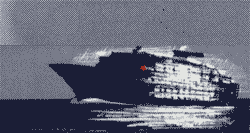
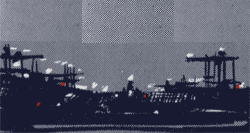
At night it's hard to judge distance and easy to convince yourself this is only a small fishing fleet with their deck lights on... |
... but, one could be a very fast moving cruise ship ablaze with lights that could be on top of you in a matter of minutes. |
|
|
|
|
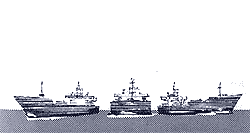
In poor visibility, it is often very hard to tell which way a ship is going and it is even harder for him to see you. So, keep the skipper informed of any nearby shipping. |
At night the relationship between the ship's two white masthead lights, together with its port and starboard lights show in which direction it is travelling. |
|
|
|
|
Various combinations of coloured lights mean different things -- even that he can't manoeuvre to get out of your way ... |
and near the shore these lights can get lost in the background SO KEEP AN EVEN BETTER LOOK OUT AT NIGHT. |


WEATHER FORECASTS
These are available on local radio, television, VH F radio or by teleph National newspapers publish weather maps and a NAVTEX teleprint to your boat. The most common source of weather information is the BBC are broadcast at set times each day on the radio.
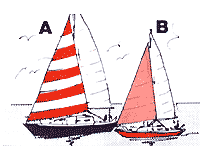
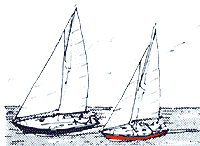
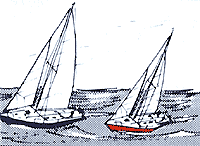
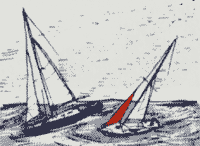
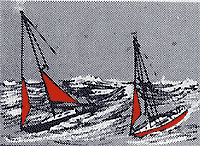
BEAUFORT SCALE WIND FORCE
|
|
DESCRIPTION |
WIND SPEED IN KNOTS | |
|
|
1 |
Light airs, ripples Drifting conditions |
1-3 |
|
2 |
Light breeze, small wavelets Both need large sails to catch breeze |
4-6 | |
|
|
3 |
Gentle breeze, crests begin to break Large headsails & full mainsails |
7-10 |
|
4 |
Moderate, small waves becoming larger, frequent white crests Reduce headsails and full main (B) might start to reef |
11-16 | |
|
|
5 |
Fresh breeze, moderate waves many white crests, spray Reduce headsails and (B) starts to reef |
17-21 |
|
6 |
Strong breeze, large waves, white foam crests Less sail |
22-27 | |
|
|
7 |
Near gale, sea heaps up, white foam, breaking waves blown in streaks Both under reefed mains with small jibs |
28-33 |
|
8 |
Gale, moderately high waves, breaking crests, foam streaks Deep reefed mains, storm jib on (B) |
34-40 | |
|
|
9 |
Severe gale, high waves, crests tumbk' spray affects visibility (A) Storm jib & trysail, storm jib only on (B) |
41-47 |
|
10 |
STORM Very high waves with long breaking crests. Survival conditions. |
48-55 | |