COMPETENT CREW
Practical Course Notes
T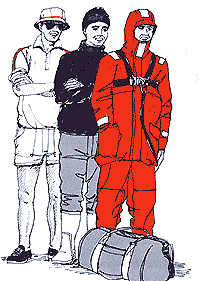 his
booklet is aimed at illustrating and clarifying the practical courses
run by the RYA. Lack of space has forced us to condense these notes
to the bare essentials and leave you to find out about the most
enjoyable part — THE SAILING!
his
booklet is aimed at illustrating and clarifying the practical courses
run by the RYA. Lack of space has forced us to condense these notes
to the bare essentials and leave you to find out about the most
enjoyable part — THE SAILING!
TO BEGIN WITH ...
If you've never lived on a boat before it might all seem rather cramped at first but you'll soon appreciate that space isn't everything when afloat.
As you'll all be living at quite close-quarters be sure to tell the skipper if you are taking any form of medicine, so he'll know what action to take if anything goes wrong.
Sea sickness sufferers will probably feel better on a small sailing yacht than they would on a large rolling ship. However take along your favourite remedy as any vomiting can upset the effectiveness of medication, including the contraceptive pill!
Rules on alcohol and tobacco vary from boat to boat, BUT any form of illegal drug found aboard could lead to the confiscation of the vessel.
RYA recognised sea schools
provide all safety equipment and often lend or hire out waterproofs
and seaboots. (See page
25 for details, if you decide to buy your own.)W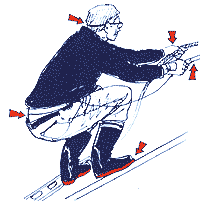 eather
afloat can vary from hot to very cold and wet, so your choice of
clothes should reflect this. But, as space is limited (and sometimes
damp) pack everything in plastic bags and then into asoft
holdall or
kitbag.
eather
afloat can vary from hot to very cold and wet, so your choice of
clothes should reflect this. But, as space is limited (and sometimes
damp) pack everything in plastic bags and then into asoft
holdall or
kitbag.
Shirts and trousers should not leave a chilling gap when you bend over and all footwear should have 'non-slip' soles. Glasses, sun hats and knives need to be tied on and a woolly hat will keep your head warm at night. Special sailing gloves can be bought if your hands need protection and rings ought to be left safely ashore.
IF YOU HAVE ANY DOUBTS ABOUT WHAT TO TAKE ASK THE PEOPLE YOU'LL BE SAILING WITH.

HARBOUR TERMS
Harbours and coastlines abound with strangely named objects and these two pages might help explain what the skipper is talking about.
1. FAIRWAY Main channel into the harbour.
2. HEADLAND Prominent land sticking out into the sea.
3. HARBOUR ENTRANCE Often there are traffic laws to be obeyed.
4. BREAKWATER, GROYNE, TRAINING BANK Obstruction used to protect the land from the sea.
5. PILE MOORING Posts driven into the seabed to tie-up
6. EBB When the tide is going out.
7. FLOOD OR FLOW When the tide is coming in.
8. CHANNEL Deep water route.
9. 'STEEP TO' CHANNEL EDGE Bottom gets deep quickly.
10. SHELVING Steep or gentle. How the bottom slopes.
11. Shoal or shallows
12. BEACON Navigation mark not always lit.
13. DOLPHIN Structure used as a navigation mark.
14. MOORING BUOYS If laid in a line they are called TROTS.
15. MARINA Enclosed area where boats are 'parked'.
16. LOCK Used to keep the water level in the marina constant, while still letting boats in and out.
17. CILL Sometimes instead of a lock a cill or dam is used to keep enough water in the marina.
18. PONTOON Floating platform to moor boats to.
19. SLIPWAY Ramp to launch boats.
20. HARD Solid ground to launch small boats from.
21. CHANDLER Shop that sells boating equipment.
22. NAVIGATION BUOYS Buoys used to mark the edge of channels (see back cover).
N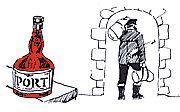 AUTICAL
TERMS
AUTICAL
TERMS
'PORT' and 'STARBOARD' are often confused — this little saying might help.
"The captain LEFT his RED wine behind"

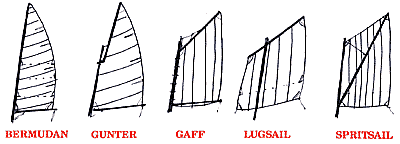
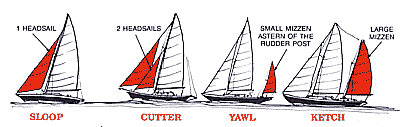
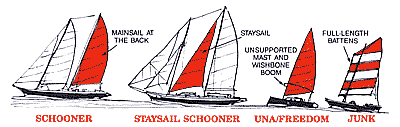
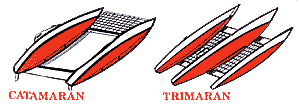
Rigs and boats
|
|

|
|
Boats come in all shapes and sizes. This page will help you put a name to some of the passing scenery. |

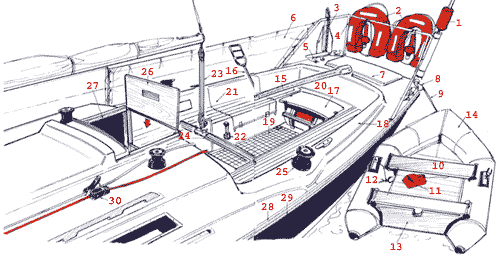
1. PULPIT (front safety rail) 2. FORESTAY (front wire supporting mast) 3. FAIRLEAD (to pass ropes through) 4. BOW ROLLER OR STEMHEAD FITTING 5. ANCHOR WELL OR LOCKER 6. GUARD RAIL (wire running around boat) 7. CLEAT (to attach ropes to) 8. WINDLASS (winch (or anchor) 9. JACKSTAY (to clip safety harness to) 10. SPINNAKER POLE (see page 60) 11. FORE DECK 12. STANCHION 13. FENDER 14. FOREHATCH 15. INNER FORESTAY (baby stay) 16. VENTILATOR 17. LIFERAFT 18. BLOCKS (pulleys) 19. MAST STEP (bottom of mast) 20. COACHROOF 21. GRABRAIL (handrail) 22. GOOSENECK 23. WINCH 24. MAST 25. BOOM 26. KICKING STRAP (see page 56) 27. SIDE DECK 28. CHAIN PLATE 29. RIGGING SCREW OR BOTTLE SCREW 30. SHROUDS (see page 14) 31. DECK FILLER (fuel or water) 32. STEM (sharp bit between deck and water) 33. FOREFOOT (where stem and keel meet) 34. KEEL 35. SKEG 36. RUDDER 37. STERN (back) 38. DRAFT (depth of water of 'what she draws') 39. CAVITA LINE (decorative line) 40. BOW (front) 41. TOPSIDES (between water and deck) 42. BOOT TOP (painted band just above water)
|
1. DAN BUOY (emergency marker) 2. LIFE BUOY (see page 28) 3. KEDGE ANCHOR (secondary anchor) 4. PUSHPIT (rear safety rail) 5. AFTER DECK 6. DODGERS (to keep spray out) 7. STERN LOCKER 8. FAIRLEAD (to pass ropes through) |
9. DINGHY PAINTER (rope to tie-up dinghy) 10. THWART (seat) 11. BAILER (to bail out water) 12. ROWLOCK ('rollock') 13. TRANSOM (flat back of boat) 14. DINGHY OR TENDER 15. TILLER 16. TILLER EXTENSION |
17. LIFE RAFT STOWAGE (not always here) 18. COAMING 19. COCKPIT SOLE (floor) 20. COCKPIT 21. COCKPIT LOCKER 22. ENGINE CONTROLS (see page 13) 23. MAIN SHEET (see page 56) 24. MAIN SHEET TRACK |
25. SHEET WINCH 26. WASH BOARDS (drop-in boards) 27. COMPANIONWAY (main entrance) 28. TOE RAIL OR GUNWALE ('gunnel' — top edge of hull) 29. RUBBING STRAKE (bumper) 30. JAMMERS (see page 34) |
|
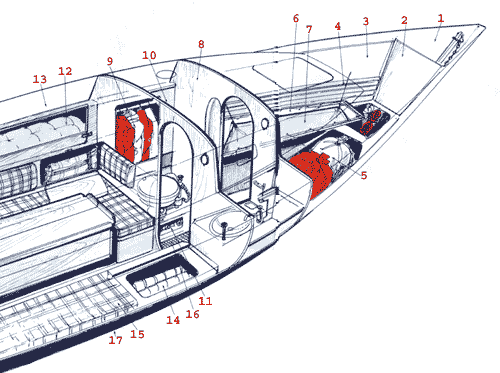
1 ANCHOR LOCKER, ANCHOR WELL OR CHAIN LOCKER Often where the main anchor (bower) is stowed. Anchor cable is sometimes kept here or in a separate chain locker 2. FOREWARD BULKHEAD 3. FORE CABIN, FORE PEAK OR FO'C'SLE (cabin in the bows) 4. CEILING (cabin sides) 5. SAIL LOCKER (sometimes aft) 6. PIPE COT (folding bed) |
7. LEE-CLOTH (stops you falling out) 8. BULKHEAD (wall) 9. HANGING LOCKER (wardrobe) If used for wet oilies it is called a wet locker 10. HEADS (lavatory) see page 16 11. SEACOCKS (valves to let water in and out) |
12. PILOT BERTH (bed) 13. MAIN SALOON (cabin) 14. LOCKER (cupboard) 15. SETTEE BERTH (bed that can often be converted into a double by lowering the table) 16. CABIN SOLE (floor) 17. BILGE (where the bottom of the boat joins the sides or the space under the sole) |

|
1. COMPANIONWAY (entrance to cabin) 2. WASH BOARDS (drop-in boards) 3. FIRE EXTINGUISHER (see page 29) 4. FLARES Not always here (see page 31) 5. COMPANIONWAY STEPS 6. FIRE BLANKET (see page 29) |
7. QUARTER BERTH (bed) Sometimes a small cabin — quarter cabin or after cabin. 8. DECK HEAD (ceiling) 9. CHART TABLE (navigation area) 10. GALLEY (kitchen) 11. ICE-BOX 12. GIMBALLED STOVE (Swings with ship's movement see page 17) |
13. SAFETY STRAP FOR COOK 14. HALF-BULKHEADS ' GRAB RAILS 16. LOCKERS (cupboards) 17. CABIN SOLE (floor) |
|
|
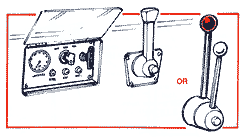
ENGINE CONTROLS These normally consist of the engine instrument panel together with the throttle and gear lever. This can be combined as one lever, so as you push it forward it engages ahead and then opens the throttle. Likewise the same happens in astern. Sometimes there are separate gear and throttle levers. But, whichever system you have ALWAYS go gently from ahead to astern. All engine instruments and controls are slightly different so make sure you understand them fully before using them. A great deal of damage can be caused by the wrong sequence of actions being carried out. |
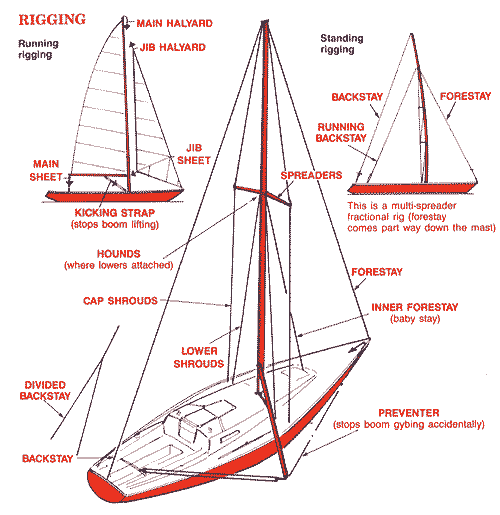
All the lines on a boat that are fixed to the mast in some way are called the rigging. Those which move to control the sails are called the RUNNING RIGGING and those that hold the mast up are called the STANDING RIGGING.
RUNNING RIGGING is normally rope but on larger boats flexible wire is also used. STANDING RIGGING is often made of wire and on some boats can be adjusted to alter the shape of the sail by bending the mast.
|
|
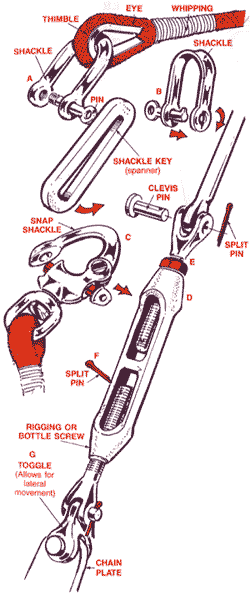
RUNNING RIGGING Rigging lines are usually attached to other things (such as sails) by some form of fastening called a SHACKLE. These come in various sizes and open in a variety of ways. (A) The most common type has a screw-in pin, which can be tightened with a slotted spanner called a SHACKLE KEY (often these are incorporated in sailor's knives). (B) Another type simply has a 'push and turn' keyhole pin. (C) Spring loaded SNAP SHACKLES open in several different ways some have triggers, but the most common have a pull-out pin. STANDING RIGGING The tension in the standing rigging is usually adjusted by turning a RIGGING SCREW (D). This has a left and right handed thread so each turn either tightens or loosens the rigging wire. Once adjusted, the rigging screw is locked in position by a locknut (E), split pin (F) or locking wire. Any signs of damage or looseness in these fittings must be reported to the skipper. The rigging wire is attached to the rigging screw with a clevis pin and split pin. These are usually taped over to stop them tearing sails. The rigging screw is connected to the boat via some form of toggle (G) which allows for some degree of movement. The toggle in turn is fixed to a chain plate or strong U bolt. Again any signs of wear in these components should be reported. |
|
|
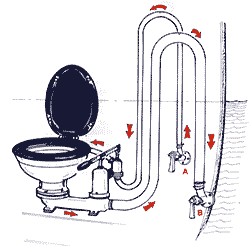
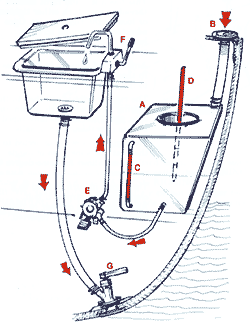
WATER - the heads On a boat, the lavatory is called 'the heads', as in the past seamen used to use the front of the boat or 'head' as a toilet. Today, the marine W.C.'s vary quite considerably in design and operation, so, make sure you understand how to use the one on your boat. Basically, they all suck in sea water through a seacock (valve) (A), flush the bowl and pump it out through another seacock (B) (or into a holding tank). Only things which have passed through the body and moderate amounts of lavatory paper can be successfully flushed away. So, women using sanitary towels should also take along a supply of disposal bags. To prevent syphoning, the pipes carrying water to and from the lavatory rise above the water level and the seacocks are turned off at seu, when the system is not being used. FRESH WATER All fresh water is carried in tanks (A), which are filled from the deck (B) and the levels are checked either by a sight-tube (C) or dip stick (D). Water gets to the sink via a footpump (E), hand pump (F) or an electric pump, whose switch often looks like a tap. Waste water drains out through another seacock (G) or into a holding tank which can be pumped out later. DO NOT WASTE WATER. |
|
|
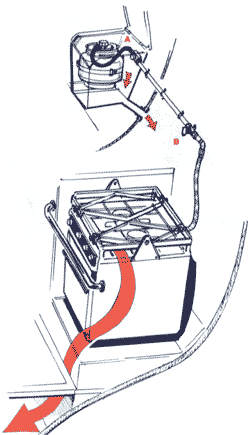
GAS Bottled gas is the main fuel used I'm- cooking and can be very dangerous. Nuniuilly, the bottle lives in a draining, cockpit locker which lets any escaping gas leak overboard. A STRUT SEQUENCE MUST l\K USED TO STOP GAS ESCAPING TO TURN ON 1. MAKE SURE ALL TAPS ARE CLOSED. ASK HOW THEY ALL WORK. 2. TURN ON AT THE BOTTLE (A) 3. TURN ON THE MAIN COCK (B) 4. LIGHT THE MATCH 5. TURN ON THE BURNER 6. DISPOSE OF THE MATCH SAFELY TO TURN OFF:- If you are going to use the stove again soon: 1. TURN OFF THE MAIN COCK (B) 2. LET THE GAS BURN OUT 3. SHUT THE BURNER TAP If you have finished with the stove 1. TURN OFF AT THE BOTTLE 2. LET THE GAS BURN OUT OF THE SYSTEM 3. SHUT OFF THE MAIN COCK 4. SHUT OFF THE BURNER TAP Liquid petroleum gas is heavier than air so, any small amounts that escape, sink into the bilge and might accumulate into an explosive mixture. |
LIVING AFLOAT
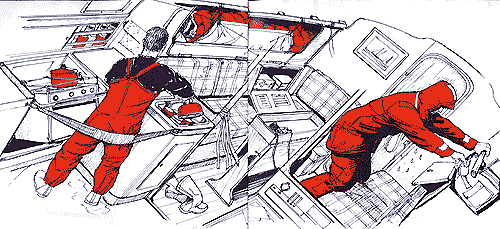
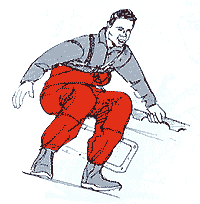
Cooking This is awkward on a boat due to the very limited .space and constant movement. In rough weather, the cook and his utensils need to be firmly wedged-in. The dangers of hot spilled liquids can be ivduri'd by wearing oilskin trousers and boots and only part fill any containers that are used.
The sink is a very good place to hold mugs while pouring out hot drinks as any spills go straight down the drain.
Sleeping Boats may provide sleeping bags or you can take your own. All bunks should be equipped with 'lee-cloths' to stop you falling out in the event of heavy weather. Although usually they aren't needed and the gentle movement of the boat rocks you to sleep.
Tidiness All gear needs to be kept in its correct place so everyone knows where to find it. This goes equally for the humble teaspoon as well as emergency equipment.
Often lists of contents are displayed inside locker lids to help with this.
Personal gear should be tidied away to avoid accidents and to stop it getting soaked in rough weather.
A hug which you can live out of saves unpacking and gives the contents a little extra protection from the wet.
Try not to drip onto bunks when moving bout in wet oilskins and avoid leaving your gear just where it fell!
GOLDEN RULES FOR LIFE AFLOAT
Be clean and tidy — wipe up any spills straight away and pack everything away neatly.
Don't leave lights on as this wastes the boat's limited battery power.
Don't waste water as only a certain amount of fresh water can be carried aboard and if its wasted, valuable sailing time has to be used up refilling the tanks.
Be tolerant.
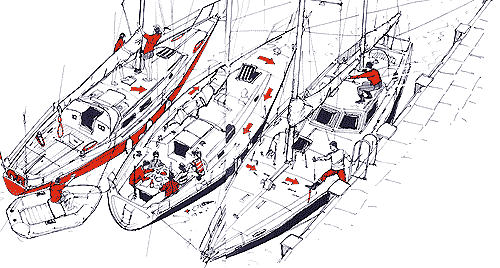
DO'S AND DON'TS WHEN MOORED ALONGSIDE
DO — Tidy the boat up before going ashore
DO — Make sure all the mooring warps and fenders are secured properly (see page 33) and the ends of lines coiled neatly.
DO— Look uloft to make sure that lines won't knock against the mast all night.
DO — Put the sail cover on to protect the mainsail.
DO — Coil and stow the shei'ts
DO — Look around the boat and report any signs of wear and tear to the skipper.
DO — Use some of your time in harbour to give the boat a good clean. Use the dinghy to get down and clean the hull.
DO — Take in the ensign (flag) at sunset if the skipper has asked you to do so. (It's e custom that the ensign isn't flown in harbour between the hours of 2100 - 0800).
DO — Secure the dinghy so it won't obstruct other people and so it doesn't bump the boat all night.
DON'T — Cross other people's boats by going through their cockpits. Respect their privacy and go around by the foredeck.
DON'T — Look into open hatches or ports (windows).
DON'T — Jump onto decks
DON'T — Stand on stanchions, guardrails, hatches or varnish work.
DON'T — Cross people's decks singing and shouting. (Remember you'll be the inside boat one day — so set an example by walking quietly.)
DON'T — Sit in the cockpit drinking and talking loudly into the small hours — as your neighbours might be trying to sleep — go below.
DON'T — Eat and drink too much if you are sailing the next day.
DON'T — Throw any rubbish into the water.
DINGHIES
Yachts' tenders (dinghies) come in all shapes and sizes and by learning to control them properly you'll add to your enjoyment allo.it But used incorrectly they can be very dangerous.
|
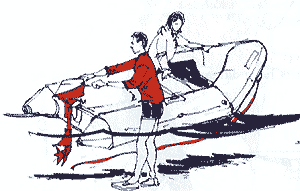
THIS IS AN EXAMPLE OF WHAT YOU SHOULD NOT DO! |
|
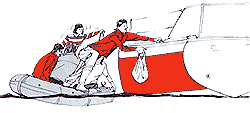
Make several trips, rather than overloading the dinghy, as a passing wash could swamp you. Don't stand up and always place stores on the deck before trying to leave the dinghy. The dinghy is more stable if secured by the painter (bow rope) rather than just holding on. And, never leave metal rowlocks in when alongside a yacht as they will scratch her hull. Also, try not to let your fingers be squashed between the two boats!

ROWING A dinghy will row easier if she's not overloaded and the weight distributed so she's trimmed level.

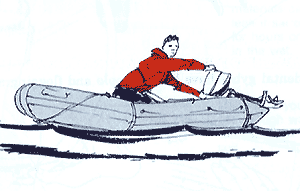
OUTBOARD MOTORS Again, the boat will go better and be more seaworthy if you trim her level. This might mean using an extension on the outboard's tiller and sitting further forward. The boat on the left is dangerous as the wind could flip her over.
|
|
USING A DINGHY AT NIGHT This can be very pleasurable or extremely dangerous. Always wear some form of buoyancy, and take the oars as well as the outboard. Take a torch, to warm others you're there and to find your own boat again! |
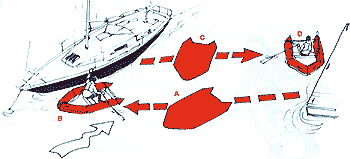
ROWING ACROSS A CURRENT
(A) When rowing out to a yacht you must allow for any tidal stream so, aim well up stream and gradually 'crab' across the current.
(B) Unship the inboard oar (and rowlock) and let the tide ease you back.
(C) When leaving the yacht to go ashore keep the bows facing up into the stream otherwise you'll be swept way downstream.
(D) Unship the inboard oar and 'push' the other one to spin you in alongside. Make fast smartly.
OUTBOARD SAFETY
|
|
|
|
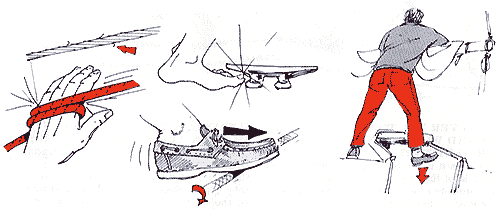
NEVER, EVER TRY TO START AN OUTBOARD WHEN STANDING IN THE . WATER NEXT TO IT. When it fires it can jump forward and slice into your legs! Row the boat off a good distance from the beach and start the engine when you are safely inside. Mso, beware of the trailing painter fouling the propeller. |
ALWAYS CUT THE ENGINE AND TIP IT UP WHEN APPROACHING A BEACH. This will save the propeller from damaging itself by churning up the sand. Also, don't let inflatables run up onto a stony beach. Stop in the shallows and unload her there. This will avoid tearing the bottom and the need to use the repair kit and pump you should be carrying. |
SAFETY
|
|
Moving around the boat safely means always: (A) Using the windward (uphill) side so, if you fall, you'll full inboard. It will also keep you away from the sails and let you brace your feet against the cabin sides. (B) Keeping your body weight low if it's choppy and crawling if it's really rough. (C) Holding on to something secure and remembering 'It's one hand for you and one hand for the boat!' |
|
|
|

BE AWARE OF WHAT'S HAPPENING AROUND YOU
Accidental gybes have killed people and flogging sails have damaged eyes.
'Fishooks' on wire rope can cut fingers and NEVER put a rope around your hand.
Think where you're putting your feet and try to wear shoes to protect your toes. Ropes and wet sails can make you slip and open hatches can be forgotten about!
WET WEATHER GEAR
A good set of oilies and boots is an expensive investment, but they should last for years. Sailing schools will lend or hire you a set but if you decide to buy, here are some things to look for:-
|
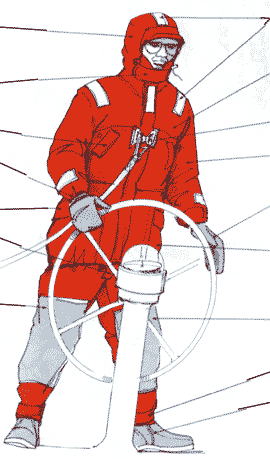
Well fitted hood that turns with your head but leaves room for a warm hat Toggle hood adjusters save tying a string across your face Large collar with flaps and a neck towel to keep out the drips Hand warmer pockets Adjustable cuffs Chest high trousers give added protection Watertight fly Tough patche |
|
Reflective tape (so you can be seen at night). Built in buoyancy or add-on life jacket are good features Integral harness Bright colour Waterproof gloves Some thin materials can leak it sat on for hours on end in the wet Make sure you can get enough warm clothes under the suit. Adjustable trouser bottoms Deck boots with non-slip soles that are large enough for warm socks to be worn. |
SAFETY HARNESS
|
|
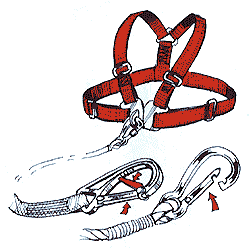
Each crew member should be supplied with a safety harness that can be adjusted to a reasonably tight fit. Once adjusted it can be easily put on when needed. ALWAYS WEAR A HARNESS IF YOU FEEL UNSAFE OR WHEN THE SKIPPER TELLS YOU TO DO SO. Don't be influenced by what other crew members are doing. |
|
There are various types of spring clips but make sure yours works and is clipped onto something strong. |
|
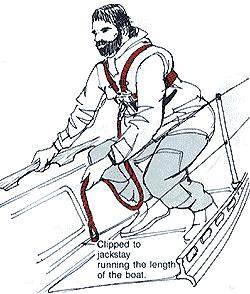
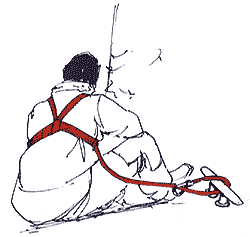
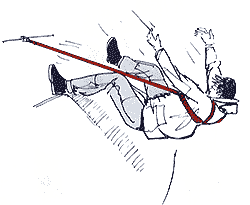
The lifeline can be clipped on to any suitable fitting that is securely bolted to the deck. If it is too large, clip it back on itself but try to avoid fittings on the edge of the boat like stanchions and lifelines. The idea is to clip on uphill so if you fall, you fall into the boat and in heavy weather ALWAYS clip on before leaving the cabin or cockpit.
LIFEJACKETS
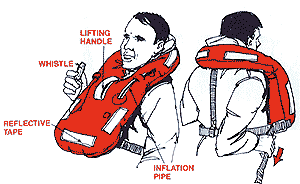
Each crew member must have a life jacket and know how to use it. They vary slightly in design, but basically go over the head and are held on with straps that are buckled or tied at the sides. Some inflate automatically but most have to be blowm up by mouth.
|
|
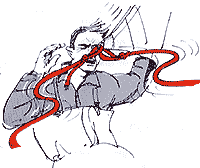
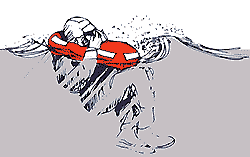
IN THE WATER By adopting this position in the water the body loses less heat and the hands keep the spray out of the nose and mouth. |
|
|
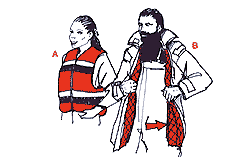
OTHER FORMS OF BUOYANCY Buoyancy aids (A) are floating waistcoats normally worn by dinghy sailors. Float coats (B) are jackets with some form of buoyancy built into them. Both are comfortable to wear but neither one is as good as a lifejacket in an emergency. |
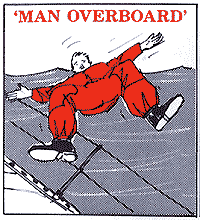

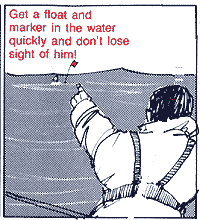
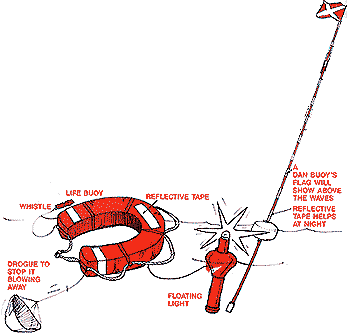
Man overboard equipment needs to be used fast, as a boat travelling at only 3 knots will be 50 feet away in 10 seconds!
So, get this lot over the side, shout 'MAN OVERBOARD', AND DON'T TAKE YOUR EYES OFF HIM
|
| |
|
|
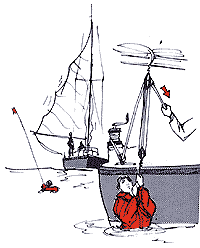
The skipper will take control and bring the boat back to the casualty. Carry out his orders as fast as you can without endangering your own life. A wet adult is extremely heavy so once he's secured alongside some form of crane might have to be constructed to get him onboard again. THE BEST THING IS TO MAKE SURE IT NEVER HAPPENS TO YOU] |
FIRE
Remember;
FIRE NEEDS:- HEAT, FUEL AND OXYGEN cut out any one and the fire goes out.
But, as always prevention is better so:-
NEVER — smoke while refuelling or in a bunk
NEVER — discard matches carelessly
NEVER — let oil, waste paper etc accumulate
ALWAYS REPORT SMELLS OF GAS and use the cooking stores properly (see page 17)
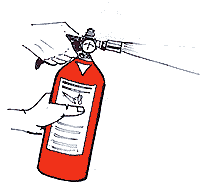
FIRE EXTINGUISHERS
There are two main types: DRY POWDER (colour coded blue) and HALON or BCF (colour coded green). Both can be used on any fire onboard a boat.
LEARN HOW TO USE THEM CORRECTLY, AND USE THEM FAST.
|
|
|
|
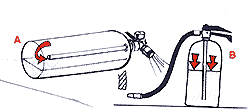
ALWAYS USE AN EXTINGUISHER UPRIGHT The tube nozzle type can be used upright yet still get to awkward places. (A) The tube nozzle type can be used upright yet still get to awkward places. As on its side (to under a door etc) only half gas or powder will come out. As on its side (to get under a door etc) only half the gas or powder will come out. The tube nozzle type can be used upright yet still get to awkward places. (B)The tube nozzle type can be used upright yet still get to awkward places. The tube nozzle type can be used upright yet still get to awkward places. The tube nozzle type can be used upright yet still get to awkward places. |
|
FIRE BLANKETS Fire blankets (or wet dish cloths) can be used to smother a galley fire. •Hold it like this to protect your hands and push it over the flames. •If a person's clothes catch fire; 1. Push them over so the flames rise away from the face 2. Smother the flames away from the face |
|
|
< |
SMOKE If the modern plastics in a boat catch fire they can give off VERY poisonous fumes. SO, NEVER BREATHE IN THE SMOKE. |


VHF RADIO DISTRESS CALL
A distress call is sent when there is GRAVE AND IMMINENT danger to a vessel or person and IMMEDIATE ASSISTANCE is required.
|
HOW TO SEND A DISTRESS CALL. Switch on power, switch on radio, select CH16. Turn to high power. Push press-to-transmit switch and speak slowly and distinctly. Switch on power, switch on radio, • MAYDAY, MAYDAY, MAYDAY. • This is (yacht name 3 times) • MAYDAY (yacht's name) • Position (see below) • Nature of distress • Any extra information which might help • Over • Release transmit switch |
Turning on the set etc can be forgotten in an emergency so make up a reminder card and stick it up near the radio. MAYDAY is the international distress signal. The name and the word yacht helps the searchers know what they are looking for. See below 'I require immediate assistance' and include number of people on board, whether you are going to abandon ship or have fired flares etc. 'Over' means please reply.'I require immediate assistance' and include number of people on board, whether you are going to abandon ship or have fired flares etc. 'Over' means please reply. |
![]()
AN URGENCY CALL
An urgency call is used when you have a very important message to send covering safety.
|
PAN PAN, PAN PAN, PAN PAN, Hello all stations (3 times) this is (yacht name 3 times) • Position • Nature of urgency • Assistance required •Over |
The advantage of an urgency call is that it lets the world know you are in some sort of trouble without launching all the rescue services at that moment.The advantage of an urgency call is that it lets the world know you are in some sort of trouble without launching all the rescue services at that moment.
|

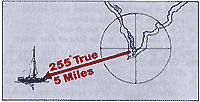
POSITIONS MUST BE GIVEN IN LAT. LONG. OR TRUE HEARINGS FROM A WELL DEFINED CHARTED POSITION WITH DISTANCE OFF. (e.g. Position 255" from South Head, 5 miles.)
If it is onboard, an Emergency Position Indicating Radio Beacon (EPIRB) should be activated to raise the alarm and help the rescue services home in on you.
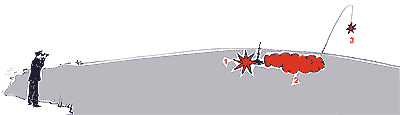
FLARES There are three main types of pyrotechnic distress signal
1 Hand flare 2. Orange smoke .3 Parachute rocket.
1 & 2 have to be in visible range 3 can be seen over the horizon.