

Color.Atlas.of.Endodontics-ublog.tk
.pdf1 6 |
Color Atlas of Endodontics |
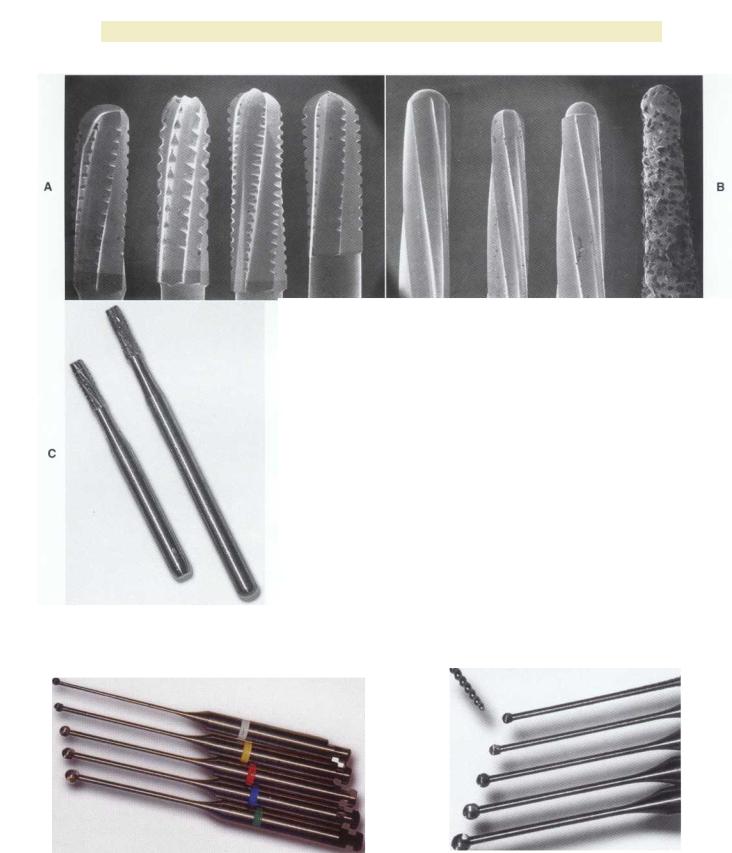
FIGURE 2-3 Coarse grit flame-shaped diamonds and a few sizes of tapered round-ended diamonds can work wonders for refining access outlines and blending canal orifices. These diamonds can safely cut natural and decayed tooth structure, precious and nonprecious crowns, PFM crowns, and all-porcelain crowns.
control, predictability, and ease; this is one reason they are used for the most delicate crown preparations. Perhaps their use should not be restricted to providing restorative treatment. Crown-preparation style diamonds seem to come in more sizes and shapes than any
other bur.
After the initial penetration into the pulp chamber has been accomplished, many clinicians advise using a round carbide to finish unroofing the chamber. Although this technique may work in some cases, it is very difficult to perform, especially on a tooth with a small access. The result of this technique is often an overprepared, uneven, gouged wall that catches the tips of files and hampers the placement of files. A much better and safer option is to use an appropriately sized tapered diamond to open and flare the access. The long cutting surface of the diamond can simultaneously open the cavosurface of the access and smooth irregularities in the access walls. The tip removes the last tags and remnants of the chamber roof and blends the dentin from the cavosurface to the canal orifice.
Penetrators and Metal Cutters
Metal cutting burs are highly practical adjuncts for use with full nonprecious castings and nonprecious sub-
structures of PFM crowns (Figure 2-4). The additional expense of using one or two new penetrating burs as opposed to numerous regular carbide fissure burs is offset by the time savings and reduced frustration.
Because of the difficulty in cutting through many restorative materials, especially nonprecious materials, the clinician is often tempted to shortchange the access preparation. Having an arsenal of sharp, new burs specially designed to penetrate these materials helps keep frustration to a minimum.
Surgical Length Burs
Surgical length burs permit displacement of the handpiece away from the incisal or occlusal surface of the tooth, greatly increasing visibility of the cutting tip of the instrument (see Figures 2-1 and 2-4, C). With technical skill, practice, and patience, the clinician can use surgical length burs to gain access in the majority of teeth, including maxillary second molars. Surgical length burs are often useful in teeth that present the greatest problems with access and visibility.
Mueller Burs
Clinicians contemplating tackling difficult or risky cases3 or those for whom referral is not an option should include Mueller burs in their armamentaria. Mueller burs are long-shaft, carbide-tipped burs used in a low-speed latch handpiece (Figures 2-5 and 2-6). They appear similar to Gates Glidden burs, but have a round carbide tip instead of the noncutting tip of the Gates Glidden bur. The long shaft is useful for working deep in the radicular portion of the tooth. In addition, it displaces the
handpiece away from the occlusal surface, allowing the clinician to see the cutting tip in action. An added bene-
fit of Mueller burs that is not well known even in the endodontic community is that unlike ultrasonics that leave
a ragged, rough, dusty, debris-filled cut, Mueller burs leave a clean, shiny surface when used on intact dentin. This surface contrasts well with the "white dot" or "white line" connective tissue remnant that was left as the pulp receded. The use of Mueller burs and a microscope makes treating even the most severely calcified
teeth less stressful and more predictable.
Mueller burs (Brasseler USA, Savannah, GA) are used after the gross coronal access has been achieved and a reasonable but unsuccessful search for the pulp chamber or canals has been completed. The access preparation is thoroughly dried and an appropriately sized Mueller bur is selected. The clinician uses the burs in a brushing motion to search for white dots or white lines representing the calcified canal. While the clinician cuts, the endodontic assistant uses short, light blasts of air to blow out the dentin dust, which is then evacuated by high-volume suction. Water is not used during the process because color differences in the dentin that indicate canal location are more evident in dry dentin. This technique is made even more efficient with the use of a Stropko irrigator on an air-only syringe.
Chapter Two Endodontic Access |
17 |
FIGURE 2-4 A, Metal cutting burs are useful for both precious and nonprecious crowns. Pictured from left to right are the Great White, the Beaver bur, the Transmetal, and the Brassler H34L.They feature a round-ended, crosscut design that minimizes chatter.They can also be used to penetrate the metal substructure of PFM crowns. The conventionallength shank also minimizes handpiece bearing load. B, Other burs advocated for endodontic access preparation include the 269GK, the Multipurpose bur, the Endo Z bur, and the Endo access bur. C, A surgical length #558 bur compared with a regular #558 bur.The surgical length bur enhances visibility by moving the head of the handpiece away from the tooth. The clinician must exercise care when using extended burs to prevent perforation. (A and B from Walton RE, Torabinejad M: Principles and practice of endodontics, ed 3, Philadelphia, 2002, WB Saunders.)
FIGURE 2-5 Mueller burs exhibit a long shank and are used in a |
FIGURE 2-b Mueller burs. The smallest 0.9 mm bur compared |
slow-speed, latch-type handpiece. |
with a #70 file. |

1 8 |
Color Atlas o f Endodontics |
FIGURE 2-7 The Analytic ultrasonic gold nitride tips are available in sizes #2 through #5, and NiTi tips are available in sizes #6 through #8. Pictured left to right are #2, #3, #6, #7, and #8. Many other configurations are available.
FIGURE 2-8 The Spartan ultrasonic handpiece has been specifically "tuned" to work the CPR ti ps.
Because these burs are carbide, they do not endure sterilization cycles well and become dull quickly. A few uses are all that can be reasonably expected before they become dull.
Ultrasonics
The CPR tips are available in nitride (gold-yellow) and NiTi (green, blue, and purple) (Figure 2-7). The extremely fine tips coupled with the small handpiece allow unprecedented visibility (Figure 2-8). Ultrasonic tips can be used to remove pulp stones and to cut dentin while locating additional canals.
Canal Orifice Flaring Instruments
An especially important step in preparation for rotary instrumentation is flaring of the canal orifice. As discussed earlier, rotary NiTi instruments cannot be precurved, have very flexible tips, and produce muted tactile sense because of the handpiece. Keeping these limitations in mind, the clinician should spend a few minutes flaring the canal orifices; this technique pays great dividends in increased speed and decreased frustration. Several instruments are available to aid in orifice flaring. These include Gates Glidden drills, GT rotary files (Dentsply Tulsa Dental, Tulsa, OK), and orifice shapers (Figures 2-9 through 2-11).

Chapter Two Endodontic Access |
1 9 |
FIGURE 2-9 Much of the fear associated with Gates Glidden burs can be mitigated by using the short versions in sizes #4 to #6. New Gates Glidden drills may tend to be drawn into the canal. They can be run backward until they are slightly dull.
FIGURE 2-10 This GT rotary file has a #35 tip, 1.25 mm maximum flute diameter, and a .12 taper. It can be used at up to 700 RPM for orifice flaring. In patent canal cases, it can be used as a
single instrument replacement for the entire set of Gates Glidden
burs or orifice shapers.
FIGURE 2-11 Orifice shapers are 19 mm long and proceed from a #20/.05 taper to #80/.08. They are used in sequence from left to right to create a funnel within the canal.

20 |
Color Atlas o f Endodontics |
FIGURE 2-12 The operating microscope is an indispensable tool for state-of-the-art endodontic treatment. The specialty practice should not be without a microscope; this instrument is useful in all phases of endodontic treatment from diagnosis to placement of the final restoration.
A B
FIGURE 2-13 A, Removal of the amalgam permits inspection of the tooth for fractures. The use of microscopy allows identification of a mesiodistal fracture. The pulp chamber has not been entered. B, On entering the pulp chamber, the clinician notes a fracture across the pulpal floor from mesial to distal. Wedging a Glick instrument into the access allows the clinician to visualize the fracture spreading and closing in this hopeless tooth. Although this gross fracture was visible with loupes, the extent of many fractures cannot be seen. Diagnosis and prognostication then become guessing games at best. Note the white dot of the MB 2 canal located (in vain) with a Mueller bur above the fracture about halfway between the fracture and the MB canal; this was not visible without the microscope.
VISION, MAGNIFICATION,
AND ILLUMINATION
Although ultrasonic and Mueller bur techniques can be used without magnification, they are faster, more predictable, and safer with magnification. The operating microscope is the greatest teacher of endodontic anatomy 4 (Figure 2-12). Previously difficult cases become stress
free with microscope use, and previously impossible cases become routine. With the enhanced vision and illumination of the microscope, the clinician operates in an entirely different mode-visually.
To become proficient with the microscope, the clinician should not pull it into service on only the most difficult cases. In fact, without the use of the microscope the clinician may not even be aware of factors increasing

Chapter Two Endodontic Access |
21 |
A B
FIGURE 2-14 A, The lingual view shows the incisally repositioned access with the rotary notch. B, From the lateral view, the darker wedge-shaped portion of the access shows how incisally this notch may be placed. With the repositioned access, very little cervical dentin needs to be removed.
the difficulty of the case and therefore miss cues only visible with the magnification and illumination the micro-
scope provides (Figure 2-13).
constraints on access design. They are unforgiving of poor access design, irregularities in the access walls, and poor blending of the walls and pulpal floor into the canal orifice.
UNCOMPLICATED ACCESS PREPARATIONS
Given the goals and constraints of endodontic access, a distinctive shape is required for each tooth type based on the most common anatomic features of the crown as well as the radicular morphology. Maxillary central and lateral incisors share common coronal and radicular anatomy,5,6 as do the maxillary premolar and molar tooth groups. The same can be said for the mandibular teeth. Although maxillary and mandibular canine teeth share common coronal and radicular form, the lack of two canals in the maxillary canine as well as less frequent lingual inclination result in a somewhat more constrained access form in the maxillary canine.
Some degree of attrition occurs in the natural adult dentition and dictates some changes in endodontic access design. Because one of the traditional anatomic landmarks (the incisal edge) has been lost, the clinician may be tempted to make the access midway between the "new" incisal edge and the cervical edge. This results in an access that is too cervically positioned.
In light of recent changes in the understanding of canal anatomy, the increased use of rotary NiTi instruments, and the advent of predictable bonding to natural tooth structure with many of new restorative materials, the time may be ripe to reconsider current notions of endodontic access design. Any one of these factors alone might merit rethinking of the access for endodontic treatment, but taken together, they dictate change.
The use of rotary NiTi instruments places even stricter
Maxillary Incisors
In uncomplicated cases, both maxillary central and lateral incisors share a common triangular-shaped access from the lingual surface of the tooth. The classic access design places the access centrally on the lingual surface between the incisal edge and the cervical edge7 ( Figure 2-14). This design is reflective of the poor restorative choices available in the past as well as the limited options for "hiding" the access more cervically. Such a design results in a much larger amount of dentin removal at the lingual cervical edge to gain straight-line access. With improved esthetic bonded composites, the classic access form can be modified by placing it considerably more incisally (Figure 2-15). The initial penetration should be approximately in the middle of the lingual surface of the tooth, not just above the cingulum as has been previously described.' After locating the canal, the clinician uses a long, tapered diamond to extend the access even further incisally and laterally. An additional modification for use with rotary instrumentation is to slightly notch the middle of the incisal extent of the access (see Figure 2-15). This allows even better straightline access and greatly decreases the potentially catastrophic cervical flexure of the rotary instruments that can contribute to premature, unexplained fracture.
In anterior teeth the clinician must take care to remove all the coronal tissue and debris from the chamber. Material left in the chamber can cause tooth discoloration. The pulp horns are common locations for residual tissue (Figure 2-16).

22 |
Color Atlas of Endodontics |
FIGURE 2-15 View of accessed tooth from the incisal and slightly lingual. Note the rotary notch in the middle of the incisal extent of the access. This notch allows more straight-line access for rotary NiTi instruments and greatly helps eliminate cervical flexure that can cause "unexplained" instrument breakage.
C
FIGURE 2-16 A, Residual pulp in horn. B, Tapered, round-ended diamond burs are used to remove debris. The diamond leaves an optimal surface for bonding. C, In immature cases with large pulps, the clinician must take care to remove all material in the pulp horns. Often a tapered, round-ended diamond bur can be used to blend the pulp horns into the access form. This blending should be rechecked before the final restoration because any residual pulpal debris, bacteria, sealer, and guttapercha can contribute to subsequent discoloration.

Chapter Two Endodontic Access |
23 |
FIGURE 2-17 Access opening for the maxillary canine.
A B
FIGURE 2-18 A, Initial access penetration occurs in the middle of the incisal-cervical dimension. After locating the canal, the clinician extends the access incisally. Note the facial veneer. B, Completed access from the incisal view.
Maxillary Canines
In uncomplicated cases the maxillary canine access is rather broad from buccal to lingual, which reflects the broad buccolingual shape of the root and the canal space (Figures 2-17 and 2-18). In the adult dentition the incisal edge of the maxillary canine has usually undergone significant attrition (Figure 2-19). This alters the normal anatomic landmarks for endodontic access midway between the cervical bulge and the incisal tip (see Figure 2- 19). Therefore the endodontic access will be located in a more incisal position than would be the case on a "vir-
gin" tooth. This modification to access may occur on any tooth but is most common with the maxillary and mandibular anterior teeth.
Maxillary Premolars
Although not all maxillary premolars have two canals,' they should all be approached from the assumption that they have separate buccal and lingual canals (Figure 2-20). This dictates a broad buccolingual access form that is somewhat constrained in the mesiodistal dimension (Figure 2-21). The maxillary premolar access is never round.

24 |
Color Atlas of Endodontics |
FIGURE 2-19 The effect of attrition.This slightly lingual and incisal view of a tooth shows the access encroaching on the incisal edge.
A B
C
FIGURE 2-20 Access for maxillary premolars. A, Buccal view. B, Mesial view. C, Occlusal view.

Chapter Two Endodontic Access |
25 |
FIGURE 2-21 A, Preoperative view with a distal occlusal (DO) composite. Note the mesial concavity. B, Initial access to the pulp chamber is broad buccolingually and narrow mesiodistally. C, The cusps are flattened to gain more accurate reference points. D, The diamond is used to blend the coronal portion of the access with the cervical portion. This blends the buccal and lingual pulp horns and removes pulp tissue from these areas.