

The_Swift_Programming_Language
.pdffallthrough
return
The control, break and fallthrough statements are described below. The return statement is described in Functions.
Continue
The continue statement tells a loop to stop what it is doing and start again at the beginning of the next iteration through the loop. It says “I am done with the current loop iteration” without leaving the loop altogether.
N O T E
In a for-condition-increment loop, the incrementer is still evaluated after calling the continue statement. The loop itself continues to work as usual; only the code within the loop’s body is skipped.
The following example removes all vowels and spaces from a lowercase string to create a cryptic puzzle phrase:
1 let puzzleInput = "great minds think alike"
2 var puzzleOutput = ""
3 for character in puzzleInput {
4switch character {
5case "a", "e", "i", "o", "u", " ":
6continue
7default:
8puzzleOutput += character
9}
rintln(puzzleOutput)
/ prints "grtmndsthnklk"
The code above calls the continue keyword whenever it matches a vowel or a space, causing the current iteration of the loop to end immediately and to jump straight to the start of the next iteration. This behavior enables the switch block to match (and ignore) only the vowel and space characters, rather than requiring the block to match every character that should get printed.

Break
The break statement ends execution of an entire control flow statement immediately. The break statement can be used inside a switch statement or loop statement when you want to terminate the execution of the switch or loop statement earlier than would otherwise be the case.
Break in a Loop Statement
When used inside a loop statement, break ends the loop’s execution immediately, and transfers control to the first line of code after the loop’s closing brace (}). No further code from the current iteration of the loop is executed, and no further iterations of the loop are started.
Break in a Switch Statement
When used inside a switch statement, break causes the switch statement to end its execution immediately, and to transfer control to the first line of code after the switch statement’s closing brace (}).
This behavior can be used to match and ignore one or more cases in a switch statement. Because Swift’s switch statement is exhaustive and does not allow empty cases, it is sometimes necessary to deliberately match and ignore a case in order to make your intentions explicit. You do this by writing the break statement as the entire body of the case you want to ignore. When that case is matched by the switch statement, the break statement inside the case ends the switch statement’s execution immediately.
N O T E
A switch case that only contains a comment is reported as a compile-time error. Comments are not statements and do not cause a switch case to be ignored. Always use a break statement to ignore a switch case.
The following example switches on a Character value and determines whether it represents a number symbol in one of four languages. Multiple values are covered in a single switch case for brevity:
1
2
let numberSymbol: Character = " " // Simplified Chinese for the number 3
var possibleIntegerValue: Int?

3 switch numberSymbol {
4 case "1", "١", " ", " ":
5possibleIntegerValue = 1
6 case "2", "٢", " ", " ":
7possibleIntegerValue = 2
8 case "3", "٣", " ", " ":
9 possibleIntegerValue = 3
ase "4", "٤", " ", " ": possibleIntegerValue = 4
efault: break
let integerValue = possibleIntegerValue {
println("The integer value of \(numberSymbol) is \(integerValue).") else {
println("An integer value could not be found for \(numberSymbol).")
/ prints "The integer value of is 3."
This example checks numberSymbol to determine whether it is a Latin, Arabic, Chinese, or Thai symbol for the numbers 1 to 4. If a match is found, one of the switch statement’s cases sets an optional Int? variable called possibleIntegerValue to an appropriate integer value.
After the switch statement completes its execution, the example uses optional binding to determine whether a value was found. The possibleIntegerValue variable has an implicit initial value of nil by virtue of being an optional type, and so the optional binding will succeed only if possibleIntegerValue was set to an actual value by one of the switch statement’s first four cases.
It is not practical to list every possible Character value in the example above, so a default case provides a catchall for any characters that are not matched. This default case does not need to perform any action, and so it is written with a single break statement as its body. As soon as the default statement is matched, the break statement ends the switch statement’s execution, and code execution continues from the statement.
Fallthrough

Switch statements in Swift do not fall through the bottom of each case and into the next one. Instead, the entire switch statement completes its execution as soon as the first matching case is completed. By contrast, C requires you to insert an explicit break statement at the end of every switch case to prevent fallthrough. Avoiding default fallthrough means that Swift switch statements are much more concise and predictable than their counterparts in C, and thus they avoid executing multiple switch cases by mistake.
If you really need C-style fallthrough behavior, you can opt in to this behavior on a case-by-case basis with the fallthrough keyword. The example below uses fallthrough to create a textual description of a number:
1 let integerToDescribe = 5
2 var description = "The number \(integerToDescribe) is"
3 switch integerToDescribe {
4 case 2, 3, 5, 7, 11, 13, 17, 19:
5description += " a prime number, and also"
6fallthrough
7 default:
8description += " an integer."
9 }
rintln(description)
/ prints "The number 5 is a prime number, and also an integer."
This example declares a new String variable called description and assigns it an initial value. The function then considers the value of integerToDescribe using a switch statement. If the value of integerToDescribe is one of the prime numbers in the list, the function appends text to the end of description, to note that the number is prime. It then uses the fallthrough keyword to “fall into” the default case as well. The default case adds some extra text to the end of the description, and the switch statement is complete.
If the value of integerToDescribe is not in the list of known prime numbers, it is not matched by the first switch case at all. There are no other specific cases, and so integerToDescribe is matched by the catchall default case.
After the switch statement has finished executing, the number’s description is printed using the println function. In this example, the number 5 is correctly identified as a prime number.
N O T E
The fallthrough keyword does not check the case conditions for the switch case that it causes execution to fall into. The fallthrough keyword simply causes code execution to move directly to the statements inside
the next case (or default case) block, as in C’s standard switch statement behavior.
Labeled Statements
You can nest loops and switch statements inside other loops and switch statements in Swift to create complex control flow structures. However, loops and switch statements can both use the break statement to end their execution prematurely. Therefore, it is sometimes useful to be explicit about which loop or switch statement you want a break statement to terminate. Similarly, if you have multiple nested loops, it can be useful to be explicit about which loop the continue statement should affect.
To achieve these aims, you can mark a loop statement or switch statement with a statement label, and use this label with the break statement or continue statement to end or continue the execution of the labeled statement.
A labeled statement is indicated by placing a label on the same line as the statement’s introducer keyword, followed by a colon. Here’s an example of this syntax for a while loop, although the principle is the same for all loops and switch statements:
label name : while condition {
statements
}
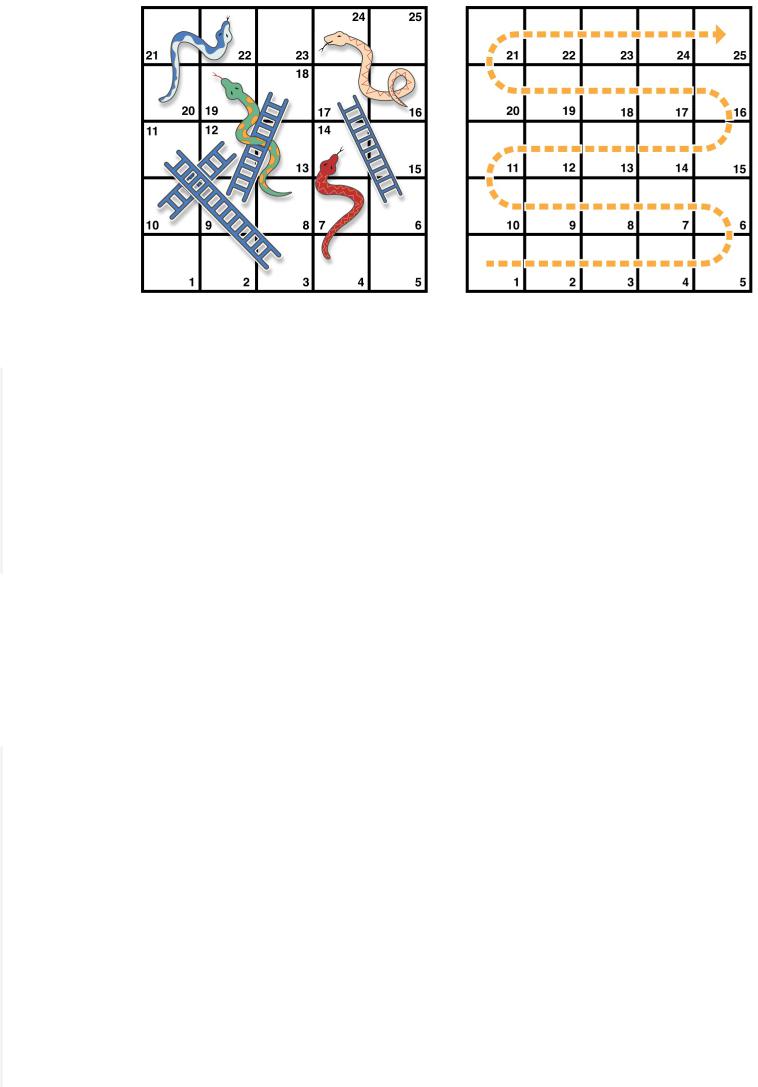
The following example uses the break and continue statements with a labeled while loop for an adapted version of the Snakes and Ladders game that you saw earlier in this chapter. This time around, the game has an extra rule:
To win, you must land exactly on square 25.
If a particular dice roll would take you beyond square 25, you must roll again until you roll the exact number needed to land on square 25.
The game board is the same as before:
The values of finalSquare, board, square, and diceRoll are initialized in the same way as before:
1
2
3
4
5
6
let finalSquare = 25
var board = Int[](count: finalSquare + 1, repeatedValue: 0)
board[03] = +08; board[06] = +11; board[09] = +09; board[10] = +02
board[14] = -10; board[19] = -11; board[22] = -02; board[24] = -08
var square = 0
var diceRoll = 0
This version of the game uses a while loop and a switch statement to implement the game’s logic. The while loop has a statement label called gameLoop, to indicate that it is the main game loop for the Snakes and Ladders game.
The while loop’s condition is while square != finalSquare, to reflect that you must land exactly on square 25:
1 gameLoop: while square != finalSquare {
2if ++diceRoll == 7 { diceRoll = 1 }
3switch square + diceRoll {
4case finalSquare:
5// diceRoll will move us to the final square, so the game is over
6break gameLoop
7case let newSquare where newSquare > finalSquare:
8// diceRoll will move us beyond the final square, so roll again
9 continue gameLoop
default:

// this is a valid move, so find out its effect square += diceRoll
square += board[square]
}
rintln("Game over!")
The dice is rolled at the start of each loop. Rather than moving the player immediately, a switch statement is used to consider the result of the move, and to work out if the move is allowed:
If the dice roll will move the player onto the final square, the game is over. The break gameLoop statement transfers control to the first line of code outside of the while loop, which ends the game.
If the dice roll will move the player beyond the final square, the move is invalid, and the player needs to roll again. The continue gameLoop statement ends the current while loop iteration and begins the next iteration of the loop.
In all other cases, the dice roll is a valid move. The player moves forward by diceRoll squares, and the game logic checks for any snakes and ladders. The loop then ends, and control returns to the while condition to decide whether another turn is required.
N O T E
If the break statement above did not use the gameLoop label, it would break out of the switch statement, not the while statement. Using the gameLoop label makes it clear which control statement should be terminated.
Note also that it is not strictly necessary to use the gameLoop label when calling continue gameLoop to jump to the next iteration of the loop. There is only one loop in the game, and so there is no ambiguity as to which loop the continue statement will affect. However, there is no harm in using the gameLoop label with the continue statement. Doing so is consistent with the label’s use alongside the break statement, and helps make the game’s logic clearer to read and understand.

Functions
Functions are self-contained chunks of code that perform a specific task. You give a function a name that identifies what it does, and this name is used to “call” the function to perform its task when needed.
Swift’s unified function syntax is flexible enough to express anything from a simple C- style function with no parameter names to a complex Objective-C-style method with local and external parameter names for each parameter. Parameters can provide default values to simplify function calls and can be passed as in-out parameters, which modify a passed variable once the function has completed its execution.
Every function in Swift has a type, consisting of the function’s parameter types and return type. You can use this type like any other type in Swift, which makes it easy to pass functions as parameters to other functions, and to return functions from functions. Functions can also be written within other functions to encapsulate useful functionality within a nested function scope.
Defining and Calling Functions
When you define a function, you can optionally define one or more named, typed values that the function takes as input (known as parameters), and/or a type of value that the function will pass back as output when it is done (known as its return type).
Every function has a function name, which describes the task that the function performs. To use a function, you “call” that function with its name and pass it input values (known as arguments) that match the types of the function’s parameters. A function’s arguments must always be provided in the same order as the function’s parameter list.
The function in the example below is called greetingForPerson, because that’s what it does —it takes a person’s name as input and returns a greeting for that person. To accomplish this, you define one input parameter—a String value called personName—and a return type of String, which will contain a greeting for that person:
1
2
3
4
func sayHello(personName: String) -> String {
let greeting = "Hello, " + personName + "!"
return greeting
}
All of this information is rolled up into the function’s definition, which is prefixed with

the func keyword. You indicate the function’s return type with the return arrow -> (a hyphen followed by a right angle bracket), which is followed by the name of the type to return.
The definition describes what the function does, what it expects to receive, and what it returns when it is done. The definition makes it easy for the function to be called elsewhere in your code in a clear and unambiguous way:
1
2
3
4
println(sayHello("Anna"))
//prints "Hello, Anna!" println(sayHello("Brian"))
//prints "Hello, Brian!"
You call the sayHello function by passing it a String argument value in parentheses, such as sayHello("Anna"). Because the function returns a String value, sayHello can be wrapped in a call to the println function to print that string and see its return value, as shown above.
The body of the sayHello function starts by defining a new String constant called greeting and setting it to a simple greeting message for personName. This greeting is then passed back out of the function using the return keyword. As soon as return greeting is called, the function finishes its execution and returns the current value of greeting.
You can call the sayHello function multiple times with different input values. The example above shows what happens if it is called with an input value of "Anna", and an input value of "Brian". The function returns a tailored greeting in each case.
To simplify the body of this function, combine the message creation and the return statement into one line:
1
2
3
4
5
func sayHelloAgain(personName: String) -> String {
return "Hello again, " + personName + "!"
}
println(sayHelloAgain("Anna"))
// prints "Hello again, Anna!"
Function Parameters and Return Values
Function parameters and return values are extremely flexible in Swift. You can define anything from a simple utility function with a single unnamed parameter to a complex function with expressive parameter names and different parameter options.

Multiple Input Parameters
Functions can have multiple input parameters, which are written within the function’s parentheses, separated by commas.
This function takes a start and an end index for a half-open range, and works out how many elements the range contains:
1
2
3
4
5
func halfOpenRangeLength(start: Int, end: Int) -> Int {
return end - start
}
println(halfOpenRangeLength(1, 10))
// prints "9"
Functions Without Parameters
Functions are not required to define input parameters. Here’s a function with no input parameters, which always returns the same String message whenever it is called:
1
2
3
4
5
func sayHelloWorld() -> String {
return "hello, world"
}
println(sayHelloWorld())
// prints "hello, world"
The function definition still needs parentheses after the function’s name, even though it does not take any parameters. The function name is also followed by an empty pair of parentheses when the function is called.
Functions Without Return Values
Functions are not required to define a return type. Here’s a version of the sayHello function, called waveGoodbye, which prints its own String value rather than returning it:
1
2
3
4
func sayGoodbye(personName: String) {
println("Goodbye, \(personName)!")
}
sayGoodbye("Dave")