


Point-to-Point Networks
See also
The last recipe of this chapter, 3-way routing, in which a more complicated setup using three remote sites is explained.
Chapter 8, Troubleshooting OpenVPN: Routing Issues
Configuration files versus the command-line
Most recipes in this book can be carried out without using configuration files. However, in most real-life cases a configuration file is much easier to use than a lengthy command-line. It is important to know that OpenVPN actually treats configuration file entries and commandline parameters identically. The only difference is that all command-line parameters start with a double dash ("--") whereas the configuration file entries do not. This makes it very easy to overrule the configuration file entries using an extra command-line parameter.
Getting ready
Install OpenVPN 2.0 or higher on two computers. Make sure the computers are connected over a network. For this recipe, the server computer was running CentOS 5 Linux and OpenVPN 2.1.1 and the client was running Windows XP SP3 and OpenVPN 2.1.1 In this recipe we'll use the secret.key file from the OpenVPN Secret keys recipe.
How to do it...
1. Create a configuration file based on an earlier recipe:
dev tun port 1194
ifconfig 10.200.0.1 10.200.0.2 secret secret.key
remote openvpnserver.example.com verb 3
Save this file as example1-6-client.conf.
2. We launch the server (listening)-side OpenVPN process on a non-standard port:
[root@server]# openvpn \
--ifconfig 10.200.0.1 10.200.0.2 \ --dev tun --secret secret.key \ --port 11000
 20
20

Chapter 1
3.Then we launch the client-side OpenVPN process and add an extra command-line parameter:
[WinClient] C:\>"\Program Files\OpenVPN\bin\openvpn.exe" \ --config client.conf \
--port 11000
The connection is established:
How it works...
The command-line and the configuration file are read and parsed from left to right. This means that most options that are specified before the configuration file can be overruled by entries in that file. Similarly, options specified after the following directive overrule the entries in that file:
--config client.conf
Hence, the following option overruled the line 'port 1194' from the configuration file:
--port 11000
However, some options can be specified multiple times, in which case the first occurrence
"wins". In that case, it is also possible to specify the option before specifying the --config directive.
There's more...
Here is another example to show the importance of the ordering of the command-line parameters:
C:\>"\Program Files\OpenVPN\bin\openvpn.exe" \ --verb 0 \
--config client.conf \ --port 11000
21 
Point-to-Point Networks
This produces the exact same connection log as shown before. The 'verb 3' from the client.conf configuration file overruled the --verb 0 as specified on the command line. However, with the following command line:
C:\>"\Program Files\OpenVPN\bin\openvpn.exe" \ --config client.conf \
--port 11000 \ --verb 0
Then the connection log shows the following:
… NOTE: OpenVPN 2.1 requires '--script-security 2' or higher to call user-defined scripts or executables
This shows all the other messages that have been muted.
OpenVPN 2.1 specifics
Some of the newer features of OpenVPN 2.1 deviate slightly from this principle, notably the
<connection> blocks and the inline certificates. See Chapter 12, OpenVPN 2.1 specifics for more details.
Complete site-to-site setup
In this recipe, we set up a complete site-to-site network, using most of the built-in security features that OpenVPN offers. It is intended as a "one-stop-shop" example of how to set up a point-to-point network.
Getting ready
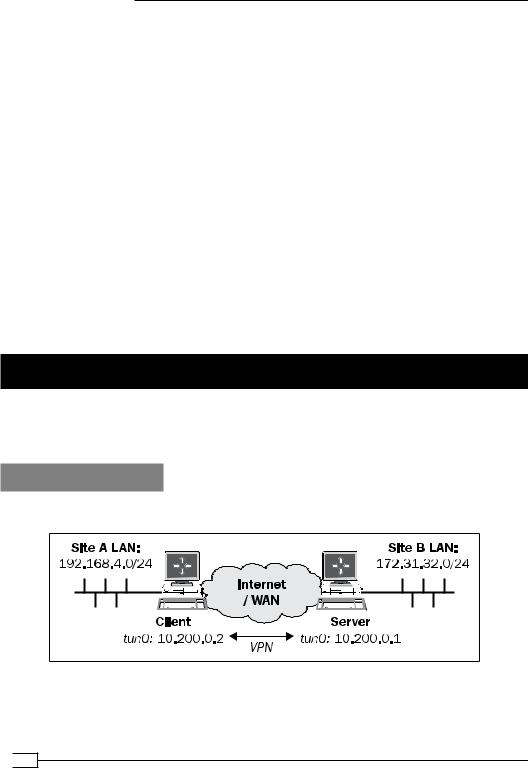
We use the following network layout:
 22
22

Chapter 1
Install OpenVPN 2.0 or higher on two computers. Make sure that the computers are connected over a network. For this recipe, the server computer was running CentOS 5 Linux and OpenVPN 2.1.1 and the client was running Fedora 13 Linux and OpenVPN 2.1.1. We'll use the secret.key file from the OpenVPN Secret keys recipe here.
Make sure routing (IP forwarding) is configured on both the server and client.
How to do it...
1.Create the server configuration file:
dev tun proto udp
local openvpnserver.example.com lport 1194
remote openvpnclient.example.com rport 1194
secret secret.key 0
ifconfig 10.200.0.1 10.200.0.2 route 192.168.4.0 255.255.255.0
user nobody group nobody persist-tun persist-key keepalive 10 60 ping-timer-rem
verb 3 daemon
log-append /tmp/openvpn.log
Save it as example1-7-server.conf.
2.On the client side, we create the configuration file:
dev tun proto udp
local openvpnclient.example.com lport 1194
remote openvpnserver.example.com rport 1194
secret secret.key 1
ifconfig 10.200.0.2 10.200.0.1 route 172.31.32.0 255.255.255.0
23 
Point-to-Point Networks
user nobody group nobody persist-tun persist-key keepalive 10 60 ping-timer-rem
verb 3 daemon
log-append /tmp/openvpn.log
Save it as example1-7-client.conf. 3. We start the tunnel on both ends:
[root@server]# openvpn --config example1-7-server.conf
And:
[root@client]# openvpn --config client.conf
Now our site-to-site tunnel is established.
4.Check the log files on both the client and server, to verify that the connection has been established.
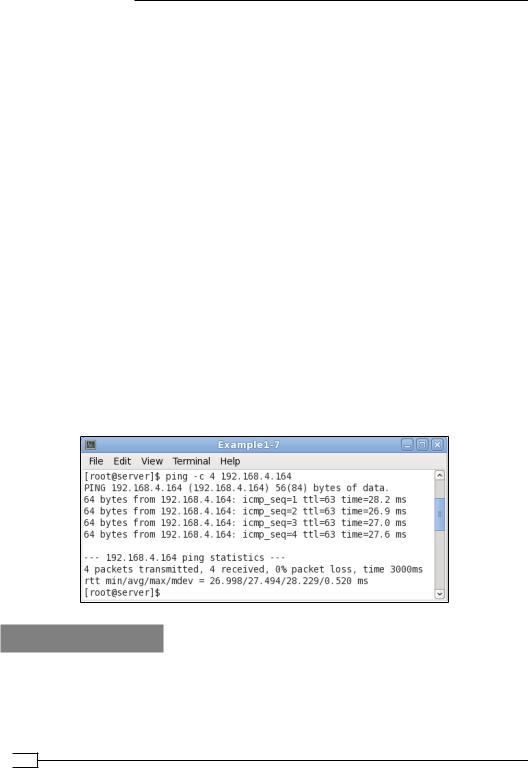
After the connection comes up, the machines on the LANs behind both end points can be reached over the OpenVPN tunnel.
5.For example, when we ping a machine on the client-side LAN from the server, we see the following:
How it works...
The client and server configuration files are very similar:
The server listens only on one interface and one UDP port
The server accepts connections only from a single IP address and port
The client has these options mirrored
 24
24