

clavien_atlas_of_upper_gastrointestinal_and_hepato-pancreato-biliary_surgery2007-10-01_3540200045_springer
.pdf224 |
SECTION 2 |
Esophagus, Stomach and Duodenum |
|
|
|
|
Open Stapling Technique |
|
|
|
|
STEP 1 |
Stapling technique |
|
|
The greater curvature is freed from the omentum, the mesocolic window is made and |
|
|
||
|
the jejunum and greater curvature are brought to apposition as previously described. |
|
|
Two stab wounds are made with the electrocautery in the greater curvature (12cm from |
|
|
the pylorus) and at the antimesenteric aspect of the jejunum (20cm from the ligament of |
|
|
Treitz). Two Allis clamps, incorporating full thickness gastric and jejunal wall, are placed |
|
|
one each in the gastric and the jejunal stab wounds. The cartridge fork of the GIA-60 |
|
|
stapler is inserted in the gastric lumen and the anvil fork into the jejunal lumen (this |
|
|
move is to push the GIA’s jaws into the lumens, not to pull the stomach and jejunum up |
|
|
towards the stapler). With the help and maneuvering of the two Allis clamps, align equal |
|
|
lengths of gastric and jejunal walls on the forks, keep the jejunal mesentery away from |
|
|
the anastomosis, close the instrument and fire. Open the handle of the stapler slowly and |
|
|
slide it out. Inspect the luminal side of the staple line for possible bleeding. |
|
|
|
|
STEP 2 |
Final reconstruction of the anastomosis |
|
|
The two Allis clamps are now repositioned to grab the two corners of the GIA staple line |
|
|
||
|
and the inner (luminal) anastomotic line is inspected for bleeding. Approximate the |
|
|
gastric and jejunal walls with two additional Allis clamps. Slip the jaws of the TA-55 |
|
|
beneath the Allis clamps incorporating all tissue layers as well as the corner end staples |
|
|
of the GIA staple line within the jaws. The corner ends of the two GIA staple lines |
|
|
should be the two corners of the TA staple line, so that these three staple lines (two |
|
|
from the GIA, one from the TA) form a triangle and the wide patency of the anastomosis |
|
|
is secured. Close the instrument and fire. Use a scalpel to excise the protruding tissue |
|
|
along a special groove on the surface of the stapler. Open the instrument to release the |
|
|
tissue and inspect for bleeding. Three single full-thickness 3-0 silk reinforcing sutures |
|
|
are placed at the three corners of the stapled anastomosis, as these represent the |
|
|
theoretically more “vulnerable” points of the anastomosis, since this is where two |
|
|
staple lines meet and overlap. A drain tube does not need to be placed. |
|

Gastroenterostomy |
225 |
|
|
STEP 1
STEP 2
STEP 3
Laparoscopic Technique
Positioning
The patient is placed supine. The senior surgeon stands on the patient’s right side and the first assistant on the left. Pneumoperitoneum is established with the Verres needle (by insufflating at a preset pressure of 12–15mmHg), the 0° or 30° laparoscope is introduced through a supraumbilical 10-mm port, but it can be moved to other ports as needed intraoperatively. Then, two 10-mm trocars and one 12-mm trocar are inserted in the anterior abdominal wall. The table is tilted at a 30° Trendelenburg position and a Babcock forcep (more atraumatic) is used to bring the omentum and transverse colon cephalad to identify the ligament of Treitz.
Preparation of the jejunal loop up to the stomach
The first jejunal loop is identified and approximated to the antrum in an antecolic route. If the retrocolic route is chosen, a window in the transverse mesocolon is made using the harmonic scalpel and the jejunal loop is brought up through it. Two 3-0 silk traction sutures are placed (5–6cm from each other) to opposite the jejunum (at a distance of 20cm from the ligament of Treitz) along the greater curvature (at a distance of 5cm from the pylorus). Two stab incisions are made at the approximated gastric and jejunal walls using the Hook device, one opposite to the other.
Technique of anastomosis
As two graspers are holding the traction sutures on the approximated stomach and jejunum, a 45-mm Endo-GIA stapler is inserted through the 12-mm port. The jaws of the instrument are introduced into the gastric and jejunal lumens. Maneuvering of the suture-holding graspers accommodates stapler insertion. The stapler is closed, fired and eventually removed. The staple line is inspected internally for patency and bleeding.
The common gastric and jejunal opening is closed with full-thickness, running 2-0 Vicryl suture tied intracorporeally. Alternatively, an Endo-TA or an Endo-GIA device can be used for closure of the common gastric and jejunal opening. A drain tube does not need to be placed.

226 SECTION 2 Esophagus, Stomach and Duodenum
Standard Postoperative Investigations
■ Gastrografin upper GI radiograph (when significant nasogastric tube output persists for longer than a week postoperatively)
Postoperative Complications
■Gastric hemorrhage
■Anastomotic bleeding
■Anastomotic leak
■Obstruction (anastomotic or functional)
■Anastomotic stenosis (long term)
Tricks of the Senior Surgeon
■When an antecolic gastrojejunostomy is chosen, the afferent jejunal loop can be kept short by placing the transverse colon as much to the right of the gastrojejunostomy as possible.
■Excessive length of the afferent limb may predispose to “afferent loop syndrome.”
■Inadvertent gastroileostomy is not that uncommon! Make sure, especially when a laparoscopic gastroenterostomy is performed, that the appropriate site of the jejunum is used.
■Gastric emptying is based on inherent gastric motor function; not on hydraulic pressure gradients. Thus, placing the anastomosis at the “most dependent” portion of the stomach does not have any scientific merit.
■Place the anastomosis where it lies more comfortably. Provided that there is no kinking, acute angles, or pressure on the efferent and afferent loops, the choice of retrocolic versus antecolic, or distal gastric versus proximal gastric placement of the anastomosis is not so important.

Conventional Gastrostomy (Kader Procedure):
Temporary or Permanent Gastric Fistula
Asad Kutup, Emre F. Yekebas
Introduction
Nowadays, gastrostomy has been replaced in most instances by less invasive procedures such as percutaneous endoscopic gastrostomy or feeding tube jejunostomy. However, gastrostomy still does have a place in highly selected instances, e.g., previous gastric surgery, the presence of ascites, or, in some instances, Crohn’s disease of the small bowel.
Indications and Contraindications
Indications |
■ |
Locally non-resectable and/or metastasized stenosing tumor of the esophagus, |
|
|
gastroesophageal junction, and proximal stomach |
|
■ |
Tumor not passable for endoscope |
|
■ |
Contraindications for endoscopic treatment (“percutaneous endoscopic |
|
|
gastrostomy”), i.e., ascites |
|
■ |
Patient unfit for major surgery |
|
■ |
Neurologic disorders (cerebral dysphagia) |
|
|
Resectable carcinoma |
Contraindications |
■ |
|
|
■ |
Previous major gastric resection/gastrectomy (in this case feeding jejunostomy |
|
|
is the treatment of choice) |
Preoperative Investigation/Preparation for the Procedure
History: |
Previous upper abdominal surgery, i.e., gastric resection; |
|
contraindication for percutaneous endoscopic gastrostomy (PEG) |
Clinical |
Exclusion of further obstruction distal to the stomach such as |
investigation: |
antral and pyloric strictures in cases of caustic burns. |
228 |
SECTION 2 |
Esophagus, Stomach and Duodenum |
|
|
|
|
Procedures |
|
|
Temporary Tube Gastrostomy |
|
|
(Synonyms: Witzel Procedure, Balloon Catheter Gastrostomy, Kader Procedure) |
|
|
|
|
STEP 1 |
Exposure |
|
|
Opening of the peritoneal cavity is done through the upper third of the left rectus |
|
|
||
|
muscle by a vertical or horizontal incision. Sharp transection of the skin, subcutis, and |
|
|
fasciae should be followed by blunt division of the muscle. |
|
|
For exposure of the anterior wall of the gastric body, it has to be pulled by clamps |
|
|
or retention sutures anteriorly. |
|
|
|
|
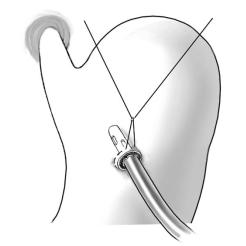
STEP 2 |
Preparation and incision of the gastric wall |
|
|
Preparation of a purse-string suture with a diameter of about 3cm usually made at the |
|
|
||
anterior aspect of the gastric body.
An incision of the gastric wall is made in the center of the purse-string suture, and a tube is inserted with its tip directed to the cardia. After the purse-string suture has been tested for leakage, the suture is tied.
In cases of caustic burns, antral and pyloric irregularities should be excluded by intragastric digital palpation of the poststomal stomach.
Surgical Gastrostomy: Temporary or Permanent Gastric Fistula |
229 |
|
|
|
|
STEP 3 |
Positioning of the catheter |
|
|
When inserting a feeding catheter with a diameter of about 1cm, the tip should |
|
|
|
|
|
be directed to the cardia. |
|
|
After proper positioning of the catheter with a minimum distance between insertion |
|
|
site and tip of the tube of 5cm, the purse-string suture is tied. |
|
|
Check for leaks at the site of the purse-string suture by filling the stomach with |
|
|
liquids. |
|
|
|
|
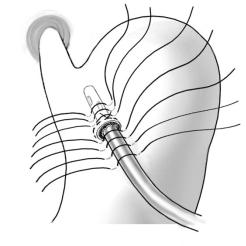
STEP 4 |
Gastroplication |
|
|
A gastroplication sutured with single stitches aborally to the insertion site of the tube is |
|
|
||
|
formed. If possible a reinforcing gastroplication of 8cm aborally to the insertion of the |
|
|
tube in the gastric wall is recommended. |
|
|
The gastric serosa is fixed with the abdominal wall by drawing the stomach upward |
|
|
and bringing the orifice of the tube distal to the gastroplication to an extraperitoneal |
|
|
location. |
|
|
The cuff of the tube is then fixed to the skin. |
|
230 |
SECTION 2 |
Esophagus, Stomach and Duodenum |
|
|
|
|
Balloon Catheter Gastrostomy |
|
|
|
|
STEP 1 |
Exposure |
|
|
Access to the peritoneal cavity, exposure, and preparation of the anterior aspect of the |
|
|
||
|
stomach as described above. |
|
|
|
|
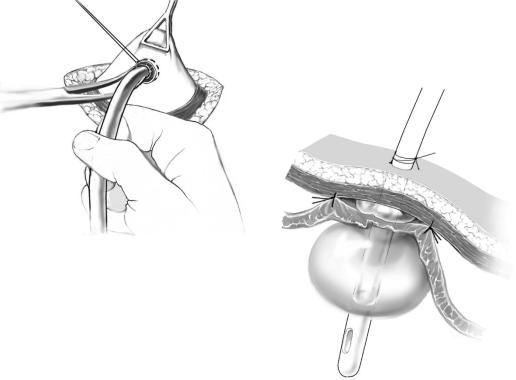
STEP 2 |
Positioning of the balloon catheter and fixation |
|
|
After exposure of the anterior wall of the stomach by clamps, a purse-string suture is |
|
|
||
|
prepared. In the center of this suture line, the gastric wall is incised. If necessary, the |
|
|
incision is dilated gently and the tube is introduced into the gastric lumen (A). |
|
|
In cases of caustic burns, antral and pyloric irregularities should be excluded by |
|
intragastric digital palpation of the poststomal stomach. After proper positioning of the catheter, the purse-string is tied. Sufficiency of the suture line is tested by a filling test. Pulling the catheter to the abdominal wall should not result in ischemia of the peristomal stomach.
Optionally, about four seromuscular interrupted stitches may be appropriate for protection from secondary insufficiency of the purse-string suture, notably when greater amounts of ascites are present (B).
A
B

Surgical Gastrostomy: Temporary or Permanent Gastric Fistula |
231 |
|
|
|
|
|
Permanent Stapled Continent Gastrostomy |
|
|
|
|
STEP 1 |
Access |
|
|
Access to the peritoneal cavity and exposure of the stomach as described above. |
|
|
|
|
|
|
|
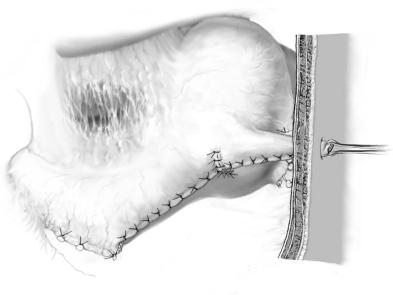
STEP 2 |
Creation of a tube |
|
|
For creation of a permanent reverse gastrostomy, usually the greater curvature is used. |
|
|
||
|
The left gastroepiploic vessels represent the vascular pedicle of the tube. After interrup- |
|
|
tion of the right gastroepiploic vessels at the site of the beginning of the tube, the gastro- |
|
|
colic and, if necessary, gastrosplenic ligaments are transected at a safe distance from the |
|
|
left vascular pedicle without compromising the integrity of the gastroepiploic arcade (A). |
|
|
The basis of the tube is localized at the middle third of the greater curvature. The left |
|
|
gastroepiploic vessels are the vascular pedicle of the gastrostomy. |
|
|
A sufficient length of the tube is achieved by two to three applications of a linear |
|
|
stapler, depending on the thickness of the abdominal wall. Inversion of the GIA suture |
|
|
lines is done by interrupted or running sutures(B). |
|
A
B
232 |
SECTION 2 |
Esophagus, Stomach and Duodenum |
|
|
|
STEP 3 |
Gastroplasty |
|
|
|
|
A gastroplasty is performed at the site of continuity with the gastric body. This should encircle almost the total circumference of the basis of the tube without compromising its blood supply at the superior aspect of the tube.
Circumferential fixation of the rim of the gastroplication is done by anchor sutures to the wall of the tube. Transabdominal pull-through of the tube is done at the left upper abdomen. Opening of the tube and positioning of the mucosal orifice flush with the skin are done to avoid aggressive gastric mucus secretions that may induce peristomal dermatitis. Stomaplast around the stoma is applied to protect from peristomal problems.

Surgical Gastrostomy: Temporary or Permanent Gastric Fistula |
233 |
|
|
Postoperative Investigations
■Liquid diet feeding 6–12h following surgery
■Feeding with normal mashed food as soon as evidence for postoperative abnormalities of gastroduodenal clearance has been excluded.
Postoperative Complications
■Postoperative obstruction due to stomal edema
■Insufficiency of the gastrostomy, suture line disruption
■Defective wound healing
■Peritonitis
■Intragastric and intraperitoneal bleeding
■Gastric wall or stomal necrosis
Tricks of the Senior Surgeon
■The continence of the gastrostomy can be enhanced by drawing the tube upward and bringing it to the surface near the costal margin.
■Avoid extreme kinking of the stomal tube by gastroplication and/or anchor sutures of the tube to the gastroplasty. Both may compromise the blood supply of the gastrostomy from the left gastroepiploic vessels.