- •Disclaimer
- •Contact
- •Table of Contents
- •Welcome to REAKTOR
- •System Requirements
- •REAKTOR Modes: Full, Player and Demo
- •How to Get Started
- •The REAKTOR Documentation
- •Special Formatting used in this Document
- •Basic Settings in REAKTOR
- •Configuring the Audio Hardware
- •Accessing the Audio and MIDI Settings… dialog
- •Selecting an Audio Hardware Device
- •Selecting a Sample Rate
- •Adjusting Output Latency
- •Routing: Assigning REAKTOR's Inputs
- •Routing: Assigning REAKTOR's Outputs
- •Configuring the MIDI Hardware
- •Loading and Playing
- •A Few Important Buttons
- •Ensembles, Instruments and KOMPLETE Instruments
- •Loading Carbon 2
- •Opening the Sidepane
- •Opening the Browser
- •Loading a File
- •Playing Carbon 2 and its Snapshots
- •Loading a Snapshot
- •Adjusting the Sound
- •Switching Effects
- •Changing the Filter Movement
- •Changing the Filter Settings
- •Saving Your Settings
- •Modifying a REAKTOR Ensemble
- •Recap
- •Using the Browser to Load the Ensemble
- •Instruments inside Ensembles
- •Junatik Panel Overview
- •The Difference Between an Ensemble and an Instrument
- •Snapshot Master for Plug-In and Snapshot Hierarchies
- •Snapshot Hierarchy as seen in Properties
- •Recall by MIDI and Snapshot Master for Plug-In
- •Snapshot Properties for the Junatik Instrument
- •Snapshot with a REAKTOR Switch Turned Off
- •Snapshot Flexibility
- •Swapping the Delay Instrument for a Reverb Instrument
- •Opening a REAKTOR Structure
- •Removing an Instrument from the Structure
- •Using the Bowser to Search for Instruments
- •Connecting the Instrument to the Audio Out
- •Making the Connections
- •Resetting the Positions of Instruments in the Ensemble Panel
- •Restoring the Correct Snapshot Hierarchy
- •Opening the Instrument Properties
- •Creating a Sequenced Synthesizer
- •Recap and Overview
- •Creating the Synth Sequencer Ensemble
- •Create a New Ensemble
- •Using the Browser to Load the Instruments
- •Making the Synth Sequencer Work
- •Overview of the Structure
- •Removing the Unwanted Instrument
- •Connecting ANALOG Outputs to the Audio Out
- •Overview of Monoliner and ANALOG
- •Making the MIDI Connections between Instruments
- •Using Internal MIDI Connections
- •REAKTOR Run and Stop Buttons
- •Looking More Closely at Monoliner
- •Changing the Direction and Speed
- •Number of Steps, Step Offset and Shuffle/Swing
- •GATE, VELOCITY and PITCH Knobs and On/Off Buttons
- •Exploring the Snapshots/Show Hints
- •Exploring Snapshots in Monoliner and ANALOG
- •Show/Hide Hints
- •Exploring a REAKTOR Sampler
- •Recap and Overview
- •Using the Browser to Launch Memory Drum 2
- •Replacing and Editing Samples in the Sample Map Editor
- •Opening the Map and Playing the Samples
- •Using Replace in the Edit Sample List
- •Using Add from the Edit Sample List
- •The Memory Drum Interface
- •Changing Pitch for Just one Sample Slot
- •Exploring the Memory Drum Snapshots
- •Building a Synth Using Macros
- •What is a Macro
- •Preparation
- •Loading a New Ensemble
- •Removing the Default Instrument
- •Inserting a New Instrument
- •Connecting the Instrument to the Audio Out
- •Adding an Oscillator and an ADSR Env to the Instrument
- •Inserting an Oscillator
- •Inserting the ADSR Env
- •Inserting Pitch and Gate Modules
- •Connecting the Pitch and Gate Modules
- •Safe Output Level
- •Inserting the Filter
- •Inserting the Filter Macro and Doing Some Rewiring
- •Unlocking the Panel to Move the Macros
- •Adding a Second Oscillator and a Mixer
- •Adding a Second Oscillator Using Duplicate
- •Using Properties to Rename the Oscillator Macros
- •Adding a Mixer
- •Increasing the Number of Mixer Inputs
- •Adding Faders and Connecting them to the Mixer
- •Connecting the NotePitch Module to the ADSR Envelopes and Filter
- •Tidying Up in the Instrument Panel
- •Changing the Appearance of the Faders
- •Playing Your Synth and Making Changes to the Sound
- •Changing the Oscillators Waveform, Resetting the Filter and Output Level
- •Creating some Snapshots
- •Saving Your Work Using Save As
- •Make a Sampler Using REAKTOR Modules
- •Recap and Overview
- •What Kind of Sampler?
- •Building the Basic Structure
- •Load up a New Ensemble
- •Inserting the First Modules
- •Inserting the Envelope
- •Adding the Controls for the Envelope
- •Making the Connections
- •Connecting the Sampler to the 2 Audio Voice Combiners
- •Connecting the NotePitch and Gate Modules
- •Loading a Sample into the Sampler
- •Opening the Sample Map Editor from the View Menu
- •Adding a Sample to the Sample Map Editor
- •Tidying Up the Appearance and Moving the Modules
- •Moving Modules in the Structure
- •Deleting unwanted Modules
- •Using the Panel Lock Button to Move the Knobs
- •Adding More Samples and Changing their Settings
- •Changing the Settings of the Existing Sample
- •Adding More Samples
- •Sample Reverse and Other Playback Possibilities
- •Looping, and Direction Buttons
- •Transposing a Sample
- •Adding a Filter
- •Inserting the Filter Into the Structure
- •Creating the Filter Controls and Making the Connections
- •Tidying Up the Appearance in the Instrument Panel
- •Using Save Ensemble to Update Your Already Saved Sampler
- •Modifying the Existing Sampler
- •Inserting the Selector
- •Connecting the Filter Outputs
- •Increasing the Number of Selector Inputs
- •Adding the Position Fader and Changing its Range
- •Final connections and Panel Appearance
- •Explore Your Sampler and Make Some Snapshots
- •What’s Next?
Modifying a REAKTOR Ensemble
Snapshot Master for Plug-In and Snapshot Hierarchies
Play some notes, and you will hear the Synth and Delay together. Lets change some of the Snapshots to hear some different sounds. Because Junatik has a separate Synth Instru ment and Effect Instrument, the Snapshot system is a little bit different.
4.4Snapshot Master for Plug-In and Snapshot Hierarchies
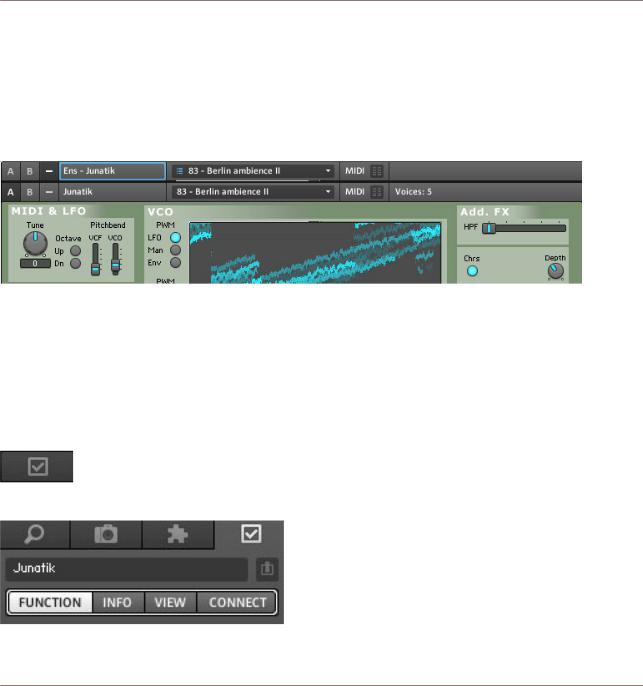
Have a look at the top of the Ensemble, and you will see a Panel named Ens – Junatik.
Fig. 4.11 Ensemble Panel
On the Ensemble Panel you will see the Snapshot number 83 – Berlin ambience II.
4.4.1Snapshot Hierarchy as seen in Properties
We need to bring up Properties, to understand the Snapshot hierarchy. To do this you need to:
1.Double-click Ens – Junatik. Alternatively you can click on the Properties tab in the Side pane.
2.Click on the Function button to see the Function page of Junatik’s Properties.
Fig. 4.12 The Function button
REAKTOR 5.5 - Getting Started Guide - 43
Modifying a REAKTOR Ensemble
Snapshot Master for Plug-In and Snapshot Hierarchies
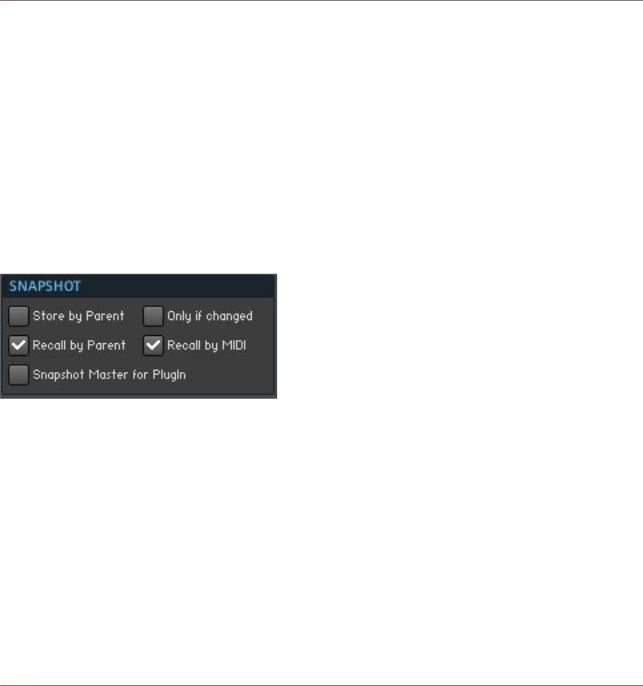
Fig. 4.13 Ensemble Properties with Recall by MIDI and Snapshot Master ticked
Have a look above at the Properties, in the Snapshot area, the checkboxes Recall by MIDI and
Snapshot Master for Plug-In, are both engaged.
REAKTOR 5.5 - Getting Started Guide - 44
Modifying a REAKTOR Ensemble
Snapshot Master for Plug-In and Snapshot Hierarchies
4.4.2 Recall by MIDI and Snapshot Master for Plug-In
▪ Snapshot Master for PlugIn means that when these Snapshots are changed by the En semble (the master), the Snapshots for the Synth and the Delay will also change to gether. In other words, the Junatik Instrument and StereoTDelay Instrument are slaves to the Ensemble master.
▪ Recall by MIDI means that this Instrument can receive Program Change messages. If the master also has this setting and is on the same MIDI channel, the master's Snap shot with take precedence.
4.4.3 Snapshot Properties for the Junatik Instrument
If you single click on the Junatik Panel, you will see that the Recall by Parent box is ticked.
Fig. 4.14 The Snapshot area of the Junatik Instrument Properties with the Recall by Parent checkbox engaged
This confirms that the Snapshots on the Ensemble Panel, are the Master Snapshots.
Try changing some Snapshots and you will see how different Snapshots in the Junatik In strument, sometimes (but not always), have different Snapshots in the StereoTDelay In strument. Let’s choose Snapshot “24 – Pointer 1”. Note that the StereoTDelay Snapshot says, 1 – Delay off. Now try choosing different Snapshots in the Junatik Instrument.
4.4.4Snapshot with a REAKTOR Switch Turned Off
You will notice that the Snapshots in the Junatik Instrument all play back with no Delay effect: Snapshot 1 in the StereoTDelay has the Delay turned off, because the On switch— above the Wet knob, is turned off.
REAKTOR 5.5 - Getting Started Guide - 45