

Chapter 5 - MPLAB
Previous page |
Table of contents |
Chapter overview |
Next page |
5.7 MPSIM Simulator
Simulator is part of MPLAB environment which provides a better insight into the workings of a microcontroller. Trough a simulator, we can monitor current variable values, register values and status of port pins. Truthfully, simulator does not have the same value in all programs. If a program is simple (like the one given here as an example), simulation is not of great importance because setting port B pins to logic one is not a difficult task. However, simulator can be of great help with more complicated programs which include timers, different conditions where something happens and other similar requirements (especially with mathematical operations). Simulation, as the name indicates "simulates the work of a microcontroller". As microcontroller executes instructions one by one, simulator is conceived - programmer moves through a program step-by- step (line-by-line) and follows what goes on with data within a microcontroller. When writing is completed, it is a good trait to, programmer's first check his program in a simulator, and then runs it out in a real situation. Unfortunately, as with many other good habits, man overflows this one too, more or less. Reasons for this are partly personality, and partly lack of good simulators.
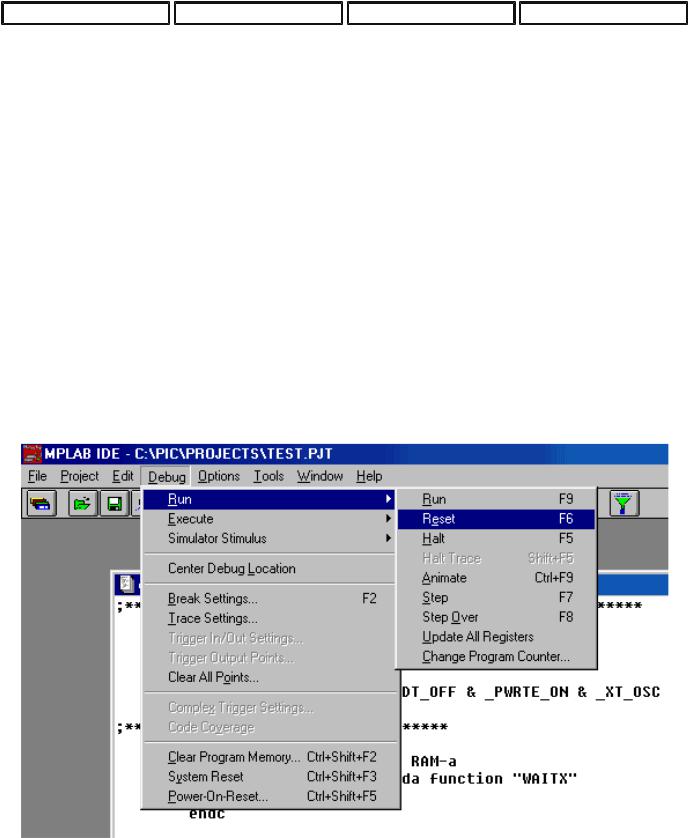
First thing we need to do, as in a real situation, is to reset a microcontroller with DEBUG > RUN > RESET command. This command results in bold line positioned at the beginning of a program, and program counter is positioned at zero which can be seen in status line (pc: 0x00).
Beginning of program simulation, resetting a microcontroller
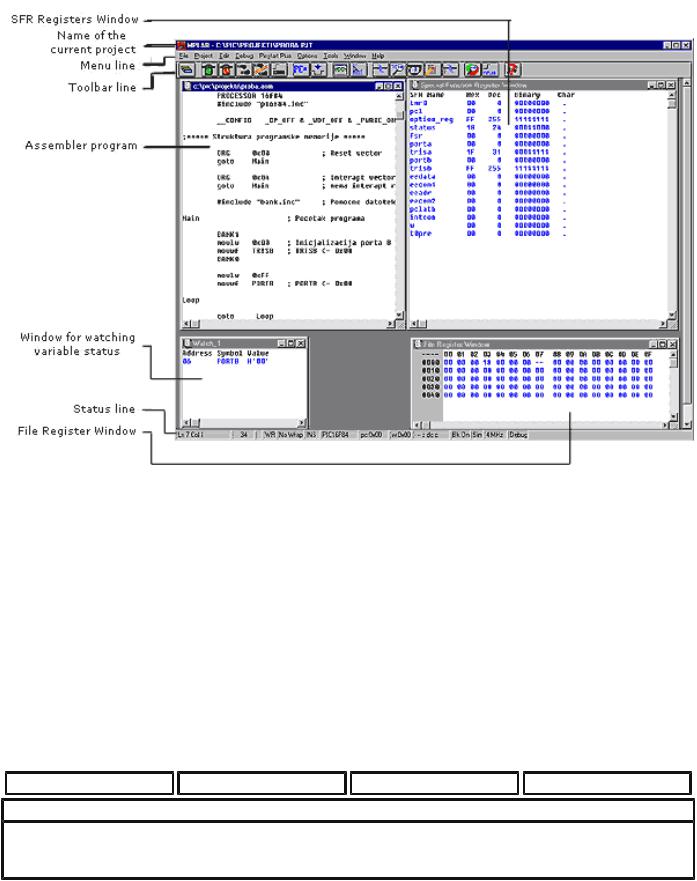
One of the main characteristics of a simulator is the ability to view register status within a microcontroller. These registers are also called special function registers, or SFR registers. We can get a window with SFR registers by clicking on WINDOW->SPECIAL FUNCTION REGISTERS, or on SFR icon.
Beside SFR registers, it is useful to have an insight into file registers. Window with file registers can be opened by clicking on WINDOW->FILE REGISTERS.
http://www.mikroelektronika.co.yu/english/product/books/PICbook/5_07Poglavlje.htm (1 of 2) [4/2/2003 16:18:32]
Chapter 5 - MPLAB
If there are variables in the program, it is good to watch them, too. To each variable is assigned one window (Watch Windows) by clicking on WINDOW->WATCH WINDOWS.
Simulator with open windows for SFR registers, file registers and variables.
The next command in a simulator is DEBUG>RUN>STEP which starts our steping through the program. The same command could have been assigned from a keyboard with <F7> key (generally speaking, all significant commands have keys assigned on the keyboard).
By using the F7 key, program is executed step-by-step. When we get to a macro, file containing a macro is opened (Bank.inc), and we proceed to go through a macro. In a SFR registers window we can observe how W register receives value 0xFF and delivers it to port B. By clicking on F7 key again, we don't achieve anything because program has arrived to an "infinite loop". Infinite loop is a term we will meet often. It represents a loop from which a microcontroller can not get out until interrupt occurs (if it is used in a program), or until a microcontroller would be reset.
Previous page |
Table of contents |
Chapter overview |
Next page |
© Copyright 1999. mikroElektronika. All Rights Reserved. For any comments contact webmaster.
http://www.mikroelektronika.co.yu/english/product/books/PICbook/5_07Poglavlje.htm (2 of 2) [4/2/2003 16:18:32]

Chapter 5 - MPLAB
Previous page |
Table of contents |
Chapter overview |
Next page |
5.8 Toolbar
Since MPLAB has more than one component, each of the components has its own toolbar. However, there is a toolbar which is some compilation of all toolbars, and can serve as a commonly used toolbar. This toolbar is enough for our needs, and it will be explained in more detail. In the picture below, we can see a toolbar we need with a brief explanation of each icon. Because of the limited format of this book, this toolbar is shown as a hanging toolbar. Generally, it is placed horizontally below the menu, over the entire length of the screen.
Universal toolbar with brief explanations of the icons
Toolbar icon description
If the current toolbar for some reason does not respond to a click on this icon, the next one appears. Changeover is repeated so that on the fourth click we will get the same toolbar again.
Icon for opening a project. Project opened in this way contains all screen adjustments and adjustment of all elements which are crucial to the current project.
http://www.mikroelektronika.co.yu/english/product/books/PICbook/5_08Poglavlje.htm (1 of 3) [4/2/2003 16:18:38]

Chapter 5 - MPLAB
Icon for saving a project. Saved project will keep all window adjustments and all parameter adjustments. When we read in a program again, everything will return to the screen as when the project was closed.
Searching for a part of the program, or words is operation we need when searching through bigger assembler or other programs. By using it, we can find quickly a part of the program, label, macro, etc.
Cutting a part of the text out. This one and the following three icons are standard in all programs that deal with processing textual files. Since each program is actually a common text file, those operations are useful.
Copying a part of the text. There is a difference between this one and the previous icon. With cut operation, when you cut a part of the text out, it disappears from the screen (and from a program) and is copied afterwards. But with copy operation, text is copied but not cut out, and it remains on the screen.
When a part of the text is copied, it is moved into a part of the memory which serves for transferring data in Windows operational system. Later, by clicking on this icon it can be 'pasted' in the text where the cursor is.
 Saving a program (assembler file).
Start program execution in full speed. It is recognized by appearance of a yellow status line. With this kind of program execution, simulator executes a program in full speed until it is interrupted by clicking on the red traffic light icon.
Stop program execution in full speed. After clicking on this icon, status line becomes gray again, and program execution can continue step by step.
Step by step program execution. By clicking on this icon, we begin executing an instruction from the next program line in relation to the current one.
Skip requirements. Since simulator is still a software simulation of real work, it is possible to simply skip over some program requirements. This is especially handy with instructions which are waiting for some requirement following which program can proceed further. That part of the program which follows a requirement is the part that's interesting to a programmer.
Resetting a microcontroller. By clicking on this icon, program counter is positioned at the beginning of a program and simulation can start.
By clicking on this icon we get a window with a program, but this time as program memory where we can see which instruction is found at which address.
With the help of this icon we get a window with the contents of RAM memory of a microcontroller.
By clicking on this icon, window with SFR register appears. Since SFR registers are used in every program, it is recommended that in simulator this window is always active.
If a program contains variables whose values we need to keep track of (ex. counter), a window needs to be added for each of them, which is done by using this icon.
When certain errors in a program are noticed during simulation process, program has to be corrected. Since simulator uses HEX file as its input, so we need to translate a program again so that all changes would be transferred to a simulator. By clicking on this icon, entire project is translated again, and we get the newest version of HEX file for the simulator.
Previous page |
Table of contents |
Chapter overview |
Next page |
http://www.mikroelektronika.co.yu/english/product/books/PICbook/5_08Poglavlje.htm (2 of 3) [4/2/2003 16:18:38]

Chapter 5 - MPLAB
© Copyright 1999. mikroElektronika. All Rights Reserved. For any comments contact webmaster.
http://www.mikroelektronika.co.yu/english/product/books/PICbook/5_08Poglavlje.htm (3 of 3) [4/2/2003 16:18:38]