


11. DISTANCE MEASUREMENT
Perform the following four settings as preparation for distance measurement.
•Distance measurement mode
•Target type
•Prism constant correction value
•Atmospheric correction factor
•EDM Standy
•EDM ALC
“24.1 Changing Instrument Options” • “EDM settings (items set, options, and input range)” on page 103.
•Check to make sure that sufficient reflected light is returned by the reflective prism sighted by the telescope. Checking the returned signal is particularly useful when performing long distance measurements.
Caution : • When the light intensity is sufficient even though the center of the reflective prism and the reticle are slightly misaligned (short distance etc.), "*" will be displayed in some cases, but in fact, accurate measurement is impossible. Therefore make sure that the target center is sighted correctly.
PROCEDURE Returned Signal Checking
1.Allocate the  softkey to the Meas mode screen.
“24.2 Allocating Key Functions”
2. Accurately sight the target.
3. Press  . Aiming <Aiming> is displayed.
The intensity of the light of the returned signal is displayed by a
gauge.
•The more  displayed, the greater the quantity of reflected light.
•If "*" is displayed; only enough light for the measurement is returned.
•When "*" is not displayed, accurately resight the target.
31

11. DISTANCE MEASUREMENT
•Press  to make a buzzer sound when measurement is
possible. Press  to shut off the buzzer.
•Press  to shift distance measurement.
•When  is displayed persistently, contact your Sokkia agent.
•If no key operations are performed for two minutes, the display automatically returns to the Meas mode screen.
11.1Distance and Angle Measurement
An angle can be measured at the same time as the distance.
PROCEDURE
1.Sight the target.
2.In the first page of Meas Mode,
press  to start distance measurement.
When measurement starts, EDM information (distance mode, prism constant correction value, atmospheric correction factor) is represented by a flashing light.
Meas |
PC |
-30 |
||
S |
ppm |
0 |
||
|
|
|
|
|
ZA |
80°30'15" |
|
|
|
HAR |
120°10'00" |
|
|
|
|
P1 |
|||
|
|
|
|
|
Dist
Rapid"r" PC -30
ppm 25
A short beep sounds, and the measured distance data (S), vertical angle (ZA), and horizontal angle (HAR) are displayed.
Meas |
PC |
-30 |
|
|||
|
ppm |
0 |
|
|||
S |
525.450m |
|
|
|
|
|
|
|
|
|
|
||
ZA |
80°30'10" |
|
|
|
|
|
HAR |
120°10'00" |
|
|
|
||
|
P1 |
|||||
|
|
|||||
32
11. DISTANCE MEASUREMENT
3.Press  to quit distance measurement.
•Each time  is pressed, S (Slope distance), H (Horizontal
distance) and V (Height difference) are displayed alternately.
Meas |
PC |
-30 |
|||
|
ppm |
0 |
|||
S |
525.450m |
|
|
|
|
|
|
|
|
||
ZA |
518.248m |
|
|
|
|
HAR |
86.699m |
|
|
||
|
P1 |
||||
|
|
|
|
|
|
•If the single measurement mode is selected, measurement automatically stops after a single measurement.
•During fine average measurement, the distance data is displayed as S-1, S-2,
... to S-9. When the designated number of measurements has been completed, the average value of the distance is displayed in the  line.
line.
•The distance and angle that are most recently measured remain stored in the memory until the power is off and can be displayed at any time.
“11.2 Recalling the Measured Data”
11.2Recalling the Measured Data
The distance and angle that are most recently measured remain stored in the memory until the power is off and can be displayed at any time.
The distance measurement value, vertical angle, horizontal angle, and the coordinates can be displayed. Distance measurement values converted into the horizontal distance, elevation difference, and the slope distance can also be displayed.
PROCEDURE
1. Allocate the |
softkey to the |
Meas |
PC |
-30 |
||
Meas mode screen. |
|
ppm |
0 |
|||
“24.2 Allocating Key Functions” |
S |
525.450m |
|
|
|
|
|
|
|
||||
H |
518.248m |
|
|
|
||
|
|
V |
86.699m |
|
|
|
|
|
|
P1 |
|||
|
|
|
|
|
|
|
33
11. DISTANCE MEASUREMENT
2.Press  .
.
The stored data that is most recently measured is displayed.
•If you have pressed  beforehand, the distance values
are converted into the horizontal distance, elevation difference, and the slope distance and recalled.
S |
525.450m |
ZA |
80°30'10" |
HAR |
120°10'10" |
N |
-128.045 |
E |
-226.237 |
Z |
30.223 |
3.Press {ESC} to return to Meas mode.
11.3Distance measurement and Outputting the Data
The following explains distance measurement and the features used to output measurement data to a computer or peripheral equipment.
Communication cables: “27.2 Optional Accessories”
Output format and command operations: “Interfacing with the SOKKIA SDR Electronic Field Book” and “Command Explanations” manuals.
PROCEDURE
1.Connect SET and host computer.
2.Allocate the  softkey to the Meas mode screen.
“24.2 Allocating Key Functions”
3.Sight the target point.
4.Press  , and select "Dist data" to measure the distance and
output the data to peripheral equipment.
5.Press  to stop the data outputting and return to Meas
Mode.
34
11. DISTANCE MEASUREMENT
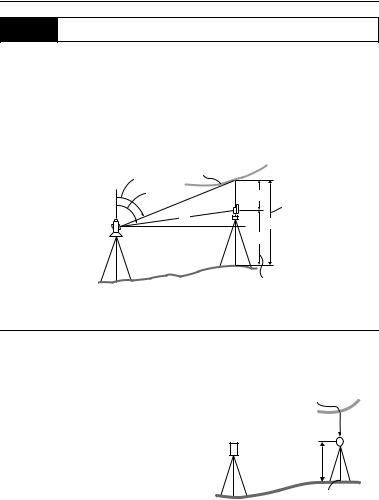
11.4REM Measurement
A REM measurement is a function used to measure the height to a point where a target cannot be directly installed such as power lines, overhead cables and bridges, etc.
The height of the target is calculated using the following formula. Ht = h1 + h2
h 2 = Ssin θ z1 x cot θ z2 - Scos θ z1
|
|
Target object |
|
θz2 |
|
Zenith angle of object |
θz1 |
h2 Object hight above ground |
|
||
Zenith angle of prism |
|
|
|
|
S |
|
|
Ht |
|
|
h1 |
Target height
PROCEDURE
1.Allocate the  softkey to the Meas mode screen.
“24.2 Allocating Key Functions”
2.Set the target directly under or directly over the object and measure the target height with a tape measure etc.
3.After inputting the target height, accurately sight the target.
" "
"
Press  in page 1 of Meas Mode to carry out measurement.
Object
Target height
Target
35

11. DISTANCE MEASUREMENT
The measured distance data (S), vertical angle (ZA), and horizontal angle (HAR) are displayed.
Press  to stop the measurement.
4.Sight the object, then press
 . The REM measurement is started and the height from the
ground to the object is displayed in "Ht.".
REM |
6.255m |
Ht. |
|
S |
13.120m |
ZA |
89°59'50" |
HAR |
117°32'20" |
Object


 Ht.
Ht.
Target
5.Press  to terminate the measurement operation.
•To re-observe the target, sight the target, then press  .
.
REM |
6.255m |
Ht. |
|
S |
13.120m |
ZA |
89°59'50" |
HAR |
117°32'20" |
6.Press {ESC} to finish measurement and return to the Meas mode screen.
•It is also possible to perform REM measurement when  on page 2 of the Meas mode screen is pressed and "REM" is selected without allocating the function key.
•Inputting target height (Step 3): Press  to set target height. It can be set also in "Stn data" of coordinate measurement.
“12.1 Entering Instrument Station Data”
36