

Будова перевірка та дослідження South NTS 352R(L) / MANUAL ET SOUTH NTS350R ING
.pdfContents
1.FEATURES.……………………………………………………………………………….. 1
2.SECURITY GUIDE………………………………………………………………………. 2
3.PREPARATION………………………….……………………………………………….. 4
4.NONMENCLATURE……………………………………………………………………... 5
5.PREPARATION FOR SURVEYING……………………………………………………. 7
5.1 |
Unpacking and Store of Instrument.……………………………………………….…… |
7 |
5.2 |
Setting the Instrument Up.……………………………………………………………… |
7 |
5.3 |
Battery Remove & Insertion, Information and Recharging.…………………………… |
8 |
5.4 |
Reflector Prisms………………………………………………… …………………….. |
9 |
5.5 |
Mounting and Dismounting Instrument from Tribrach ...……………………………… |
10 |
5.6Eyepiece Adjustment and Object Sighting……………………………….…………….. 11
5.7Turn On and Off………………………………………………………………………... 11
5.8 How To Enter Alphanumeric Characters……………………………………………… 12
6.FUNCTION KEY AND DISPLAY.……………………………………………………….. 14
6.1 Operating Key..…………………………………………………………………………. 14
6.2 Function Key…………………………………………………………………………… 15
6.3Star key …………………………………………………………………………………. 17
7.INITIAL SETTING……………………………………………………………………….. 19
7.1Setting of Temperature, Air Pressure and Prism Constant.…………………………….. 19
7.2 Setting of Temperature and Atmospheric Pressure.……………………………………. 19
7.3Setting of Atmospheric Correction.…………………………………………………….. 20
7.4Atmospheric Refraction and Earth Curvature Correction ………………………….….. 21
7.5Setting of Prism Constant………………………………………………………………. 22
7.6Setting of Maximum Measurement Range………………………………………….. 23
7.7Setting of Minimum Reading.………………………………………………………….. 24
7.8Setting of Auto Cut-Off.…………………………………………………………….….. 24
7.9 Setting of Vertical Angle Tilt Correction..……………………………………………… 25
7.10Setting of LCD Contrast..……………………………………………………………. 26
7.11Setting of Instrument Constant.……………………………………………………….. 27
7.12Setting of Instrument Constant in Reflectorless Mode…………………………… 27
8.ANGLE MEASUREMENT.……………………………………………………………… 29
8.1Measuring Horizontal Angle Right and Vertical Angle …………………………….….. 29
8.2Switching Horizontal Angle Right/Left.……………………………………………….. 30
8.3Setting of Horizontal Angle…………………………………………………………….. 30
8.3.1 Setting by Holding the Angle.………………………………………………… 30
PDF "pdfFactory Pro" www.fineprint.com.cn
8.3.2 Setting Horizontal Angle from the Keys……………………………………… 31
8.4Vertical Angle Percent Grade (%)Mode.……………………………………………….. 31
8.5Buzzer Sounding for Horizontal Angle 90ºIncrements.……………………………….. 32
8.6 Compasses (Vertical Angle).…………………………………………………………… 33
9.DISTANCE MEASUREMENT..……………………………………………………….… 34
9.1Setting of the Atmospheric Correction…………………………………………………. 34
9.2Setting of the Correction for Prism Constant.………………………………………….. 34
9.3 |
Distance Measurement (Continuous Measurement)…………………………………… |
34 |
9.4 |
Distance Measurement (N-time Measurement/Single Measurement) ………………… |
35 |
9.5 |
Fine Mode/Track Mode..……………………………………………………………….. |
37 |
9.6 |
Stake Out (S.O.)...……………………………………………………………………… |
37 |
9.7 Offset Measurement.…………………………………………………………………… |
39 |
|
9.7.1Angle Offset..…………………………………………………………………. 39
|
9.7.2 Distance Offset Measurement………………………………………………… 41 |
|
|
9.7.3 Plane Offset Measurement.……………………………………………………. |
43 |
|
9.7.4 Column Offset Measurement.…………………………………………………. |
45 |
10. COORDINATE MEASUREMENT.……………………………………………………... |
48 |
|
10.1 |
Execution of Coordinate Measurement...……………………………………………... |
48 |
10.2 |
Setting Coordinate Values of Occupied Point.………………………….……………. |
50 |
10.3 |
Setting Height of the Instrument.……………………………………………………... |
52 |
10.4 |
Setting Height of Target (Prism Height).…………………………………………….. |
52 |
11.SPECIAL MODE..………………………………………………………………………… 54
11.1Surveying Program Mode (PROGRAMS).…………………………………….…….. 54
11.1.1Remote Elevation Measurement REM ………………………………………. 54
11.1.2Missing Line Measurement MLM ………………………………………….. 57
11.1.3Setting Z Coordinate of Occupied Point …………………………………….. 61
11.1.4Area Calculation.……………………………………………………………... 65
11.1.5Point to Line Measurement…………………………………………………... 68
11.2Setting the GRID FACTOR …………………………………………………………. 70
11.3 Setting Illumination of Display and Cross Hairs…………………….………………. 71
12.DATA COLLECTION.…………………………………………………………………… 73
12.1 Operation procedure…………………………………………………………………. 74
12.2 Preparation……………………………………………………………………….…... 74
12.2.1 |
Selecting a File for Data Collection...……………………………………… 74 |
|
12.2.2 |
Selecting a Coordinate File for Data Collection…………….……………… 75 |
|
12.2.3 Occupied Point and Backsight Point……………………………………….. 76 |
||
12.2.4 |
Measuring and Memorizing the Data.……………………………………… |
79 |
12.3 Data Collect Offset Measurement Mode.……………………………………………. |
83 |
|
PDF "pdfFactory Pro" www.fineprint.com.cn
12.3.1 Angle Offset...……………………………………………………………… 83
12.3.2 Distance Offset Measurement……………………………………………… 85
12.3.3Plane Offset Measurement.…………………………………………………. 87
12.3.4Column Offset Measurement.…………………………………………….… 89
12.4Editing PCODE Library [PCODE INPUT] …………………………………………. 92
12.5 Setting Parameter of Data Collection………………………………………………... 93
13.LAYOUT ……………………………………………………..……………………………. 94
13.1 Setting Parameter of Data Collection……………………………………………….… 95
13.2Preparation……………………………………………………………………….….… 95
13.2.1Setting the GRID FACTOR..…………………………………………….….. 95
13.2.2Selecting Coordinate Data File.………………………………………….….. 97
13.2.3Setting Occupied Point.………………………………………………….….. 98
13.2.4Setting Backsight Point.……………………………………..…………….. 100
13.3Executing A Layout.……………………………………………………………....….. 102
13.4 Setting A New Point.………………………………………………………………… 104
13.4.1Side Shot Method……………………………….…………………………. 104
13.4.2Resection Method………………………………………………………….. 107
14.MEMORY MANAGEMENT MODE…………………………………………………... 113
14.1Display Internal Memory Status…………………………………………………….. 114
14.2Searching Data.…………………………………………………………………….… 114
14.2.1Measured Data Searching……………………………………………........... 115
14.2.2Coordinate Data Searching..………………………………………………... 117
14.2.3 PCODE LIBRARY Searching……………………………………………….. 118
14.3File Maintenance……………………………………………………………………. 118
14.3.1 Renaming a File.………………………………………………………….… 119
14.3.2Searching Data in a File.…………………………………………………….. 120
14.3.3Deleting a File……………………………………………………………..… 121
14.4Coordinate Data Direct Key Input …………………………….…………………….. 121
14.5 Deleting a Coordinate Data from a File………………………………………….…… 122
14.6Editing PCODE Library……………………………………………………………... 123
14.7Data Communication………………………………………………………………… 124
14.7.1Sending Data……………………………………………………………….. 125
14.7.2Loading Data……………………………………………………………….. 126
14.7.3Setting Parameter of Data Communication.………………………………... 127
14.8Initialization.…………………………………………………………………...….…. 128
15.BASIC SETTING.………………………………………………………………………... 130
15.1 The Items of Basic Setting…………………………………………………………… 130
16.CHECK AND ADJUSTMENT..………………………………………………………… 132
PDF "pdfFactory Pro" www.fineprint.com.cn
16.1 |
Plate Vial……………………………………………………………………………... |
132 |
16.2 |
Circular Vial……………………………………………………………………….… |
132 |
16.3 |
Inclination of Reticle………………………………………………………………… |
133 |
16.4 |
Perpendicularity of line of sight to Horizontal Axis (2c) .……………………….….. |
134 |
16.5 Vertical Index Difference Compensation.…………………………………………… |
134 |
|
16.6 Adjustment of Vertical Index Difference ( angle) and Vertical Angle 0 Datum…... |
135 |
|
16.7Optical Plummet……………………………………………………………………... 136
16.8Instrument Constant K …………………………………………………………… 137
16.9 Parallel between Line of Sight and Emitting Photoelectric axis…………………..… |
138 |
16.10 Tribrach Leveling Screw.……………………………………………………….…. |
139 |
16.11 Related Parts for Reflector.……………………………………………………….… |
139 |
17.SPECIFICATION……………………………………………………………………….. 140
18.ERROR DISPLAYS.……………………………………………………………………... 143
19.ACCESSORIES..…………………………………………………………………………. 145
PDF "pdfFactory Pro" www.fineprint.com.cn

1. FEATURES
1 Reflectorless Mode
The reflectorless function of NTS-350R series Total Station enables you to carry out long-distance and high-accuracy measurement directly towards objects of different materials and different colors, like wall of buidling, telegraph pole, wire, escarpmetnt, mountain, mud, stake, etc. It’s the best solution to the difficult measurement for those objects not easy to reach or even unreachable.
2 Complete Functions
NTS-350R series Total Station is provided with complete surveying programs with the functions of data record and parameter setting, and is applicable for professional and construction survey.
3 Simple Operation
The operation of NTS-350 series Total Station is very simple, easy to learn and master. The keys are comfortable to press.
4 Powerful Memory Management
The instrument adopts the program module with internal memory and can record the surveying data and coordinate data of 3000 points or only the coordinate data of 8000 points. You can manage the memory conveniently and add, delete, modify and transfer the data.
5 Auto Data Collection
With the automated data collection software, you can record the surveying data and coordinate data automatically, transfer them between the instrument and computer to realize the real digitized survey.
6 Small & Light EDM Head
The appearance and internal structure of the new Total Station has been made mare scientific and reasonable design. So the EDM head becomes smaller, lighter and more convenient for survey.
1
PDF "pdfFactory Pro" www.fineprint.com.cn

7 Special Surveying Programs
Except for the basic surveying modes (angle, distance, coordinate measurement), the instrument is provided with special surveying program that can carry out REM, Angle Offset, MLM, Staking-out by distance or coordinates, Setting new point and etc. to meet the requirement of professional survey.
2. SECURITY GUIDE
Built-in EDM (Visible Laser) Instruction:
The instrument is equipped with a built-in EDM of laser unit at the level of Class 3R/III A. and can be identified via the following:
A.An indicating label “3A Laser Instrument” and icon on the main body, above the vertical tangent and clamp screw.
B.The Class 3R unit complies with the IEC 60825-1:2001 “RADIALZATION SECURITY OF THE LASER PRODUCT”.
C.Continuous looking into the laser beam is particularly harmful and you requested to avoid being shooting directly to your eyes. The emitting maximum may achieve to 5 times of Class2/II when the wavelength is 400mm to 700mm.
Warning:
Continuous looking into the laser beam directly is harmful. Precaution:
Never stare at the laser beam and collimate human beings. Reflector beam is effective measurement for the instrument.
Warning:
When the laser beam is shooting at prism, mirror, metal surface or window, the reflector laser beam is also harmful to eyes.
Precaution:
Never stare at the locations with laser reflection. When the reflectorless function is enabled for EDM, never stare beside the laser beam or prism. Collimating the prism via the telescope unit is requested only.
Warning:
Incorrect application of Class 3R laser equipment is very dangerous.
2
PDF "pdfFactory Pro" www.fineprint.com.cn

Precaution:
To avoid being hurt, you must pay particular attention to the precaution measures and keep it under control within the distance of possible danger according to standard IEC60825-1:2001.
The following is about the main part of relevant standard.
Class 3R laser product is applicable for outdoors and construction site use, to measure, fix lines, level etc.
A.Only those users who are professionally trained and certified can install, adjust and operate such laser equipments.
B.Relevant laser warning symbols should be easily identified within the operating range.
C.Stop anyone staring at laser beam directly or using optical device to collimate the laser beam.
D.In order to prevent the laser from hurting human beings, the laser beam should be blocked at the end point of working route. The laser beam must be stopped when it travels through the restricted area (* Harmful Distance *) or somebody is staying there.
E.The working route of laser beam must be fixed higher or lower than the line of sight of human beings.
F.The unit should be well kept when it is not working. Uncertified user is not allowed to operate it.
G.Stop the laser beam shooting at plane mirror, metal surface, window, etc. without conscious, especially the surface of plane mirror and concave mirror.
* Harmful Distance refers to the maximum distance from the starting point of laser beam to its weakest end not harmful to human beings.
The harmful distance of built-in laser unit is 1000m (3300ft). When the operation is beyond this range and laser beam is weakened to Class 1R, direct staring at laser beam is less harmful.
3
PDF "pdfFactory Pro" www.fineprint.com.cn

3. PREPARATION
1.Never collimate the objective lens direct to sunlight without a filter.
2.Never store the instrument in high and low temperature, avoid the sudden and great change of temperature.
3.When not using the instrument, place it in the case and avoid shock, dust and humidity.
4.If there is great difference between the temperature in work site and that in store place, you should leave the instrument in the case till it fits the temperature of environment.
5.If the instrument has not been used for a long time, you should remove the battery for separated store. The battery should be charged once a month.
6.When transporting the instrument should be placed in its carrying case, it is recommended cushioned material is used around the case for support.
7.Be sure to secure the instrument with one hand when mounting or removing from the tripod.
8.Clean exposed optical parts with degreased cotton or lens tissue only!
9.Clean the instrument's surface with a woolen cloth when finished with use. If it gets wet, dry it immediately.
10.Before operating, inspect the power, functions and indications of the instrument as well its initial setting and correction parameters.
11.Unless you are a maintenance specialist, do not attempt to disassemble the instrument by yourself even if you find the instrument abnormal.
12.Never collimate the eyes with the laser beam of NTS-350R Series Total Station.
4
PDF "pdfFactory Pro" www.fineprint.com.cn

4. NOMENCLATURE
Collimator
Instrument
Center Mark
Objective
Lens
Plate Vial
Optical
Plummet
Display
Circular Vial
Leveling Screw
Adjustment Screw for
Circular vial
5
PDF "pdfFactory Pro" wwwÿ .fineprint.com.cn
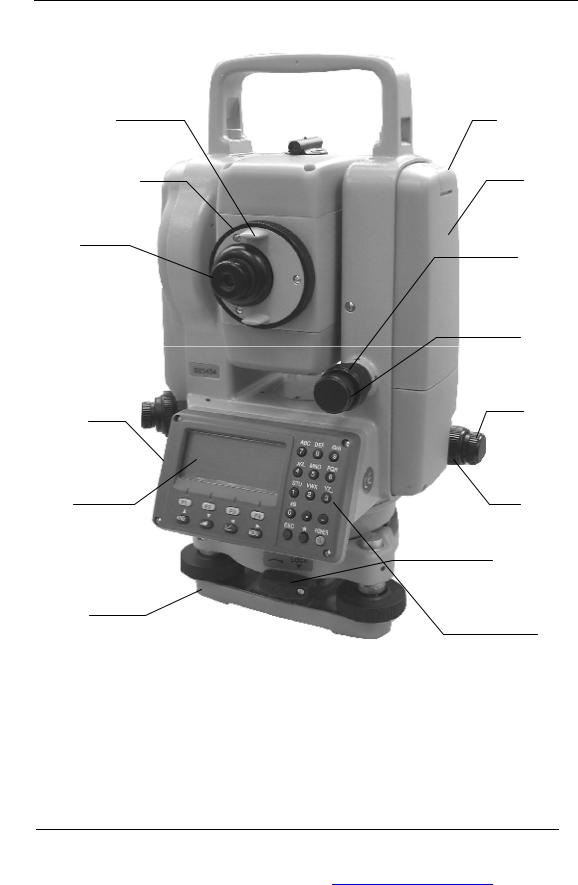
Telescope Grip
Telescope Focusing
Knob
Eyepiece
Data Port
Display
Base
Battery locking Lever
BatteryNB-20A
Vertical Clamp
Screw
Vertical
Tangent Screw
Horizontal
Tangent Screw
Horizontal
Clamp Screw
Tribrach Fixing
Lever
Keyboard
6
PDF "pdfFactory Pro" wwwÿ .fineprint.com.cn