

Professional Java.JDK.5.Edition (Wrox)
.pdfChapter 3
Figure 3-12
The CenterPanel is a typical user data entry form. It’s important to notice that there is no code to process the login in this class. Its responsibility is strictly user interface:
package wrox.pattern.mvc; import java.awt.GridLayout; import javax.swing.JLabel; import javax.swing.JPanel; import javax.swing.JTextField;
public class CenterPanel extends JPanel {
private JTextField login= new JTextField(15); private JTextField password= new JTextField(15);
public CenterPanel() { setLayout(new GridLayout(2, 2)); add(new JLabel(“Login:”)); add(login);
add(new JLabel(“Password:”)); add(password);
}
public String getLogin() { return login.getText();
}
public String getPassword() { return password.getText();
}
}
The next user interface component, WorkPanel, contains CenterPanel. Notice that there are no references to the WorkPanel from the CenterPanel. This is an example of composition, allowing the CenterPanel to be switched out for another form, or viewed in a different frame:
package wrox.pattern.mvc; import java.awt.BorderLayout;
import java.beans.PropertyChangeEvent; import java.beans.PropertyChangeListener; import javax.swing.Action;
import javax.swing.JButton; import javax.swing.JLabel; import javax.swing.JPanel;
126

Exploiting Patterns in Java
As you can see from the class declaration, the WorkPanel is a swing component. In addition, it also implements the PropertyChangeListener interface. This allows the WorkPanel to register with the application Model and have change Notifications published to it when the Model changes. The WorkPanel is registered with the Model as a PropertyChangeListener. This provides low coupling between the interface and domain logic, allowing the view to be changed with changes to the Model:
public class WorkPanel extends JPanel implements PropertyChangeListener { private Model model;
private JPanel center;
private JPanel buttonPanel= new JPanel();
private JLabel loginStatusLabel= new JLabel(“ “);
public WorkPanel(JPanel center, Model model) { this.center= center;
this.model= model; init();
}
private void init() { setLayout(new BorderLayout()); add(center, BorderLayout.CENTER);
add(buttonPanel, BorderLayout.SOUTH); add(loginStatusLabel, BorderLayout.NORTH);
}
When the Model changes. The propertyChange() method is called for all classes that registered with the Model:
public void propertyChange(PropertyChangeEvent evt) {
if (evt.getPropertyName().equals(“model.loginStatus”)) { Boolean status= (Boolean)evt.getNewValue();
if (status.booleanValue()) { loginStatusLabel.setText(“Login was successful”);
}else {
loginStatusLabel.setText(“Login Failed”);
}
}
}
The addButton() method allows you to do two things. First, you can configure any number of buttons. Second, it provides the action classes. They specify the work each performs when the button is pressed. The action represents the final part of the MVC pattern: the controller. The controller will be discussed in the next section.
public void addButton(String name, Action action) { JButton button= new JButton(name); button.addActionListener(action); buttonPanel.add(button);
}
}
127

Chapter 3
Controller
The purpose of the controller is to serve as the gateway for making changes to the model. In this example, the controller consists of two java.swing.Action classes. These Action classes are registered with one or more graphical components via the components’ addActionListener() method. There are two Action classes in this application. The first attempts to login with the Model. The second exits the application:
package wrox.pattern.mvc;
import java.awt.event.ActionEvent; import javax.swing.AbstractAction;
The LoginAction extends the AbstractionAction and overrides the actionPerformed() method. The actionPerformed() method is called by the component, in this case the command button, when it is pressed. The action is not limited to registration with a single user interface component. The benefit of separating out the controller logic to a separate class is so that the action can be registered with menus, hotkeys, and toolbars. This prevents the action logic from being duplicated for each UI component:
public class LoginAction extends AbstractAction {
private Model model; private CenterPanel panel;
It is common for the controller to have visibility of both the Model and the relevant views; however, the model cannot invoke the actions directly. Ensuring the separation of business and interface logic remains intact:
public LoginAction(Model model, CenterPanel panel ) { this.model= model;
this.panel = panel;
}
public void actionPerformed(ActionEvent e) {
System.out.println(“Login Action: “+ panel.getLogin() +” “+ panel.getPassword()
);
model.login( panel.getLogin(), panel.getPassword() );
}
}
The ExitAction strictly controls the behavior of the user interface. It displays a message when the Exit button is pressed confirming that the application should close:
package wrox.pattern.mvc;
import java.awt.event.ActionEvent; import javax.swing.AbstractAction; import javax.swing.JFrame;
import javax.swing.JOptionPane;
public class ExitAction extends AbstractAction {
public void actionPerformed(ActionEvent e) {
JFrame frame= new JFrame();
int response= JOptionPane.showConfirmDialog(frame,
“Exit Application?”,
128

Exploiting Patterns in Java
“Exit”,JOptionPane.OK_CANCEL_OPTION);
if (JOptionPane.YES_OPTION == response) { System.exit(0);
}
}
}
Finally, you can view the Application class. The Application class is responsible for initialization, and it creates the associations that establish the MVC separation of logic design principles:
package wrox.pattern.mvc;
import java.awt.event.WindowAdapter; import java.awt.event.WindowEvent; import javax.swing.JFrame;
public class Application extends JFrame { private Model model;
The Swing Application creates an association to the Model class, shown in the following code in the application constructor:
public Application(Model model) { this.model= model;
Then, create the Views to display the swing interface:
CenterPanel center= new CenterPanel();
WorkPanel work= new WorkPanel(center, model);
Create the Action classes that represent the controller and register them with the command buttons:
work.addButton(“login”, new LoginAction(model, center)); work.addButton(“exit”, new ExitAction() );
model.addPropertyChangeListener(work); setTitle(“MVC Pattern Application”);
Use Swing housekeeping to display the application:
getContentPane().add(work); pack();
show();
addWindowListener(new WindowAdapter() { public void windowClosing(WindowEvent e) {
System.exit(0);
}
});
}
public static void main(String[] args) { Model model= new Model();
Application application= new Application(model);
}
}
129
Chapter 3
The Model-View-Controller pattern is a combination of best practices in software design. It prompts a separation of concern between the user interface and business layers of an application. This example covered a number of design patterns: composition, action, and event publish-subscribe. The next pattern is the Command pattern. The Command pattern provides a consistent means of handling user requests.
Command
The Command pattern provides a standard interface for handling user requests. Each request is encapsulated in an object called a Command. Figure 3-13 shows the classes involved in the Command pattern.
|
|
|
Pattern example |
|
|
Pattern |
|
|
Extended Command to |
|
|
|
|
|
|
|
|
|
support more robust |
|
|
|
|
request lifecycle |
CommandManager |
«interface» |
|
|
«interface» |
|
|
|
||
|
CommandManager |
|
ManageLifecycle |
|
|
Command |
«interface» |
||
|
|
|||
|
|
+start() |
||
+add(in command) |
|
|
||
+execute() |
|
Command |
||
|
+destroy() |
|||
+get(in name) |
|
+add() |
+execute() |
|
|
+validate() |
|||
|
|
|||
|
|
+get(in name) |
|
+getErrors() |
|
ConcreteCommand |
|
|
|
|
|
|
DefaultCommand |
|
|
|
|
|
ManagedCommand |
Figure 3-13
The three classes of the command pattern are the Command, CommandManager, and Invoker. The Command class represents an encapsulation of a single behavior. Each behavior in an application, such as save or delete, would be modeled as a command. In that way the behavior of an application is a collection of command objects. To add behavior to an application, all a developer needs to do is implement additional command objects. The next component in the Command pattern is the CommandManager. This class is responsible for providing access to the commands available to the application. The final component is the Invoker. The Invoker is responsible for executing the command classes in a consistent manner. The next section will look at the anatomy of the Command class.
Command
The first part of the Command pattern is the Command interface identified by a single method:
package wrox.pattern.command;
public interface Command {
public void execute();
}
The life cycle is different from calling a typical method. For example, if you need to pass in an object parameter like the following method:
public void getTotal(Sale) { //calculate the sale.
}
130

Exploiting Patterns in Java
As a command you would write the following:
public CalculateSale implements Command { private Sale sale;
public void setSale( Sale sale ) { this.sale = sale;
}
public void execute( ) { // calculate the sale.
}
For the purpose of the example, we will use an empty command to demonstrate the interaction between the classes in this pattern:
package wrox.pattern.command;
public class DefaultCommand implements Command {
public void execute() {
System.out.println(“executing the default command”);
}
}
The next section will look at the class that manages the command for an application.
CommandManager
The CommandManager class will process all requests. Using a HashMap, all of the commands will be initialized before requests are processed, then retrieved by name. They are stored using the add()method, and retrieved through the getCommand() method:
package wrox.pattern.command; import java.util.HashMap; import java.util.Map;
public class CommandManager {
private Map commands= new HashMap();
public void add(String name, Command command) { commands.put(name, command);
}
public Command getCommand(String name) { return (Command)commands.get(name);
}
}
Invoker
A standalone client will demonstrate the execution of the Command pattern. When the Client constructor is called it adds the DefaultCommand to the manager:
package wrox.pattern.command; import java.util.Collection;
import java.util.HashMap; import java.util.Map;
131

Chapter 3
public class Client {
private CommandManager manager= new CommandManager();
public Client() {
manager.add(“default”, new DefaultCommand());
}
Here, the command mapping has been hard coded. A more robust implementation would initialize the command map from a resource file:
<commands>
<command name=”default” class=”wrox.Pattern.command.DefaultCommand” /> </commands>
Then, as requests are received by the invoke(String name) method, the command name is looked up in the CommandManager and the Command object is returned:
public void invoke(String name) {
Command command= manager.getCommand(name); command.execute();
}
public static void main(String[] args) { Client client= new Client(); client.invoke(“default”);
}
}
This is an important part of most Web frameworks like Struts or WebWork. In WebWork there is a specific Command pattern component called xWork. It is described in detail in Chapter 8, “Developing Web Applications Using the Model 2 Architecture.”
By handling each request as a Command object, it is possible to apply common services to each command. Some common services could be things such as security, validation, and auditing. The next section will extend the current Command pattern and implement a ManagedLifecycle interface. This interface will define a set of methods that are called during each request:
package wrox.Pattern.command;
import java.util.Collection; import java.util.Map;
public interface ManagedLifecycle extends Command {
public void initialize();
public void setApplicationContext(Map context); public boolean isValidate();
public Collection getErrors( ); public void destroy();
}
132

Exploiting Patterns in Java
The ManagedLifecycle interface is a contract between the Command object and the client code. The following is an example command that implements the ManagedLifecycle interface:
package wrox.pattern.command; import java.util.Collection; import java.util.Map;
import java.util.HashMap;
public class ManagedCommand implements ManagedLifecycle { private Map context;
private Map errors= new HashMap( ); public void initialize() {
System.out.println(“initializing..”);
}
public void destroy() { System.out.println(“destroying”);
}
public void execute() { System.out.println(“executing managed command”);
}
public boolean isValidate() { System.out.println(“validating”); return true;
}
public void setApplicationContext(Map context) { System.out.println(“setting context”); this.context= context;
}
public Collection getErrors() { return errors.getValues();
}
}
The following code shows initialization and invocation of two types of commands, the standard and managed:
package wrox.pattern.command; import java.util.Collection; import java.util.HashMap; import java.util.Map;
public class Client {
private Map context= new HashMap();
private CommandManager manager= new CommandManager();
public Client() {
manager.add(“default”, new DefaultCommand());
A new ManagedCommand has been added to the CommandManager:
manager.add(“managed”, new ManagedCommand());
}
public void invoke(String name) {
Command command= manager.getCommand(name);
133
Chapter 3
Next, a check is put in place to determine whether the command being executed implements the
ManagedLifecycle interface:
if (command instanceof ManagedLifecycle) { ManagedLifecycle managed= (ManagedLifecycle)command; managed.setApplicationContext(context); managed.initialize();
if (managed.isValidate()) { managed.execute();
} else {
Collection errors = managed.getErrors();
}
managed.destroy();
}else { command.execute();
}
}
The calling sequence of the ManagedLifecycle is richer with functionality compared with its single method version. First it passes required application data, calls the initialize method, performs validation, and then calls the execute method.
Allowing the client invoker to pass resources to the command is a very powerful concept referred to as IOC inversion of control. This eliminates the need for the Command class to look up services and resources that are available to the invoker.
Strategy
The Strategy pattern allows you to replace algorithms on the fly. To implement the solution, you represent each algorithm as a strategy class. The application then delegates to the current strategy class to execute the strategy specific algorithm. Figure 3-14 shows the UML for the strategy pattern alongside the example for this section.
Context |
|
Strategy |
Person |
|
Role |
|
|
-strategies : Strategy |
|
|
|
-roles : Role |
|
|
|
+setStrategy() |
1 |
* +operation() |
+setRole() |
1 |
* +isSatisfied() |
|
|
+getStrategy() |
|
|
|
+getRole() |
|
|
|
|
ConcreteStrategy |
ConcreteStrategy |
|
|
Buyer |
Seller |
|
Figure 3-14
134
Exploiting Patterns in Java
A common mistake in domain modeling is the overuse of subtyping. A subtype should be created only when a specific “is-a” type relationship can be described between a subtype and its super-type. For example, when modeling a person within a domain model, it is tempting to create a subtype for each role for which a person is a participating. There is no wrong way of modeling a problem, but in this case each person can take on several roles. This doesn’t pass the “is-a” relationship test for subtyping. It is fitting that a person’s behavior varies by his role; this concept can be expressed using the Strategy pattern.
The example application in this section looks at the roles of buyers and sellers, showing how their differing behavior can be abstracted out into a strategy.
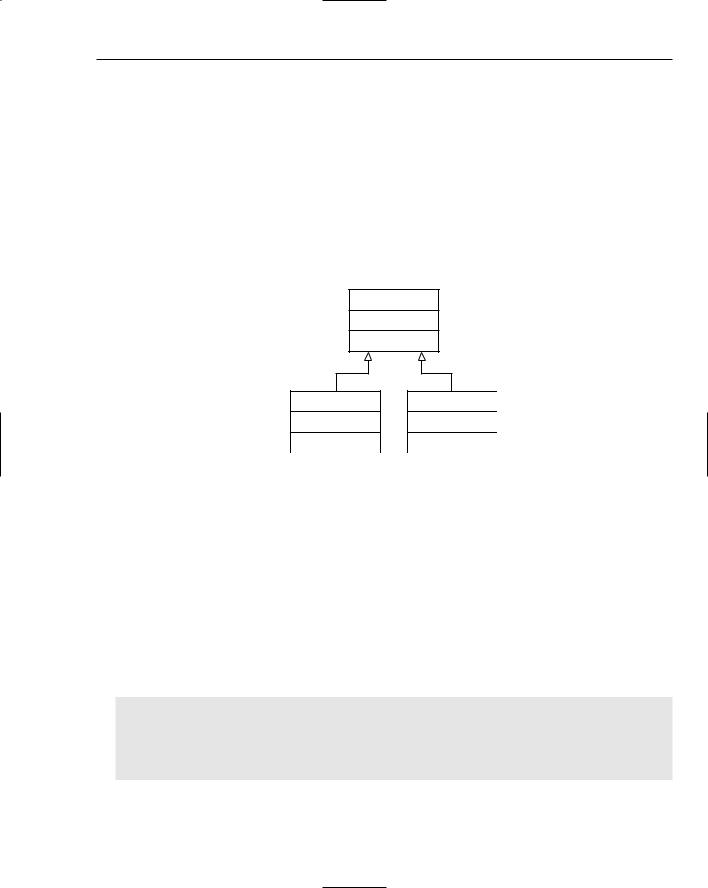
This is a mistake locking each person into one role or the other. The need to be able to switch between the behaviors of classes in a class hierarchy is the motivation for using the Strategy pattern. Figure 3-15 shows the wrong way to model the “play’s a role” relationship.
Person
BuyerPerson SellerPerson
Figure 3-15
The Strategy pattern is made up of an interface that defines the pluggable behavior, implementing subclasses to define the behavior, and then an object to make use of the strategy.
Strategy
The solution is to model each role as a class and delegate role-specific behavior from the Person class to the Role current State. First, look at the behavior that will differ by the current state object. The example uses the interface Role to declare the strategy behavior, and the two concrete classes, Buyer and Seller, to implement the differing behavior.
To provide a little context to the example, the Buyer and Seller are trying to agree on a product price. The isSatisified() method is passed a Product and a Price and both parties must determine if the deal is acceptable:
package wrox.pattern.strategy;
public interface Role {
public boolean isSatisfied( Product product, double price );
}
135