

86 |
Part II Installation |
The uses of the various partitions is a very advanced subject. For the exam, remember which types of files are stored in which partitions, and you may be able to find the particular file fairly easily or avoid a wrong answer on the test.
The other partitions, such as /usr and /bin, are used to organize the system files and to create default mount points that are pre-configured when the system is installed. The Linux installation program will create most of the other default partitions. Custom partitions, however, are not created by the Linux installation program; these are usually used to store user data, and specialized applications. The more organized a system is, the easier it is to manage, move, update, and fix damaged files. By planning the software, hardware, and partitions, the installation of the Linux system will progress smoothly and in an organized manner.
Installing Linux
2.1 Determine appropriate method of installation based on the environment (e.g., boot disk, CD-ROM, Network (HTTP, FTP, NFS, SMB))
2.11Install and configure Xfree86 server
2.12Select Video card support (e.g., chipset, memory, support resolution(s))
2.13Select appropriate monitor manufacturer and settings (e.g., custom, vertical, horizontal, refresh)
2.14Select the appropriate window managers or desktop environment (e.g., KDE, GNOME)
At this point, all of the planning is complete and it is time to start the installation.
The installation of Linux by a network server is an excellent way to install Linux on a large number of systems that will be similarly configured.
This ability is important because it can be installed on a system that has no diskette drive or CD-ROM for a corporate environment — or other similar mass production need.
The way that you decide to install Linux may have been part of the planning, because you have several methods to choose from. First, Linux supports bootable diskettes that hold a small portion of the Linux kernel and allow the further installation of Linux. Some Linux distributions actually use only diskettes to create the Linux system — but those distributions are not commonly used today. Second, Linux also includes support for bootable CD-ROMs or DVDs, which are now more common for user and enterprise installation methods. Finally, you also have the ability to install the Linux system from an NFS or other network server. This option is usually only chosen for the enterprise environment, or by the user with a very good broadband connection.
Chapter 4 Installing Linux |
87 |
The CD-ROM installation method is the most common method that users employ to install Linux. Because Linux can be installed in as little as 15 minutes, this method imposes no time constraints on its user. The CD-based installation is usually interactive and requires that the person performing the installation make selections for the type of installation, packages to be included, and configurations of the installation. The following steps will illustrate the CD-ROM method of installation of Linux. A bootable CD can start the CD-ROM installation of Linux. After Linux has begun installing, the choices begin.
Text or GUI installation
2.2 Describe the different types of Linux installation interaction and determine which to use for a given situation (e.g., GUI, text, network)
The type of interface is the first selection in the installation process that the installer must make. Most modern Linux installations will launch to a GUI (graphical user interface) based installation by default. GUI is usually the easiest installation to follow and use; some do almost everything for you (much like a Microsoft installation), but others walk you through each step of the installation. GUI installations require some minimal hardware. GUI installations are capable of detecting most hardware, and usually have excellent tools for setting up the system; however, if the system doesn’t have enough memory, processor power, or video capability, the GUI installation is not appropriate and the text-based installation should be chosen instead.
The text installation uses a very basic command line interface, or shell, which allows the installer to easily install Linux on older and slower machines (even machines that lack a video card) by using a terminal. Other reasons that you may have for using the text installation instead of GUI include:
Text installations use minimal graphics. Therefore, it is usually faster to move from screen to screen.
Text installations can create a batch file to answer your questions for mass installations.
Mass installation and upgrades are a fact of life in the real world of big corporations and governments. Failures usually occur when the installer did not correctly identify the hardware, did not properly configure the network, or was given the wrong source files for the installation or upgrade. Therefore, always make sure to verify the hardware, network configuration, and source files, and perform a test installation at each site.

88 |
Part II Installation |
Performing mass installations used to be challenging, but programs like Kickstart from Red Hat are eliminating the difficulties. With Kickstart, an installer can set up a server to automatically respond to client requests for software downloads, which can be customized. So no matter which type of installation you need, Linux can supply it. All you have to do is select the installation method, as shown in Figure 4-1.
Figure 4-1: The Red Hat Linux welcome screen
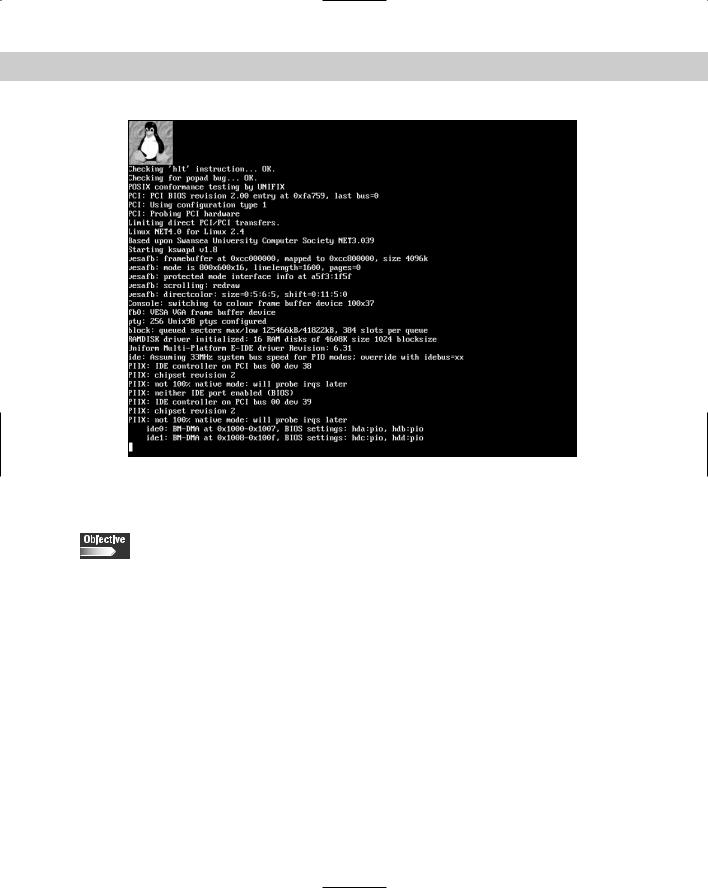
After you have selected the method of installation, Linux will begin to detect hardware. Even though Linux hardware probing is fairly accurate, I recommend that you observe the detection of hardware before the installation program moves to the GUI, shell, or command line interface for the installation of Linux. Figure 4-2 shows the hardware detection screen.
This screen shows the detection of hardware in the machine, including the lines:
PIIX: IDE controller on PCI bus 00 dev 38
This is the PCI controller for the IDE interface based on the primary chipset in the machine. If the installation doesn’t detect the controller needed for hard drive access, however, the installation won’t be able to continue. Although this doesn’t happen very often, it is worth your while to watch the major and minor hardware detection at this stage. After basic hardware has been detected, the installation moves to the next phase — basic interface setup.
Chapter 4 Installing Linux |
89 |
Figure 4-2: The hardware detection screen
Basic setup of Linux
2.3 Select appropriate parameters for Linux installation (e.g., language, time zones, keyboard, mouse)
At this point, you need to provide some general information to the Linux installation before it can proceed. The following sections outline this information.
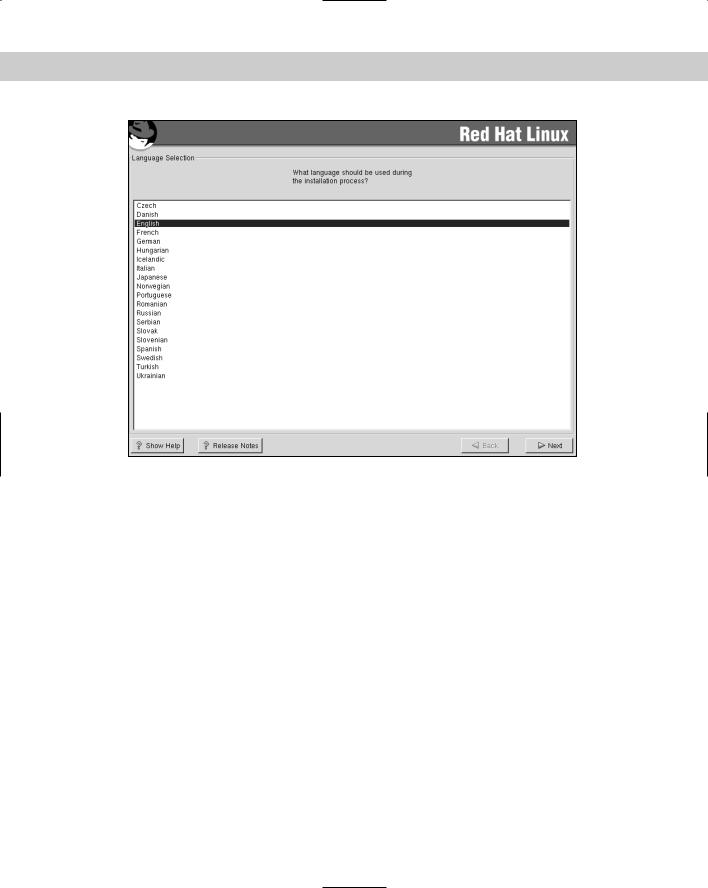
Language
First, the installer must select the language that the installation will proceed in. This choice sets the language for the rest of the installation. If the wrong language is selected, the installer may find that he or she won’t be able to read the options correctly to move forward or backward in the installation process. Therefore, you should use care in selecting the language, as shown in Figure 4-3.
90 |
Part II Installation |
Figure 4-3: The Red Hat language selection screen
Licensing agreement
You must accept a licensing agreement before continuing to install the Linux operating system and any additional packages included with the distribution. Read this statement completely because it may contain licensing that doesn’t meet the needs of the installation. If you do find an issue with the licensing agreement, don’t install the software — find a distribution without the hindering license or with the knowledge that the license needs to be followed.
Keyboard and mouse
After the installer has agreed to the license, the system usually presents some other simple configuration questions, which usually involve the following:
The selection of a mouse
The selection of a keyboard model
The type of installation
The level of security of the installation
The layout that is being used
The selection of special features, such as Internet buttons
Chapter 4 Installing Linux |
91 |
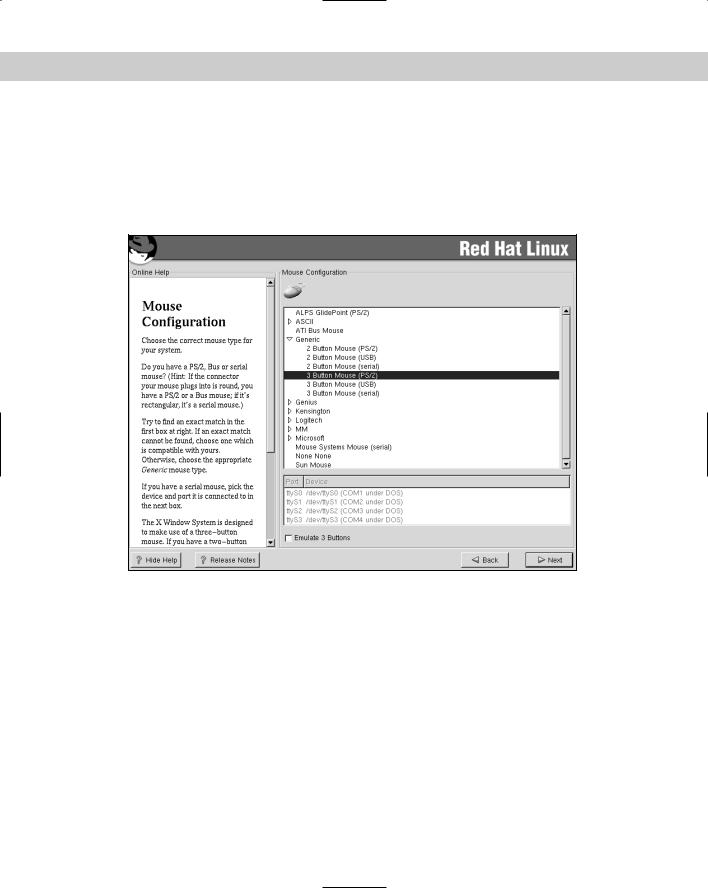
After these configuration questions have been answered and the features correctly selected, the installer can move on to selecting the mouse attached to the unit. Hopefully, the mouse has already been working at a minimum level. However, you select the actual type of mouse from a list that gives you the option of allowing a two-button mouse to emulate a three-button mouse. Notice the help window in Figure 4-4 that provides some basic help in selecting the correct mouse.
Figure 4-4: The Red Hat mouse configuration screen
Unlike other operating systems, Linux uses the capabilities of a three-button mouse to provide various features:
The left button is the standard button for selecting items in a windows environment
The right button is used to bring up a secondary menu in the active window
The third button is used for special features of an application or window
This usually completes the basic configuration, and the installer can continue with the installation of Linux.