

Kill Team Rules
.pdfKILL TEAM MISSION RULES
There are six available missions to try out in your games of Warhammer 40,000: Kill Team. Each mission has its own special rules, objectives and challenges. Regardless of the mission, they all share a few variations to the normal Warhammer 40,000 rules which you must adhere to in order to play Kill Team, all of which are presented below:
Skirmish Battlefield: All Kill Team missions are designed to be played on a 4'x4' battlefield.
Every Man for Himself: Most models in a Kill Team are selected as part of one or more squads. However, when deploying your Kill Team and throughout the course of the game, each model is treated as a separate unit. This even includes models that are selected as wargear options for a unit, such as Tau Empire Drones or Space Wolves Fenrisian Wolves. If a model has the Independent Character unit type, it cannot join another model to form a unit of two.
Transport Vehicles: Transport vehicles can carry a number of models equal to their Transport Capacity (but following all of the normal restrictions), regardless of which unit they were selected from during Kill Team selection. However, only models that were selected as part of the same unit during Kill Team selection, and were assigned a Dedicated Transport, can begin the game embarked upon their Dedicated Transport.
You’re on Your Own: Extra models cannot be generated during the course of the game by any means. Furthermore, the Reserves rule is not used unless as a result of the Outflank special rule. Models cannot enter Ongoing Reserve by any means. If any models in your Kill Team can normally only be deployed via Deep Strike, simply deploy them along with the rest of your army.
Scoring Units: Unless specifically stated otherwise in their rules (e.g. Blood Angels Death Company), all models are scoring units, including vehicles.
Psychic Solitude: The Brotherhood of Psykers/Sorcerers special rule has no effect in games of Kill Team.
Break Tests: If, at the start of your turn, your opponent has destroyed (or otherwise caused to be removed from play) more than half the total number of models in your Kill Team, your force is Broken. From that point on, each of your models must make a Break test at the beginning of each of your Movement phases, including the turn on which your force was Broken. Starting with your Leader (if he is still alive), each of your models must make a Leadership test. If the test is passed, all is well and the model bravely fights on as normal; if the test is failed, your model flees from the battlefield and is immediately removed as a casualty. Vehicles and models with the Fearless special rule automatically pass Break tests. Models with the And They Shall Know No Fear special rule re-roll failed Break tests.

Command Range: Your Leader has a Command Range of 6". If your force is Broken and your Leader passes his Break test, all friendly models within his Command Range automatically pass their Break tests.
CODEX EXCEPTIONS FOR KILL TEAM MISSIONS
Codex: Chaos Daemons: The Warp Storm special rule is not used in Kill Team missions.
Codex: Chaos Space Marines: The Champion of Chaos special rule Is not used in Kill Team missions.
Codex: Necrons: Whenever a Necron model is removed as a casualty, replace the model with a Reanimation Protocol marker. Only make Reanimation Protocol rolls for markers that are within 2" of another friendly Necron model (other Reanimation Protocol markers do not count); any markers that are more than 2" away from a friendly Necron model when Reanimation Protocol rolls are made fail automatically – remove the marker.
Codex: Dark Eldar: All friendly models from a Dark Eldar Kill Team that have the Power from Pain special rule, immediately count as having earned one Pain Token for every five enemy non-vehicle models they have killed. Necron models only count as killed when they have failed their Reanimation Protocol rolls.
KILL TEAM MISSION SECONDARY OBJECTIVES
Each Kill Team Mission uses some or all of the following Secondary Objectives, shared by both players:
Slay the Leader: If, at the end of the game, the enemy’s Leader has been slain, you score 1 Victory Point. If the enemy Leader fled the battlefield as a result of a failed Break test, a Victory Point is not awarded.
Linebreaker: If, at the end of the game, you have at least one model in the enemy’s deployment zone, you score 1 Victory Point. Models that are falling back or that have gone to ground do not count.
First Blood: If, at the end of the game, the first model to be removed as a casualty was part of your opponent’s Kill Team, you score 1 Victory Point.
Break the Enemy: If, at the end of the game, you have completely destroyed more than half of your opponent’s models, you score 1 Victory Point.
KILL TEAM MISSIONS
There are two ways that you can choose which Kill Team mission to use. The first is to agree with your opponent which Kill Team mission to play. The second is to pick randomly by rolling a D6 and consulting the following chart:
KILL TEAM MISSION TABLE
D6 - Result
1 - Forward Push
2 - Alone in the Dark
3 - Head Hunt
4 - Infiltrate the Camp
5 - Secure the High Ground
6 - Supply Drop
Mission 1
KILL TEAM: FORWARD PUSH
‘Onwards, men. Drive the scum back to the hellhole they crawled from!’
Your Kill Team has been tasked with pushing back the forward elements of the enemy army from a strategically important location, so that vanguard units can follow up and secure the area.
THE ARMIES
Choose armies as described in the Choosing Your Kill Team section.
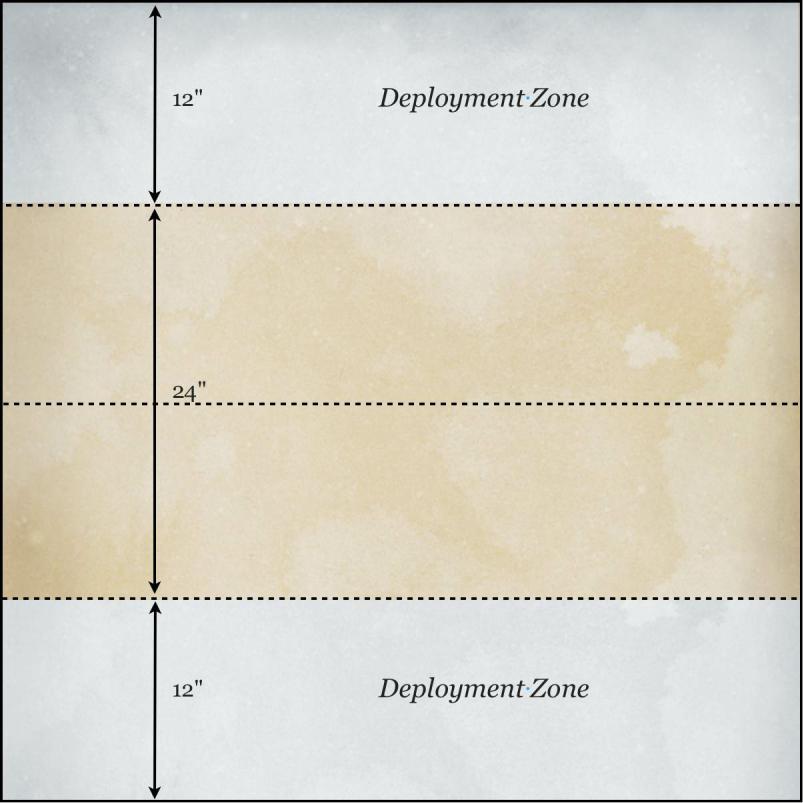
THE BATTLEFIELD
Use the deployment map included with this mission. Set up terrain as described in the
Warhammer 40,000 rulebook.
PLACE PRIMARY OBJECTIVES
After setting up the terrain, both players must roll-off. Players take it in turns to place a total of 3 Objective Markers, starting with the player who won the roll-off (see the Warhammer 40,000 rulebook).
DEPLOYMENT
Before any models are deployed, both players must roll to determine their Leader Traits.
Both players then deploy forces as described in the Fighting a Battle section of the
Warhammer 40,000 rulebook.
FIRST TURN
The player that deployed first has the first turn unless their opponent can Seize the Initiative.
SEIZE THE INITIATIVE
If a player who is due to go second wishes to Seize the Initiative, he can roll a D6 before the beginning of the first turn. On a roll of a 6, he successfully seizes the initiative and goes first instead. His army has clearly outwitted that of his opponent!
GAME LENGTH
This mission uses Variable Game Length.
VARIABLE GAME LENGTH
At the end of game turn 5, one of the players must roll a D6. On a roll of 3+ the game continues, otherwise the game is over. If another turn is played, another D6 must be rolled at the end of game turn 6, and this time, the game only continues on a roll of 4+. The battle automatically ends at the close of game turn 7.
VICTORY CONDITIONS
At the end of the game, the player that has scored the most Victory Points wins the battle. If the players have the same number of Victory Points, the game is a draw.
PRIMARY OBJECTIVES
At the end of the game, each Objective Marker is worth 1 Victory Point to the player that controls it.
SECONDARY OBJECTIVES
Slay the Leader, Linebreaker, First Blood, Break the Enemy.
MISSION SPECIAL RULES
Night Fighting, Mysterious Objectives.
Mission 2
KILL TEAM: ALONE IN THE DARK
‘Careful, lads. The enemy is around here somewhere, so keep an eye… Arrrgh!’
You are undertaking a dangerous mission under cover of darkness. Enemy patrols were spotted in this location before night fell, and you have been charged with driving them from the area and holding your ground until dawn.
THE ARMIES
Choose armies as described in the Choosing Your Kill Team section.
THE BATTLEFIELD
Use the deployment map included with this mission. Set up terrain as described in the
Warhammer 40,000 rulebook.
PLACE PRIMARY OBJECTIVES
After setting up the terrain, both players must roll-off. Players take it in turns to place a total of 3 Objective Markers, starting with the player who won the roll-off (see the Warhammer 40,000 rulebook).
DEPLOYMENT
Before any models are deployed, both players must roll to determine their Leader Traits.
Both players then deploy forces as described in the Search Pattern mission special rule (see below).
FIRST TURN
The player that deployed first has the first turn unless their opponent can Seize the Initiative.
SEIZE THE INITIATIVE
If a player who is due to go second wishes to Seize the Initiative, he can roll a D6 before the beginning of the first turn. On a roll of a 6, he successfully seizes the initiative and goes first instead. His army has clearly outwitted that of his opponent!
GAME LENGTH
This mission uses Variable Game Length.
VARIABLE GAME LENGTH
At the end of game turn 5, one of the players must roll a D6. On a roll of 3+ the game continues, otherwise the game is over. If another turn is played, another D6 must be rolled at the end of game turn 6, and this time, the game only continues on a roll of 4+. The battle automatically ends at the close of game turn 7.
VICTORY CONDITIONS
At the end of the game, the player that has scored the most Victory Points wins the battle. If the players have the same number of Victory Points, the game is a draw.
PRIMARY OBJECTIVES
At the end of the game, each Objective Marker is worth 1 Victory Point to the player that controls it.
SECONDARY OBJECTIVES
Slay the Leader, Linebreaker, First Blood, Break the Enemy.
MISSION SPECIAL RULES
Mysterious Objectives.
Death by Moonlight: In this mission, the Night Fighting rules are in effect for the entire battle.
Search Pattern: Before deployment, both players make a dice roll for each model in their Kill Team that does not already have the Outflank special rule. On the roll of a 1 or 2, that model is not deployed, but instead gains the Outflank special rule. On the roll of a 3+, that model is deployed anywhere within his side’s deployment zone, but cannot be placed anywhere within 3" of another model.