

Owners_Manual_online_wo_chapter_breaks
.pdfMaintenance
Opening and closing the hood
Never work on a vehicle that is plugged in. Always remember to unplug the
vehicle before working under the hood or the underside of the vehicle.S
WARNING: Make sure that the hood is in the fully open position before working in the area under the hood. In windy conditions,
you may need to secure the hood stay to prevent the hood from being closed by the wind.S
Opening
1. Pull the hood release handle located to the left of the steering column.
2. Raise the hood.
3. Insert the hood stay into the slot.
Closing
TR0043
Return the hood stay to its original position and lower the hood to the closed position. Press down firmly on each side of the hood (see illustration) to engage the locks. You can hear the locks ‘click’ into place.
Caution: Before driving, check that the locks on both sides of the hood are fully engaged by attempting to lift the hood - there
should be no movement.
Maintenance and care |
9-3 |
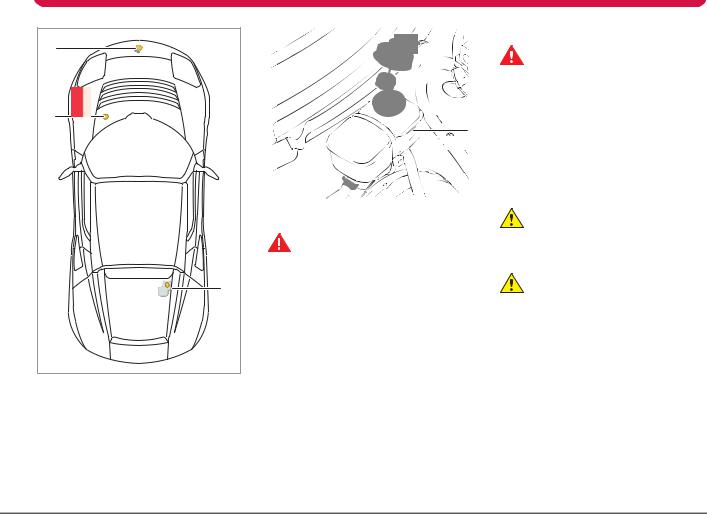
Fluid reservoirs
1 |
2 |
3 |
TR0053 |
Fluid reservoir locations
1.Windshield washer fluid
2.Brake fluid
3.Battery coolant
MAX
 MIN
MIN
TR0052
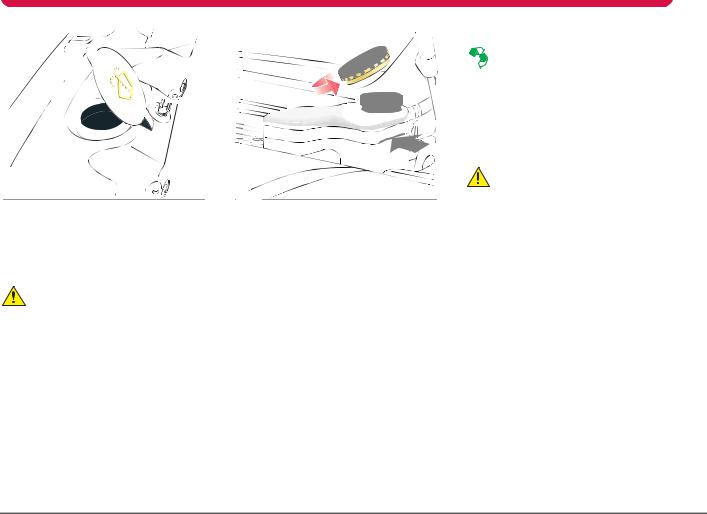
Brake fluid
WARNING: Seek qualified assistance immediately if brake pedal travel is
unusually long or if there is a significant loss of brake fluid. Driving under such conditions could result in extended stopping distances or complete brake failure.S
Fluid level check
Check the brake fluid level weekly with the vehicle on level ground. The fluid level can be checked visually through the side of the reservoir without removing the filler cap.
The brake fluid level should be between the MIN and the MAX marks.
Topping up the fluid
WARNING: Brake fluid is highly toxic. Keep containers sealed and out of the reach of children. In the event of accidental
consumption, seek medical attention immediately.S
1.Clean the filler cap before removing to prevent dirt from entering the reservoir.
2.Unscrew the cap and remove.
3.Top-up the reservoir to the MAX mark using brake fluid meeting DOT4 specification.
4.Replace the reservoir cap.
Caution: Brake fluid will damage painted surfaces. Immediately soak up
any spills with an absorbent cloth and wash the area with a mixture of vehicle shampoo and water.
Caution: Only use new fluid from an air-tight container. Do not use fluid
from previously opened containers or fluid that has been previously bled from the system - this fluid has absorbed moisture and will decrease braking performance.
9-4 |
Maintenance and care |
Fluid reservoirs
TR0051
Windshield washer fluid
To ensure proper cleaning of the windshield and to prevent freezing in cold weather check the reservoir level weekly. If needed, top up with windshield washer fluid.
Caution: Always follow the directions provided by the windshield washer fluid
manufacturer. If the windshield washer fluid requires dilution, carefully follow the manufacturer’s directions and mix the recommended quantities of water and windshield washer fluid in a separate container before topping up the reservoir. Undiluted windshield washer fluid can cause paint to discolor.
TR0056
Battery coolant
Fluid level check
Check the fluid level weekly with the vehicle on level ground and when the vehicle is cool. The fluid level can be checked visually through the side of the reservoir without removing the filler cap. The fluid level should be between the MIN and the MAX marks.
If the level drops significantly, a leak may exist. Contact Tesla Motors before using the vehicle.
Topping up the coolant
The cooling system for your vehicle
 contains a propylene glycol (PG) based antifreeze. Compared to conventional ethylene glycol based antifreezes, propylene glycol is less toxic, safer for children, pets and
wildlife, and safer for the environment.
Top-up to the MAX mark with a 50% mix of water and Havoline® Extended Life antifreeze Coolant-PG (Havoline XLC-PG).
Caution: Do not mix with any other type of antifreeze! In an emergency, top up with distilled water only and be aware of the
reduced frost and corrosion protection.
Antifreeze contains important corrosion inhibitors. Maintain the antifreeze content of the coolant between 50% and 60% year round. Do not exceed 60% or cooling efficiency will be impaired.
Ensure cap is replaced and fully tightened after topping up.
Note: Change coolant every four years, regardless of mileage.
Maintenance and care |
9-5 |
Windshield wiper and washer
TR0078
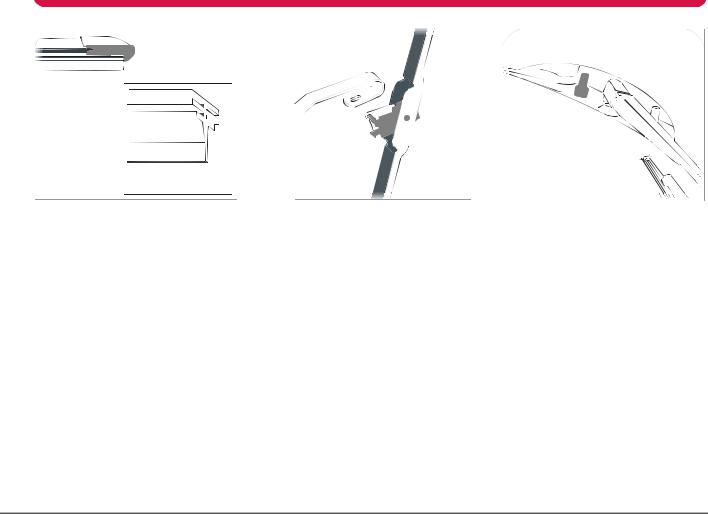
Checking the wiper blade
Periodically check and clean the wiping edge of the wiper blade.
Check the blade rubber for cracks, splits and roughness. If any damage, wear or roughness is detected, replace immediately to prevent damage to the glass.
Clean the blade edge by wiping with a soft cloth or sponge, using warm soapy water.
TR0079
Replacing the wiper blade
Install only a replacement wiper blade that is identical to the original specification.
1.Lift the wiper arm away from the windshield.
2.Turn the blade at right angles to the arm.
3.Depress the locking tab while sliding the blade down the arm.
To install the new blade, position the new assembly on the wiper arm and slide the blade towards the hooked end of the arm until it locks into place.
TR0070
Windshield washer jets
Washer jets are set when your vehicle is manufactured and should not need adjusting.
If necessary, use a needle to clear blockages, or lever gently to redirect the spray towards the center of the windshield.
9-6 |
Maintenance and care |

Cleaning and vehicle care
TR0159
Environmental precautions
Some cleaning products contain
chemicals that are hazardous to the environment. Always take precautions
to prevent fluids from spilling.
It is illegal to pollute drains, rivers and waterways. Used toxic chemicals must be disposed of at authorized waste disposal sites only.
Cleaning the vehicle exterior
Hand washing
Caution: Substances that are corrosive, such as bird droppings, tree resin, dead
insects, tar spots, road salt and industrial fall-out can damage the vehicle's paint. Remove such deposits as soon as possible to prevent damage.
To preserve the paint finish, observe the following:
•Before washing, use a hose to remove heavy deposits of mud and dirt.
•Never wash a vehicle that is “hot to the touch” or during exposure to strong, direct sunlight.
•Wash the body using cold or lukewarm water containing a good quality wash and wax shampoo.
•Never use strong household detergents or soap. These products can discolor and spot painted surfaces.
•For best results, always use a clean sponge or car wash mitt with plenty of water.
•After washing, rinse with clean water and thoroughly wipe dry with a chamois. Do not allow cleaning agents to dry on the finish.
Automatic car washers and pressure washers
Caution: Tesla Motors recommends that you hand wash your vehicle.
Do not use an automatic car washer or pressure washer as these may damage your vehicle’s paint finish, soft top, or other components. The use of a pressure washer to clean components in the Battery compartment may damage critical seals on the Battery and other electrical components.
Note: Vehicle or paint damage caused by using an automatic car washer or pressure washer is not covered under the New Vehicle Limited Warranty.
Underbody maintenance
If salt has been used on the highways (such as during winter months), thoroughly remove all traces of road salt. Use a hose to rinse salt from the underside of the vehicle.
Flush away accumulations of mud in areas where debris easily collects (such as wheel arches and panel seams).
Removing tar spots
Use denatured alcohol to remove tar spots and stubborn grease stains from paint. After cleaning, immediately wash the area with soapy water to remove the alcohol.
Washing the soft-top
Caution: Scrubbing or brushing with a hard bristle brush will damage the
fibers of the fabric, causing fabric deterioration and impairing its cosmetic appearance.
When washing the soft-top, follow these guidelines:
1.Before washing, vacuum the soft-top using a soft brush attachment to remove dust and dirt.
2.Soften encrusted dirt using soap and water, then rinse with clean water.
3.Wash using mild soap and water. Never use solvent, petroleum or chemical-based cleaners, detergents, or wash/wax compounds.
Maintenance and care |
9-7 |
Cleaning and vehicle care
Wheels
Wash wheels with warm, fresh water containing a good quality wash and wax shampoo. Thoroughly rinse the wheels to remove any soap residue.
Windshield, windows and mirrors
Regularly clean all windows inside and out using a window cleaning solution. An automotive glass cleaner is recommended.
After washing the vehicle with wash/wax products, clean the outside of the windshield with glass cleaner.
Mirror glass is particularly susceptible to damage. Do not use abrasive cleaning compounds.
Wiper blades
Clean wiper blades using mild soap and warm water only. Do not use petroleum or alcohol-based cleaners.
Polishing the body
To preserve the cosmetic appearance of the body, occasionally apply a good quality polish. A good polish should contain a very mild abrasive that removes surface contamination without damaging the surface, a mild filling compound to reduce the appearance of scratches, and wax to provide a barrier between the cleaned body surface and airborne contaminants.
Do not use cutting paste, color restoration compounds, or polishes containing a harsh abrasive. These can scour the surface and permanently degrade the body.
Using a car cover
To preserve the cosmetic appearance of the body, you may want to use a car cover. Only an approved Tesla Motors car cover should be used. DONOT use the car cover when charging the vehicle. Doing so can interfere with adequate cooling during charging.
Paint damage and rectification
Treat chips and scratches to the paint using a paint touch-up pen. Use the touch-up pen after washing but before polishing or waxing.
More extensive repairs to the body should only be carried out by a facility approved by Tesla Motors. Contact Tesla Motors for a list of approved body repair facilities.
Cleaning the vehicle interior
Plastic materials
Caution: Do not polish the upper surfaces of the dashboard. Polished
surfaces are reflective and may interfere with the driver's view.
Clean with diluted upholstery cleaner, then wipe with a damp cloth.
Carpet and fabrics
Clean with diluted upholstery cleaner. Test a concealed area first.
Leather
Clean with warm water and a non-detergent soap. Dry and polish with a dry, clean, lint-free cloth.
Seat belts
Extend the belts and clean with warm, soapy, fresh water only. Do not use any type of detergent or chemical cleaning agent. Allow the belts to dry naturally while extended, preferably away from direct sunlight.
Instruments and display screens
Clean the instrument panel, Touch Screen, and audio system screen using a damp cloth. Do not use cleaning compounds or solutions.
9-8 |
Maintenance and care |

Roadside emergencies
|
Tool kit |
|
|
|
|
|
|
|
Tool kit location |
9-2 |
|
|
Tool kit components |
9-2 |
|
|
Energy Depletion |
|
|
|
Dealing with a discharged Battery |
9-3 |
|
|
Getting a few extra miles |
9-3 |
|
|
Tire repair |
|
|
|
Tire sealant |
9-4 |
|
|
Safety precautions |
9-4 |
|
|
Repairing a tire |
9-4 |
|
|
Replacing the tire sealant |
9-5 |
|
|
Wheels |
|
|
|
Removing the wheel |
9-6 |
|
|
Replacing the wheel |
9-6 |
|
|
Fuse replacement |
|
|
|
Replacing a fuse |
9-7 |
|
|
Fuse specification chart |
9-8 |
|
|
Bulb replacement |
|
|
|
Replacing a bulb |
9-9 |
|
|
Interior light |
9-9 |
|
|
Trunk light |
9-10 |
|
|
License plate light |
9-10 |
|
|
Raising the vehicle |
|
|
|
Vehicle jacking points |
9-11 |
|
|
Vehicle lifting points |
9-12 |
|
|
Vehicle recovery |
|
|
|
Transporting the vehicle |
9-13 |
|
|
Transporter tie down straps |
9-14 |
|
10-1
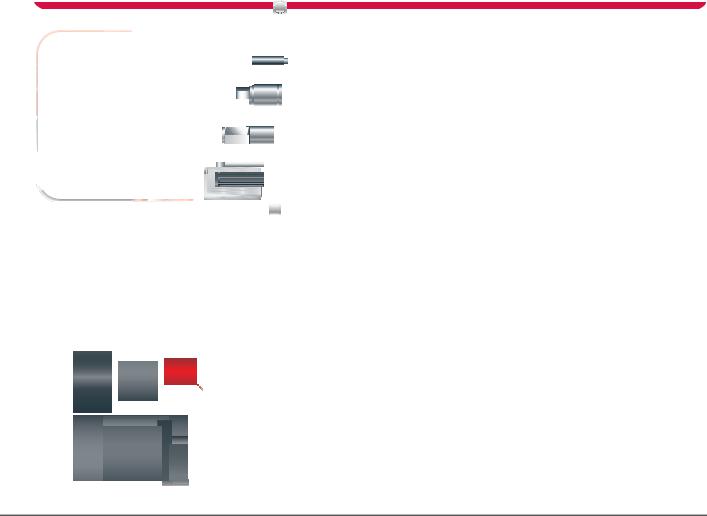
Tool kit
|
1 |
2 |
3 |
4 |
5 |
|
|||||
|
|
|
|
|
|
|
|
|
|
|
|
|
|
|
|
|
|
|
|
|
|
|
|
|
|
|
|
|
|
TR0161
Tool kit location
The tool kit is located in the storage space beneath the trunk floor. To access the storage space, pull the tab located at the rear edge of the floor covering.
TR0150
Tool kit components
1. Hard-top Torx® tool
2. Screwdriver
3. Wheel bolt extension tool
4. Locking wheel nut adapter
5. Vehicle recovery eye
10-2 |
Roadside emergencies |

Energy Depletion
Dealing with a discharged
Battery
When driving the vehicle, the Touch Screen displays warning messages as the level of charge approaches a low level. You’ll notice the color of the charge level graph on the Energy screen turn yellow, then red, to alert you that you need to charge the vehicle.
If you ignore these warnings and continue to drive the vehicle, the charge level will eventually reach 0% and the car will stop. Pull the vehicle over to a safe location and call Roadside Assistance.
Caution: If the Battery’s charge level falls to 0%, it must be plugged in
immediately. Failure to do so can permanently damage the Battery and this damage is not covered by the New Vehicle Limited Warranty. Also, if you allow the Battery to fall to a critically low level it may not be possible to charge the vehicle. If you are unable to charge the vehicle, contact Tesla Motors.
A few extra miles
When the vehicle’s Battery is fully depleted while driving, the vehicle switches to RESERVE mode which provides you with the opportunity to immediately get the vehicle off the road. The distance you can drive in RESERVE mode is very limited (depending on energy being used it could be as little as 1 mile).
Roadside emergencies |
10-3 |
Tire repair
TR0168
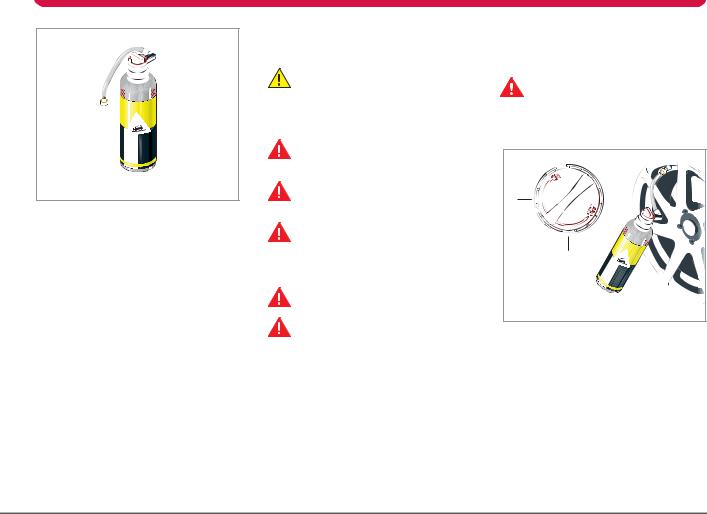
Tire sealant
Your vehicle has no spare tire. Instead, a tire sealant is provided. This aerosol is located in the trunk.
You must repair or replace a damaged tire as soon as possible. Use of the aerosol is temporary and is designed only to allow you to drive the vehicle to the nearest repair facility. The aerosol repairs only small punctures in the tread. If damage is more severe (such as punctures larger than 5 mm, ripped tires, or tires that have separated from the rim), call Roadside Assistance to have the vehicle transported to a tire repair facility.
The tire sealant contains liquid latex and a propellant. When injected into the tire through the valve, the liquid latex penetrates the puncture site and cures to form a temporary repair. At the same time the
propellant inflates the tire, allowing you to drive the vehicle at low speed (less than 30 mph) to reach a tire repair facility.
Caution: Do not drive on a deflated tire as this can seriously damage the wheel
and the vehicle.
Safety precautions
WARNING: Never exceed 30 mph (45 km/h) when driving with a repaired
tire.S
WARNING: Never drive with a deflated tire, vehicle handling and braking will
be compromised.S
WARNING: Always read the directions and warnings on the tire sealant before starting a repair. Follow the directions on the
aerosol exactly and pay attention to the following precautions.S
WARNING: Always keep the tire sealant out of the reach of children.S
WARNING: The tire sealant contains components which are harmful if
consumed or inhaled:
•If swallowed, do not induce vomiting. Seek medical assistance immediately.
•If inhaled, breathe fresh air. If breathing is affected, seek medical assistance immediately.
•If the sealant comes into contact with the eyes, immediately flush the eyes with water. If irritation persists, seek medical assistance.
•Do not breathe gas, fumes, vapor or spray that may be emitted from the tire sealant. Inhalation can cause drowsiness and dizziness.S
WARNING: Store the tire sealant in its correct location in the trunk.
Temperatures in other locations may exceed safe storage conditions. Never carry the tire aerosol in the vehicle’s cabin area.S
TR0167 |
Repairing a tire
If possible, stop in a safe place away from traffic. Always ask a passenger to wait in a safe area away from traffic. Switch on the hazard warning lights to alert other road users, then follow these steps:
1.Inspect the deflated tire for cause of puncture. If possible, remove foreign material (such as screws or nails) from the tread.
2.Remove the tire sealant from the trunk.
10-4 |
Roadside emergencies |