

Beginning CSharp Game Programming (2005) [eng]
.pdf140Chapter 6 Setting Up a Framework
protected virtual void ProcessFrame()
{
if( !paused )
{
// do processing here
}
else
System.Threading.Thread.Sleep( 1 );
}
The ProcessFrame function has a little addition this time: It checks to see if the game is paused or not. If the game is not paused, then you should go ahead and perform your game calculations. If the game is paused, then the function tells the system thread to sleep for one millisecond.
t i p
Here is something that most game programmers tend to forget: You are not the sole owner of a computer system. On today’s modern computers, it’s not uncommon for someone to be running hundreds of processes at the same time, and therefore you need to share nicely with all of the other processes. When you tell the current thread to sleep, you’re telling the operating system, “I don’t really have any processing to do right now, so go ahead and work on something else that might need it.” If you don’t have this line in your program, then your game will eat up as much of your processor’s resources as it can grab, even while it’s paused. This is a very bad thing.
The Render and Run functions haven’t changed significantly, so I’m leaving those out of the description here.
Events
One thing you have to watch out for in a windowed game is losing focus. In a multi-tasking operating system like Windows, it’s very easy for the user to decide to stop playing your game and check another window for something on a whim. Naturally, your game shouldn’t be selfish; it should say, “Okay user, go ahead and use another program. I’ll just sit here *sniff* and wait for you to return.” Whenever your program loses focus (meaning the user has switched to a different program), the OnLoseFocus event gets executed:
protected override void OnLostFocus( EventArgs e )
{
base.OnLostFocus( e ); Paused = true;
}

The Advanced Framework |
141 |
You tell the base Form class that the program has lost focus, and then set the Paused property to true, telling the game that it has been paused. I’ll get to this property in the next subsection.
n o t e
It might seem like a good idea to unpause the game when the program regains focus (with the OnGotFocus event), but it’s really not. The reasoning is thus: What if the user paused the game manually, then exited, and then re-entered? Should the game automatically unpause? Probably not. Therefore, it’s just safer to leave the game paused and make the user manually unpause it.
The Paused Property
The Advanced Framework has a property in it named Paused, which wraps around the paused Boolean variable:
public bool Paused
{
get { return paused; } set
{
// pause the game
if( value == true && paused == false )
{
gametimer.Pause(); paused = true;
}
// unpause the game
if( value == false && paused == true )
{
gametimer.Unpause(); paused = false;
}
}
}
The code is fairly straightforward. The get action simply returns the value of the paused variable. The set action is a bit more complex; it performs the actual pausing and unpausing of the game. If you set Paused to true, then the game checks to see if the game isn’t already paused (if it is, the function does nothing). If not, then the function pauses the game timer and sets the paused variable to true. Unpausing does the opposite; it unpauses the timer and sets paused to false.

142Chapter 6 Setting Up a Framework
The Entry Point
The entry point for the framework has been changed a bit in the Advanced Framework, as well:
static void Main()
{
try
{
Game game = new Game(); game.InitializeGraphics(); game.InitializeSound(); game.InitializeInput();
game.Show();
game.Run();
}
catch( Exception e )
{
MessageBox.Show( “Error: “ + e.Message );
}
}
The game is created, and the three main media components are initialized, the game form is shown, and then it is run. Finally, there’s a catch-block that catches any exceptions and prints out the error message to the user. This is a little different from the old framework; it used Boolean return values in the initialization functions to determine if there was an error. Here, I simply converted it entirely to an exception-based system.
Summary
You now have a robust framework with which you can begin to design your games. Unfortunately, as you don’t really know how to use DirectX yet, you’re going to have to continue reading! Oh darn!
The good news is that the next three chapters are going to explain all of that confusing DirectX mumbo-jumbo that you saw within the frameworks. I wouldn’t worry too much, however. Managed DirectX 9 is a huge improvement over the older versions, and it is incredibly easy to use compared to what it used to be.

Summary 143
What You Learned
The main concepts that you should have picked up from this chapter are:
How to create a new project in SharpDevelop.
How to create a new project in Visual C#.
How to use project wizards to create a framework.
How to use the basic features of a form.
How to use Form event handlers.
How to use the DirectX high-precision timer.
How to use the Advanced Framework’s timer.
How the Advanced Framework works.
How to play nicely with the operating system.
How to handle losing window focus.
Review Questions
These review questions test your knowledge on the important concepts exposed to you in this chapter. The answers can be found in Appendix A.
6.1.Why is it a good idea to use a project wizard to start your projects?
6.2.True or False: All windowed programs must have a class that inherits from
System.Window.
6.3.True or False: Default Form event handlers do nothing, so you don’t ever have to call the base version of the functions.
6.4.Why is it a better idea to use the AdvancedFramework.Timer class instead of the
DXUtil.Timer function?
6.5. What does System.Threading.Thread.Sleep() do?
On Your Own
This chapter introduced you to a lot of concepts that I’m not really going to expand on. For example, the System.Windows.Forms.Form class is incredibly complex and has literally dozens of functions and properties in it, but I showed you only a handful. Generally speaking you’re probably not going to be concerned with them, but it helps to be knowledgeable about these kinds of things; this knowledge will come in mighty handily if you ever decide to make a GUI-based resource editor for your game. So you should look into forms programming on your own if you’re interested in learning all about it.
This page intentionally left blank

chapter 7
Direct3D
Direct3D has evolved into one of the most complex graphics APIs in existence. Luckily for you and me, it’s also amazingly flexible. Direct3D has come a very long way since the days of yore, and even though each release becomes more complex, Microsoft has also managed to make each release simpler to use. I can’t tell you how many times I heard people complaining about the number of lines of code required to simply set up a rendering device back when DirectX 5 was king. You don’t have to deal with that because DirectX 9 has come to save the day.
In this chapter, you will learn:
How to create a Direct3D Device.
What a back buffer is.
How to make sure a device is available for you to use.
What display formats (pixel formats) are.
How the updated framework looks.
How to handle multitasking in fullscreen mode.
How to draw a triangle.
How to use colors and alpha blending.
How textures and texture coordinates work.
How to use D3DX to load a texture quickly.
How to use triangle strips and fans to optimize your geometry.
How to use D3DX to handle sprites for you easily.
How to load fonts and draw text.
145

146 Chapter 7 Direct3D
DirectX Versions
During writing of this book, Microsoft rudely introduced a new version of the DirectX SDK. The newest version, as of this writing, is DirectX 9.0c, whereas this book uses DirectX 9.0b. I’ve included the 9.0b SDK on the CD for you, in the /extras directory, so you can use that version if you don’t have it installed.
Unfortunately, if you have the newest version installed, then some of the code examples will not compile for you, as the Direct3D D3DX libraries have changed in a few key places. I didn’t have the time update the code examples to get them into this book by printing time, but I will try my best to release a 9.0c version of all the code examples on my Web site (http://ronpenton.net) later on.
One Device to Rule Them All
The core component of Direct3D is the Direct3D.Device. A Direct3D device simply represents whatever device you’re using to render with, which is almost always your video card.
n o t e
DirectX uses vague terms like “device” because in the future, there may be no such thing as a video card, and you may be using something entirely different.
In Demos 6.1, 6.2, and 6.3, you were presented with Direct3D initialization code. It probably didn’t make much sense to you at the time, but here’s where I explain it all to you.
It’s All about Presentation
Direct3D devices are amazingly configurable. Because of this, Microsoft has created a special class that allows you to describe exactly how you want to configure your graphics device. This class is called Direct3D.PresentParameters. It has a whole load of properties, a lot of which I won’t have room to cover here. Table 7.1 lists the properties you will be concerned with in this book.
n o t e
If you’re interested in learning about all those advanced properties that I don’t use in this book, you should check out a book on Direct3D, such as Beginning DirectX 9, by Wendy Jones.
Buffers and Buffer Swapping
If you don’t know anything about graphics drawing, then this section is for you. In the old days of game programming, graphics hardware was very primitive, and you only had enough graphics memory to hold what was actually on the screen. The old systems would
One Device to Rule Them All 147
Table 7.1 Direct3D.PresentParameters Properties
Property |
Description |
Windowed |
Determines if the program is windowed or not |
SwapEffect |
Tells Direct3D how to swap back buffers |
BackBufferCount |
Tells Direct3D how many back buffers there should be |
BackBufferFormat |
Tells Direct3D what format back buffer you want to use |
BackBufferHeight |
Tells Direct3D what window height you want to use |
BackBufferWidth |
Tells Direct3D what window width you want to use |
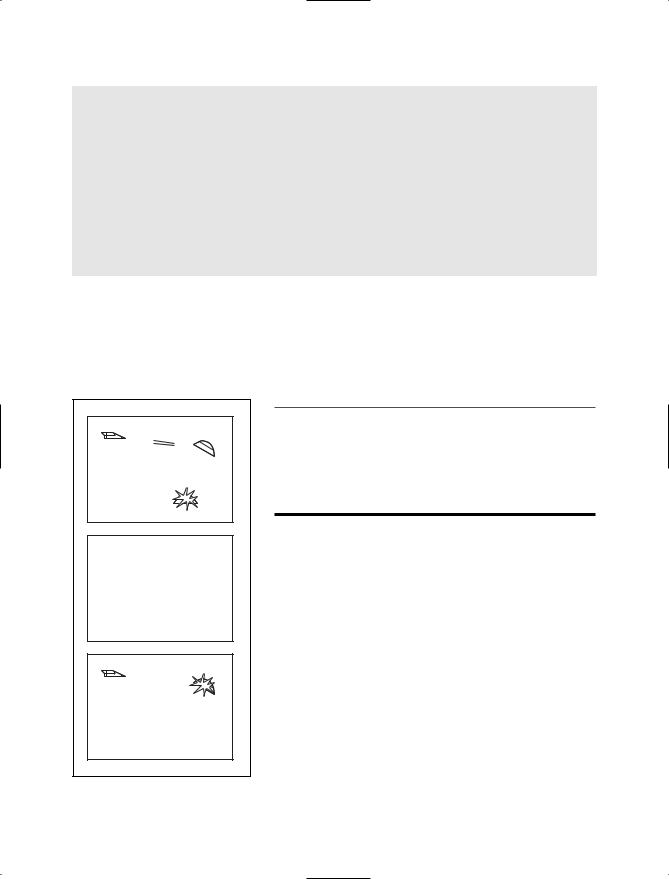
draw a scene, clear the screen, and then draw the next scene. This resulted in a bad flickering effect because the screen would literally change to black for a few milliseconds before it was updated with the new data. Figure 7.1 shows this effect. Not very many games were made like this because they would give users headaches.
Figure 7.1 |
The flickering effect |
n o t e
A method called dirty rectangles was invented to take care of the problem at first. Whenever something moved on the screen, the computer would keep track of a rectangle around the area where something changed, and then redraw the rectangle that changed, without blanking anything. Thankfully, we don’t have to do this anymore.

148 Chapter 7 Direct3D
As graphics hardware became more advanced, a new method called buffer swapping or back-buffering was introduced. The idea is to keep two buffers, a front buffer and a back buffer, open at all times. You draw to the back buffer, and when you want the data to be presented to the screen, the back buffer is swapped with the front buffer, and the old front buffer becomes the back buffer. This method is shown in Figure 7.2.
Figure 7.2 |
Back buffer can prevent flickering. |
At one point, it was determined that buffer swapping took a very long time and the games were actually sitting there waiting for the buffers to swap before they could start writing to the back buffer again. This was especially true in the days when memory busses were incredibly slow. To fix the problem, game programming pioneers decided to add another buffer into the mix—to create triple-buffering. While the back buffer was being swapped onto the front buffer, the game would actually begin writing to a third buffer rather than waiting for the buffer swap to finish. Of course, memory bus speeds started catching up to the resolutions that games used, and you don’t often see triple-buffering anymore.

One Device to Rule Them All 149
n o t e
DirectX supports up to three back buffers, giving you the option of using quadruple-buffering if you’d like. I personally don’t see much need for that much buffering, but you can try it out just for kicks.
The following subsections will describe the three different ways to perform buffer swapping in DirectX 9.
Copying
The first swap effect is Direct3D.SwapEffect.Copy. This format requires that your program have exactly one back buffer. Every time you present the current scene, DirectX copies everything from the back buffer onto the front buffer. Naturally, this can take quite a long time. Think about it: If you have a game running at a reasonable resolution, say 1280×960, using 32-bit color, your screen is going to take up 4.68 megabytes of space. A 1600×1200 screen takes up 7.32 megabytes. So when you perform copying, you’re trying to copy 4–8 megs of information over onto the primary buffer somewhere around 30–60 times per second. That’s a transfer rate of anywhere from 120 to 480 megs per second.
Flipping
The second swap effect is Direct3D.SwapEffect.Flip. Flipping works on multiple back buffers by flipping whichever buffer is currently displayed on the screen. If your application is full-screen, then there usually won’t be any actual memory copying going on. If your application is windowed, however, there will be memory copying, as your program only controls part of the screen.
Discarding
The final swap effect—the one you’re probably going to end up using almost exclusively— is Direct3D.SwapEffect.Discard.
Recently, video cards started getting really complex; video card makers have figured out all sorts of ways to make presenting graphics even faster than the traditional methods. Some of them have created some really neat algorithms that only update parts of the screen that have actually changed, and they don’t really tell us how they do it. The end result is that the video card hardware does a lot less work than it used to, and it does everthing automatically. In this case, you would use the discarding method to swap your buffers.
Creating a Device
The constructor for the Direct3D.Device class is a behemoth, unfortunately. There are five parameters to the constructor; these are listed in Table 7.2.