

the-swift-rogramming-language
.pdfdoes not guarantee the order in which they will be retrieved. For more on arrays and dictionaries, see Collection Types.)
In addition to arrays and dictionaries, you can also use the for-in loop to iterate over the Character values in a string:
for character in "Hello" { println(character)
}
//H
//e
//l
//l
//o
For-Condition-Increment
In addition to for-in loops, Swift supports traditional C-style for loops with a condition and an incrementer:
for var index = 0; index < 3; ++index { println("index is \(index)")
}
//index is 0
//index is 1
//index is 2
Here’s the general form of this loop format:
for initialization ; condition ; increment {
statements
}
Semicolons separate the three parts of the loop’s definition, as in C. However, unlike C, Swift doesn’t need parentheses around the entire “initialization; condition; increment”
block.
The loop is executed as follows:
1.When the loop is first entered, the initialization expression is evaluated once, to set up any constants or variables that are needed for the loop.
2.The condition expression is evaluated. If it evaluates to false, the loop ends, and code execution continues after the for loop’s closing brace (}). If the expression evaluates to true, code execution continues by executing the statements inside the braces.
3.After all statements are executed, the increment expression is evaluated. It might increase or decrease the value of a counter, or set one of the initialized variables to a new value based on the outcome of the statements. After the increment expression has been evaluated, execution returns to step 2, and the condition expression is evaluated again.
The loop format and execution process described above is shorthand for (and equivalent to) the outline below:
initialization
while condition {
statements increment
}
Constants and variables declared within the initialization expression (such as var index = 0) are only valid within the scope of the for loop itself. To retrieve the final value of index after the loop ends, you must declare index before the loop’s scope begins:
var index: Int
for index = 0; index < 3; ++index { println("index is \(index)")
}
//index is 0
//index is 1
//index is 2
println("The loop statements were executed \(index) times") // prints "The loop statements were executed 3 times"

Note that the final value of index after this loop is completed is 3, not 2. The last time the increment statement ++index is called, it sets index to 3, which causes index < 3 to equate to false, ending the loop.
While Loops
A while loop performs a set of statements until a condition becomes false. These kinds of loops are best used when the number of iterations is not known before the first iteration begins. Swift provides two kinds of while loop:
while evaluates its condition at the start of each pass through the loop. do-while evaluates its condition at the end of each pass through the loop.
While
A while loop starts by evaluating a single condition. If the condition is true, a set of statements is repeated until the condition becomes false.
Here’s the general form of a while loop:
while condition {
statements
}
This example plays a simple game of Snakes and Ladders (also known as Chutes and Ladders):
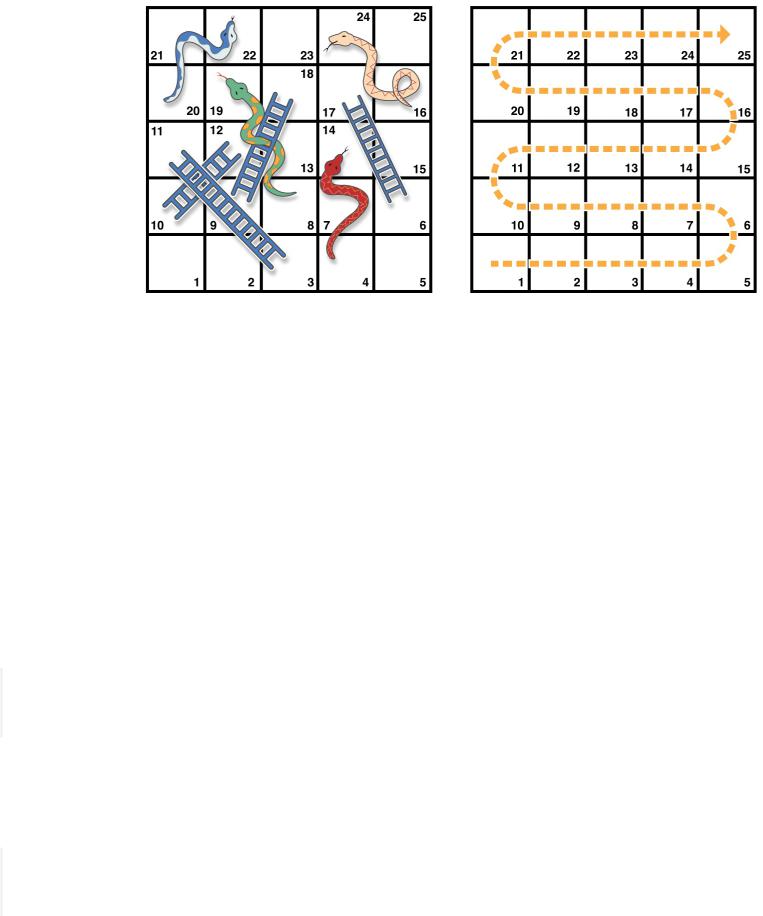
The rules of the game are as follows:
The board has 25 squares, and the aim is to land on or beyond square 25.
Each turn, you roll a six-sided dice and move by that number of squares, following the horizontal path indicated by the dotted arrow above.
If your turn ends at the bottom of a ladder, you move up that ladder. If your turn ends at the head of a snake, you move down that snake.
The game board is represented by an array of Int values. Its size is based on a constant called finalSquare, which is used to initialize the array and also to check for a win condition later in the example. The board is initialized with 26 zero Int values, not 25 (one each at indices 0 through 25 inclusive):
let finalSquare = 25
var board = Int[](count: finalSquare + 1, repeatedValue: 0)
Some squares are then set to have more specific values for the snakes and ladders. Squares with a ladder base have a positive number to move you up the board, whereas squares with a snake head have a negative number to move you back down the board:
board[03] = +08; board[06] = +11; board[09] = +09; board[10] = +02 board[14] = -10; board[19] = -11; board[22] = -02; board[24] = -08
Square 3 contains the bottom of a ladder that moves you up to square 11. To represent this, board[03] is equal to +08, which is equivalent to an integer value of 8 (the difference between 3 and 11). The unary plus operator (+i) balances with the unary minus operator (- i), and numbers lower than 10 are padded with zeros so that all board definitions align.

(Neither stylistic tweak is strictly necessary, but they lead to neater code.)
The player’s starting square is “square zero”, which is just off the bottom left corner of the board. The first dice roll always moves the player on to the board:
var square = 0 var diceRoll = 0
while square < finalSquare { // roll the dice
if ++diceRoll == 7 { diceRoll = 1 } // move by the rolled amount square += diceRoll
if square < board.count {
// if we're still on the board, move up or down for a snake or a ladder square += board[square]
("Game over!")
This example uses a very simple approach to dice rolling. Instead of a random number generator, it starts with a diceRoll value of 0. Each time through the while loop, diceRoll is incremented with the prefix increment operator (++i), and is then checked to see if it has become too large. The return value of ++diceRoll is equal to the value of diceRoll after it is incremented. Whenever this return value equals 7, the dice roll has become too large, and is reset to a value of 1. This gives a sequence of diceRoll values that is always 1, 2, 3, 4, 5, 6, 1, 2 and so on.
After rolling the dice, the player moves forward by diceRoll squares. It’s possible that the dice roll may have moved the player beyond square 25, in which case the game is over. To cope with this scenario, the code checks that square is less than the board array’s count property before adding the value stored in board[square] onto the current square value to move the player up or down any ladders or snakes.
Had this check not been performed, board[square] might try to access a value outside the bounds of the board array, which would trigger an error. If square is now equal to 26, the code would try to check the value of board[26], which is larger than the size of the array.
The current while loop execution then ends, and the loop’s condition is checked to see if the loop should be executed again. If the player has moved on or beyond square number

25, the loop’s condition evaluates to false, and the game ends.
A while loop is appropriate in this case because the length of the game is not clear at the start of the while loop. Instead, the loop is executed until a particular condition is satisfied.
Do-While
The other variation of the while loop, known as the do-while loop, performs a single pass through the loop block first, before considering the loop’s condition. It then continues to repeat the loop until the condition is false.
Here’s the general form of a do-while loop:
do {
statements
} while condition
Here’s the Snakes and Ladders example again, written as a do-while loop rather than a while loop. The values of finalSquare, board, square, and diceRoll are initialized in exactly the same way as with a while loop:
let finalSquare = 25
var board = Int[](count: finalSquare + 1, repeatedValue: 0)
board[03] = +08; board[06] = +11; board[09] = +09; board[10] = +02 board[14] = -10; board[19] = -11; board[22] = -02; board[24] = -08 var square = 0
var diceRoll = 0
In this version of the game, the first action in the loop is to check for a ladder or a snake. No ladder on the board takes the player straight to square 25, and so it is not possible to win the game by moving up a ladder. Therefore, it is safe to check for a snake or a ladder as the first action in the loop.
At the start of the game, the player is on “square zero”. board[0] always equals 0, and has no effect:
do {
// move up or down for a snake or ladder

square += board[square] // roll the dice
if ++diceRoll == 7 { diceRoll = 1 } // move by the rolled amount square += diceRoll
} while square < finalSquare println("Game over!")
After the code checks for snakes and ladders, the dice is rolled, and the player is moved forward by diceRoll squares. The current loop execution then ends.
The loop’s condition (while square < finalSquare) is the same as before, but this time it is not evaluated until the end of the first run through the loop. The structure of the do-while loop is better suited to this game than the while loop in the previous example. In the do-while loop above, square += board[square] is always executed immediately after the loop’s while condition confirms that square is still on the board. This behavior removes the need for the array bounds check seen in the earlier version of the game.
Conditional Statements
It is often useful to execute different pieces of code based on certain conditions. You might want to run an extra piece of code when an error occurs, or to display a message when a value becomes too high or too low. To do this, you make parts of your code conditional.
Swift provides two ways to add conditional branches to your code, known as the if statement and the switch statement. Typically, you use the if statement to evaluate simple conditions with only a few possible outcomes. The switch statement is better suited to more complex conditions with multiple possible permutations, and is useful in situations where pattern-matching can help select an appropriate code branch to execute.
If
In its simplest form, the if statement has a single if condition. It executes a set of statements only if that condition is true:
var temperatureInFahrenheit = 30

if temperatureInFahrenheit <= 32 {
println("It's very cold. Consider wearing a scarf.")
}
// prints "It's very cold. Consider wearing a scarf."
The preceding example checks whether the temperature is less than or equal to 32 degrees Fahrenheit (the freezing point of water). If it is, a message is printed. Otherwise, no message is printed, and code execution continues after the if statement’s closing brace.
The if statement can provide an alternative set of statements, known as an else clause, for when the if condition is false. These statements are indicated by the else keyword:
temperatureInFahrenheit = 40
if temperatureInFahrenheit <= 32 {
println("It's very cold. Consider wearing a scarf.") } else {
println("It's not that cold. Wear a t-shirt.")
}
// prints "It's not that cold. Wear a t-shirt."
One of these two branches is always executed. Because the temperature has increased to 40 degrees Fahrenheit, it is no longer cold enough to advise wearing a scarf, and so the else branch is triggered instead.
You can chain multiple if statements together, to consider additional clauses:
temperatureInFahrenheit = 90
if temperatureInFahrenheit <= 32 {
println("It's very cold. Consider wearing a scarf.") } else if temperatureInFahrenheit >= 86 {
println("It's really warm. Don't forget to wear sunscreen.") } else {
println("It's not that cold. Wear a t-shirt.")
}
// prints "It's really warm. Don't forget to wear sunscreen."
Here, an additional if statement is added to respond to particularly warm temperatures. The final else clause remains, and prints a response for any temperatures that are neither too warm nor too cold.
The final else clause is optional, however, and can be excluded if the set of conditions does not need to be complete:
temperatureInFahrenheit = 72
if temperatureInFahrenheit <= 32 {
println("It's very cold. Consider wearing a scarf.") } else if temperatureInFahrenheit >= 86 {
println("It's really warm. Don't forget to wear sunscreen.")
}
In this example, the temperature is neither too cold nor too warm to trigger the if or else if conditions, and so no message is printed.
Switch
A switch statement considers a value and compares it against several possible matching patterns. It then executes an appropriate block of code, based on the first pattern that matches successfully. A switch statement provides an alternative to the if statement for responding to multiple potential states.
In its simplest form, a switch statement compares a value against one or more values of the same type:
switch some value to consider { case value 1 :
respond to value 1 case value 2 ,
value 3 :
respond to value 2 or 3 default:
otherwise, do something else
}

Every switch statement consists of multiple possible cases, each of which begins with the case keyword. In addition to comparing against specific values, Swift provides several ways for each case to specify more complex matching patterns. These options are described later in this section.
The body of each switch case is a separate branch of code execution, in a similar manner to the branches of an if statement. The switch statement determines which branch should be selected. This is known as switching on the value that is being considered.
Every switch statement must be exhaustive. That is, every possible value of the type being considered must be matched by one of the switch cases. If it is not appropriate to provide a switch case for every possible value, you can define a default catch-all case to cover any values that are not addressed explicitly. This catch-all case is indicated by the keyword default, and must always appear last.
This example uses a switch statement to consider a single lowercase character called
someCharacter:
let someCharacter: Character = "e" switch someCharacter {
case "a", "e", "i", "o", "u": println("\(someCharacter) is a vowel")
case "b", "c", "d", "f", "g", "h", "j", "k", "l", "m", "n", "p", "q", "r", "s", "t", "v", "w", "x", "y", "z": println("\(someCharacter) is a consonant")
default:
println("\(someCharacter) is not a vowel or a consonant")
ts "e is a vowel"
The switch statement’s first case matches all five lowercase vowels in the English language. Similarly, its second case matches all lowercase English consonants.
It is not practical to write all other possible characters as part of a switch case, and so this switch statement provides a default case to match all other characters that are not vowels or consonants. This provision ensures that the switch statement is exhaustive.
No Implicit Fallthrough